
How to transfer everything from iPhone to iPhone, use Quick Start or iCloud Backup. Both methods ensure a seamless data transfer.
Switching to a new iPhone should be effortless and stress-free. Apple offers two primary methods to transfer data: Quick Start and iCloud Backup. Quick Start uses your current device to set up your new one quickly. ICloud Backup, on the other hand, involves backing up your old iPhone’s data to iCloud and restoring it on the new device.
Both methods ensure that all your apps, settings, and personal data are transferred. Following these steps will help you transition smoothly to your new iPhone without losing any important information.
How to Transfer Everything from iPhone to iPhone?

Introduction To Iphone Data Transfer
Transferring data from one iPhone to another can seem daunting. But it doesn’t have to be. With the right tools, you can easily move everything. This guide will help you understand the process.
Importance Of Seamless Data Migration
Seamless data migration ensures you don’t lose important information. Photos, contacts, and apps are essential. A smooth transfer saves time and prevents stress. It keeps your new iPhone ready to use right away.
Common Scenarios For Transferring Data
- Upgrading to a new iPhone model
- Replacing a lost or stolen iPhone
- Switching phones for a family member
| Scenario | Reason |
|---|---|
| Upgrading | Better features and performance |
| Replacing | Lost or damaged phone |
| Switching | Passing phone to family |
- Back up your old iPhone.
- Use iCloud or iTunes for backup.
- Turn on your new iPhone.
- Follow the setup steps.
- Choose to restore from backup.
Ensure you have a strong Wi-Fi connection. This will speed up the process.
Pre-transfer Checklist
Transferring everything from one iPhone to another can seem challenging. To make the process smooth, follow this pre-transfer checklist. This guide ensures you don’t miss any crucial steps.
Ensuring Compatibility Between Iphones
First, make sure both iPhones are compatible. Check if they support the same iOS version.
- Go to Settings > General > Software Update.
- Install any available updates.
Older iPhones may not support the latest iOS. Confirm compatibility before starting the transfer process.
Backing Up Your Current Iphone
Backing up your current iPhone is crucial. You have two main options: iCloud and iTunes.
| Backup Method | Steps |
|---|---|
| iCloud Backup |
|
| iTunes Backup |
|
Ensure the backup process completes successfully. This step is vital to transfer your data securely.
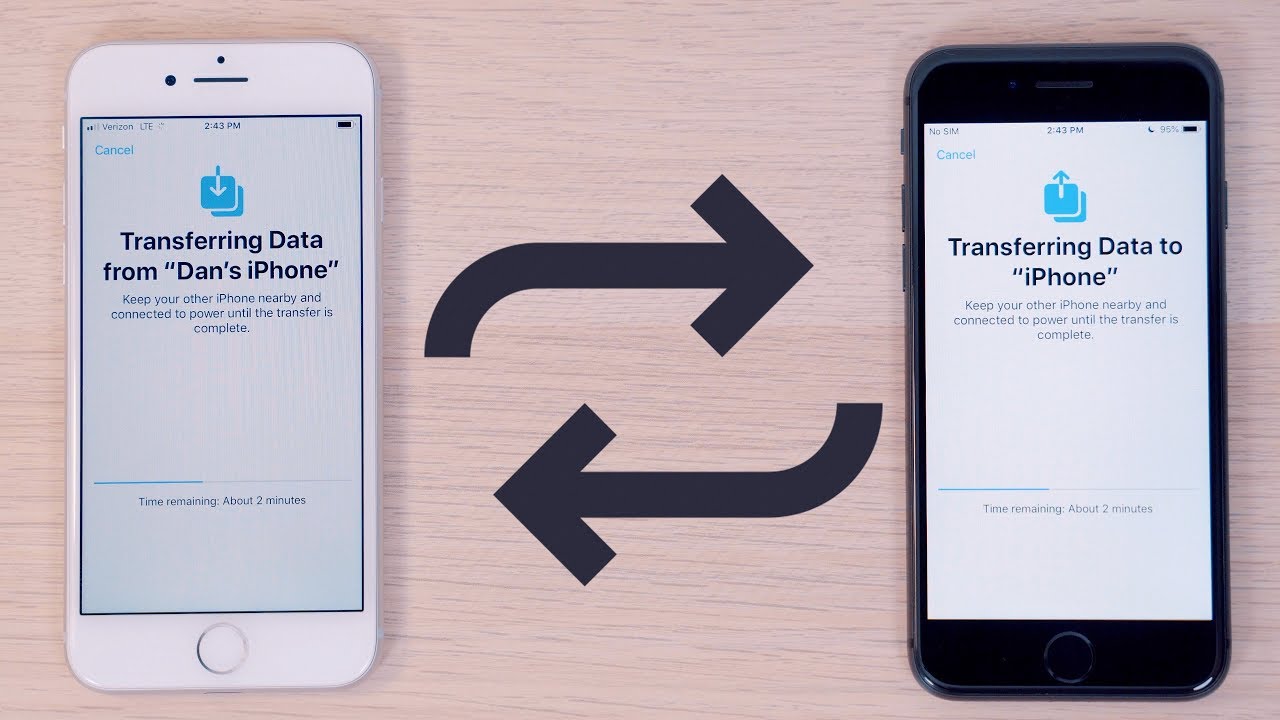
Using Quick Start For Instant Setup
Transferring data from one iPhone to another is easy with Quick Start. Quick Start helps you move all your data and settings quickly. It’s a convenient way to set up your new device without hassles.
Step-by-step Guide To Quick Start
- Place both iPhones close together.
- Turn on the new iPhone and start the setup process.
- A Quick Start screen will appear on your old iPhone.
- Tap Continue on your old iPhone.
- An animation will appear on your new iPhone.
- Hold your old iPhone over the new iPhone to scan the animation.
- Enter your old iPhone’s passcode on the new iPhone.
- Follow the on-screen instructions to set up Face ID or Touch ID.
- Choose Transfer from iPhone to begin the data transfer.
- Wait for the transfer to complete, then finish the setup on your new iPhone.
Troubleshooting Quick Start Issues
Sometimes, Quick Start may not work as expected. Here are some tips to troubleshoot:
- Ensure both iPhones are running iOS 12.4 or later.
- Make sure Bluetooth is turned on both devices.
- Restart both iPhones to refresh their systems.
- Place the iPhones closer together to ensure a strong connection.
- Check your Wi-Fi connection for stability and strength.
- Ensure your old iPhone has enough battery life for the transfer.
If these tips don’t help, consider using iCloud or iTunes for the transfer.
Leveraging Icloud For Data Sync
Transferring data from one iPhone to another can be easy. Leveraging iCloud ensures all your data syncs smoothly. This method is efficient and user-friendly. Follow these simple steps to make the transfer seamless.
Configuring Icloud Backup Settings
First, ensure your current iPhone is backed up. Go to Settings and tap on your name. Choose iCloud, then select iCloud Backup. Toggle the switch to enable iCloud Backup. Tap Back Up Now to start the process. Ensure your iPhone is connected to Wi-Fi.
Here’s a quick rundown in table format:
| Step | Action |
|---|---|
| 1 | Open Settings |
| 2 | Tap your name |
| 3 | Select iCloud |
| 4 | Choose iCloud Backup |
| 5 | Toggle iCloud Backup |
| 6 | Tap Back Up Now |
Restoring Data From Icloud To A New Iphone
Once backed up, power on your new iPhone. Follow the setup instructions on the screen. When asked, choose Restore from iCloud Backup. Sign in with your Apple ID. Choose the most recent backup to restore. Wait for the process to complete.
Here’s a step-by-step guide:
- Turn on your new iPhone.
- Follow the on-screen setup steps.
- Select Restore from iCloud Backup.
- Sign in with your Apple ID.
- Select the latest backup.
- Wait for the restore to finish.
Using iCloud makes the transfer process simple and quick. Ensure you have a stable internet connection throughout the process. Your data will be safe and ready on your new device.
Itunes/finder Based Method
Transferring data from one iPhone to another can seem tricky. The iTunes/Finder Based Method is a reliable way to do it. This method uses your computer to create a backup and then restore it on your new iPhone. Follow these steps to ensure a smooth transition.
Creating A Backup With Itunes/finder
First, connect your old iPhone to your computer. Open iTunes if you’re using Windows or macOS Mojave or earlier. Use Finder if you’re on macOS Catalina or later.
- iTunes: Select your iPhone in the top left corner.
- Finder: Find your iPhone under “Locations” in the sidebar.
Next, click on the “Summary” tab. In the “Backups” section, choose “This Computer” and ensure “Encrypt iPhone Backup” is checked. This will save your passwords and health data.
Finally, click “Back Up Now“. Wait for the backup to complete. You can track the progress at the top of the iTunes or Finder window.
Transferring Your Backup To The New Iphone
Turn on your new iPhone. Follow the setup instructions until you reach the “Apps & Data” screen. Select “Restore from Mac or PC“.
Connect your new iPhone to the computer you used for the backup. Open iTunes or Finder and select your new iPhone.
Click the “Summary” tab and then click “Restore Backup…“. Choose the most recent backup from the list. Enter your encryption password if prompted.
Wait for the restore process to complete. Your new iPhone will restart and sync with your computer. This can take a few minutes.
Once done, your new iPhone should have all your data, apps, and settings from your old iPhone.
Direct Transfer Via Airdrop
Transferring data between iPhones can be easy with AirDrop. This method is fast and wireless. AirDrop uses Bluetooth and Wi-Fi to share files. Below, we will guide you on how to use AirDrop for transferring data.
Selecting Data For Airdrop
First, open the app with the data you want to transfer. For example, open the Photos app to share pictures. Next, tap the Share icon. You will see an option called AirDrop. Tap on it.
A list of nearby devices will appear. Make sure your new iPhone is close and Bluetooth is on. Select your new iPhone from the list. Wait for the confirmation on your new iPhone.
Receiving Data On The New Iphone
On your new iPhone, you will see a popup. It will ask if you want to Accept the data. Tap on Accept. The data will begin to transfer. This may take a few seconds or minutes.
Once the transfer is complete, you can find the files in their respective apps. For example, photos will be in the Photos app. This method is simple and quick.
Third-party Apps And Services
Transferring data from one iPhone to another is often a necessity. Sometimes, built-in methods might not cover all your needs. That’s where third-party apps and services come into play. These tools can help make the transfer seamless and quick.
Choosing The Right Third-party App
Selecting the right third-party app is crucial. There are many options available, but not all are reliable. Consider the following factors:
- Compatibility: Ensure the app works with your iPhone models.
- User Reviews: Check what other users say about the app.
- Security: The app should safeguard your data.
- Ease of Use: A user-friendly interface is essential.
Some popular third-party apps for iPhone data transfer include:
| App Name | Key Features | Rating |
|---|---|---|
| iMazing | Backup, transfer, and manage iOS data | 4.5/5 |
| AnyTrans | Comprehensive data transfer and management | 4.7/5 |
| Dr.Fone | Data recovery and transfer | 4.3/5 |
Performing The Transfer With External Apps
Once you choose a third-party app, follow these steps to perform the transfer:
- Download and Install: Install the chosen app on both iPhones.
- Backup Data: Create a complete backup of your old iPhone.
- Connect Devices: Use a cable or Wi-Fi to connect both iPhones.
- Start Transfer: Follow the app instructions to begin the transfer.
- Verify Data: Check both iPhones to ensure all data transferred.
These steps ensure a smooth transition to your new iPhone. Always verify that the transferred data is complete and correct.
Using third-party apps can save time and provide more options. Always choose apps that prioritize security and ease of use.

Post-transfer Steps
Transferring data from one iPhone to another can be smooth. But, after the transfer, there are essential steps to follow. These steps ensure everything works perfectly on the new device. Below are the post-transfer steps to follow.
Verifying Data On The New Iphone
After the transfer, check all your apps and data. Ensure everything is where it should be.
Follow these steps to verify data:
- Open the Photos app. Ensure all photos are present.
- Check the Contacts app. Verify all contacts are there.
- Open the Messages app. Ensure all messages are transferred.
- Check your email accounts. Ensure they are set up and working.
- Open your favorite apps. Ensure they function correctly.
Next, check your settings. Ensure all preferences are set. This includes Wi-Fi, Bluetooth, and notifications.
What To Do With The Old Iphone
After verifying data on the new iPhone, decide what to do with the old one.
Here are some options:
- Backup the old iPhone: Make a final backup to iCloud or iTunes.
- Erase all content and settings: Go to
Settings > General > Reset > Erase All Content and Settings. - Recycle or sell: Consider recycling or selling the old device.
If you plan to keep the old iPhone, ensure it is secure. Remove any personal data and reset it.
Following these steps will make your transition smooth. Enjoy your new iPhone!
Troubleshooting Common Transfer Issues
Transferring data from one iPhone to another can be tricky. Sometimes, you may face issues during the process. This section will help you troubleshoot common transfer problems.
Resolving Connectivity Problems
Connectivity issues are common during transfers. Ensure both iPhones have stable Wi-Fi connections. If the Wi-Fi signal is weak, move closer to the router.
Check that both iPhones have Bluetooth enabled. If not, enable Bluetooth in the settings. Ensure the devices are within a close range of each other.
Sometimes, restarting both iPhones can solve connectivity issues. Hold down the power button and slide to power off. Turn the devices back on and try again.
Dealing With Incomplete Or Failed Transfers
Incomplete or failed transfers can be frustrating. Ensure both iPhones have enough storage space. Delete unnecessary files if space is low.
Check for software updates on both iPhones. Go to Settings > General > Software Update. Install any available updates before trying the transfer again.
If the transfer still fails, reset network settings. Go to Settings > General > Reset > Reset Network Settings. This will not delete your data but will reset Wi-Fi passwords.
| Issue | Solution |
|---|---|
| Weak Wi-Fi | Move closer to the router |
| Bluetooth disabled | Enable Bluetooth in settings |
| Low storage | Delete unnecessary files |
| Software update needed | Install updates |
| Network settings issue | Reset network settings |
Final Thoughts
Transferring everything from one iPhone to another can be smooth. With the right steps, you can move your data securely. Below are some best practices and tips to maintain data integrity and privacy during transfers.
Best Practices For Future Transfers
- Always back up your iPhone before any transfer.
- Use iCloud or iTunes for regular backups.
- Ensure both iPhones are fully charged.
- Keep your devices close during the transfer.
- Update both iPhones to the latest iOS version.
Maintaining Data Integrity And Privacy
Keeping your data safe is crucial. Here are some tips to help:
- Encrypt your backups: Use encrypted backups to protect your data.
- Use strong passwords: Always use strong, unique passwords.
- Enable two-factor authentication: This adds an extra layer of security.
- Monitor your accounts: Regularly check for any unauthorized access.
- Delete old data: Remove data you no longer need from old devices.
Following these best practices can ensure a smooth and secure transfer.
Conclusion
Transferring data from iPhone to iPhone is simple with the right steps. Follow our guide to ensure a smooth transition. Your photos, contacts, and apps will be ready on your new device. Enjoy your seamless iPhone experience with all your data intact.
Happy transferring and enjoy your new iPhone!