
How to take pictures of the moon with an iPhone, use the Night mode and adjust the exposure. Keep your phone steady for a clear shot.
Capturing the moon with an iPhone can be both fun and rewarding. Night mode on newer iPhones significantly improves low-light photography. Adjusting the exposure helps in capturing the moon’s details without overexposing it. Using a tripod or a stable surface ensures minimal camera shake, leading to sharper images.
Apps like NightCap can offer more control over camera settings, enhancing your moon photography experience. Experiment with different settings to find what works best. With practice, you can take stunning moon photos using just your iPhone.
How to Take Pictures of the Moon?
Capturing The Moon’s Majesty With Your Iphone
Taking pictures of the moon can be magical. You can do it with your iPhone. This guide will show you how to capture the moon’s beauty.
The Allure Of Lunar Photography
The moon has always fascinated people. Its glow lights up the night sky. Capturing this beauty on camera is a challenge. Yet, it is also rewarding. You can share stunning moon pictures with friends and family. It makes you feel connected to the universe.
Why Iphones Are Suitable For Moon Shots
iPhones are great for taking moon pictures. They have advanced camera technology. The Night Mode feature helps in low light. You can take clear and bright pictures. The iPhone’s camera also has a good zoom. This helps you capture the moon’s details.
| iPhone Camera Feature | Benefit for Moon Photography |
|---|---|
| Night Mode | Brightens photos taken in low light. |
| Zoom | Captures more details of the moon. |
| Stabilization | Reduces blur in your photos. |
Here are some tips to get the best moon pictures with your iPhone:
- Use a tripod to keep your phone steady.
- Turn on Night Mode for brighter images.
- Zoom in to capture more details of the moon.
- Use the timer to avoid shaking the camera.
Follow these tips, and you will take amazing moon pictures with your iPhone. Happy shooting!
Gear Up: Essential Accessories
Taking pictures of the moon with your iPhone can be exciting. To capture the best shots, you need the right accessories. Here are some essential tools to help you take amazing moon photos with your iPhone.
Choosing The Right Tripod
A sturdy tripod is crucial for moon photography. It keeps your iPhone steady, reducing blur. Look for a tripod that is both lightweight and durable.
- Check if the tripod is compatible with your iPhone.
- Adjustable legs are useful for uneven surfaces.
- A tripod with a phone holder is a plus.
Using A Telephoto Lens Attachment
A telephoto lens attachment helps you zoom in on the moon. It captures more details than your iPhone’s built-in camera.
- Choose a lens with at least 2x magnification.
- Ensure it fits securely over your iPhone’s camera.
- Look for lenses made from high-quality glass.
With these accessories, your moon photos will be clearer and more detailed. Happy shooting!
Mastering The Iphone Camera Settings
Capturing the moon with your iPhone can be a thrilling experience. To get those stunning moon shots, mastering the iPhone camera settings is essential. Here, we break down the key settings you need to adjust.
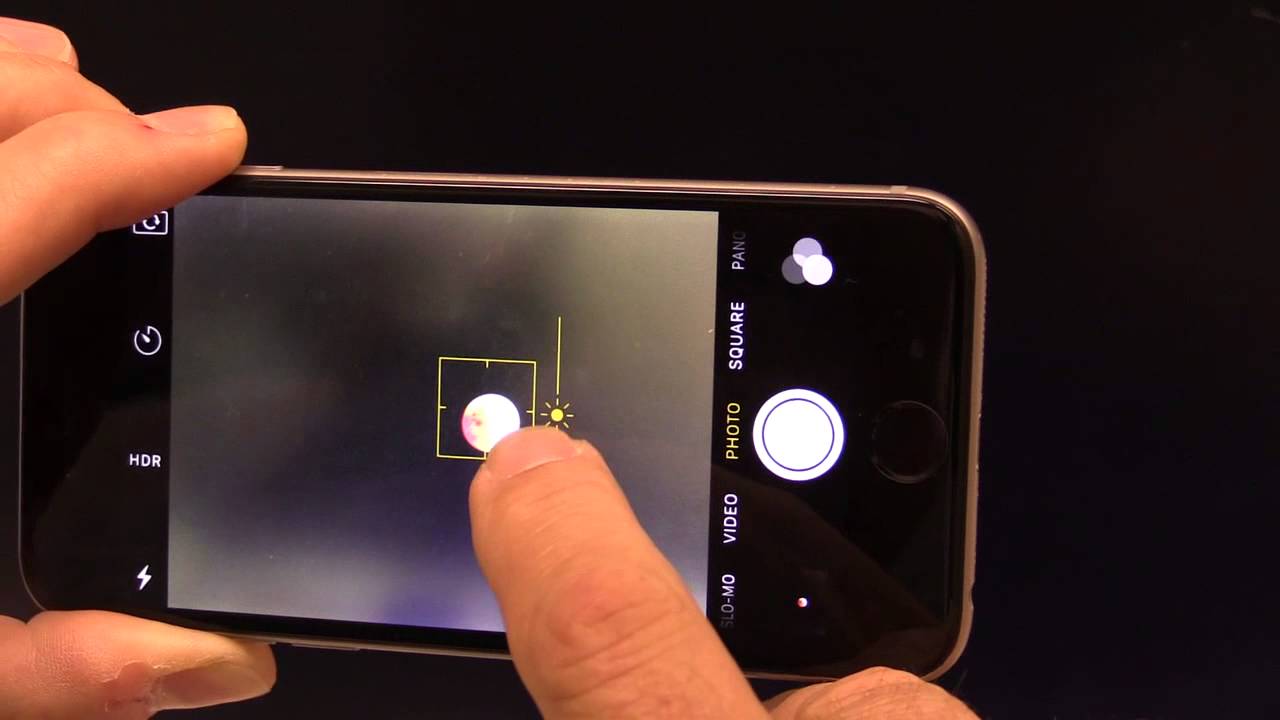
Manual Focus For Sharp Moon Details
Using manual focus is crucial for clear moon pictures. Follow these steps:
- Open the Camera app.
- Tap and hold on the screen where the moon is.
- A yellow box will appear; this locks the focus.
- Slide your finger up or down to adjust the focus manually.
By focusing manually, you ensure the moon remains sharp.
Adjusting Exposure And Iso
Proper exposure and ISO are key for moon photography. Here’s how to adjust them:
| Setting | How to Adjust |
|---|---|
| Exposure | Slide your finger up or down on the screen to adjust. |
| ISO | Use a third-party app like ProCamera to adjust ISO settings. |
Lower ISO settings reduce noise. Adjust exposure to balance light.
The Best Time For Moon Photography
Capturing the moon with your iPhone can be magical. Timing plays a crucial role. Knowing the best time enhances your photos greatly.
Tracking Moon Phases
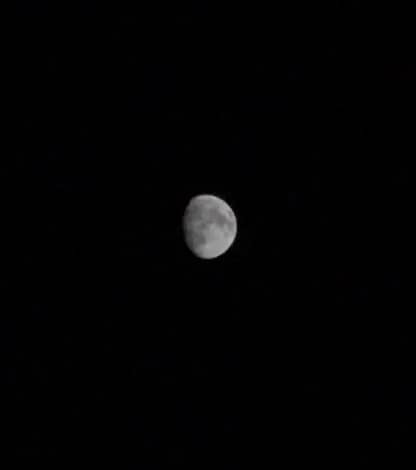
The moon goes through different phases. Each phase offers unique photo opportunities. Full moon is the brightest and easiest to capture. New moon provides a dark sky, great for showing the moon’s surface. Here is a quick overview:
| Moon Phase | Best Features |
|---|---|
| New Moon | Dark sky, detailed surface |
| First Quarter | Good lighting, clear craters |
| Full Moon | Bright, easy to capture |
| Last Quarter | Interesting shadows, clear details |
Track the moon phases using an app or a calendar. This will help you plan your shoots effectively.
Planning Around The Golden Hour
The golden hour occurs right after sunrise and just before sunset. During this time, the sky has a beautiful glow. This light makes the moon stand out more. Here’s how to use the golden hour:
- Check the sunrise and sunset times.
- Set up your iPhone 30 minutes before these times.
- Use a tripod for stability.
- Capture the moon as it rises or sets.
Combining the golden hour with the right moon phase can create stunning photos. Always be prepared and have your iPhone ready.
Composing The Perfect Moon Shot
Capturing the moon with your iPhone can be fun. Composition is key. Use the following tips to make your moon shots stunning.
Incorporating The Rule Of Thirds
The rule of thirds divides your image into nine equal parts. Imagine two horizontal and two vertical lines over your screen. Place the moon along these lines or at their intersections. This creates a balanced and engaging photo. Here’s how to enable the grid on your iPhone:
- Open the Settings app.
- Scroll down and tap Camera.
- Toggle on the Grid option.
With the grid enabled, it’s easy to follow the rule of thirds. Always try to align the moon with these lines or points.
Framing With Foreground Elements
Foreground elements can add context and depth. Trees, buildings, or mountains work well. Place them in the frame to create interest. Your moon shot will look more dynamic and layered.
Here’s a quick guide to framing:
- Find an interesting foreground object.
- Position it to one side of the frame.
- Place the moon in the opposite corner.
Experiment with different angles and distances. This helps find the best composition. Remember, practice makes perfect.
| Tip | Description |
|---|---|
| Use Night Mode | Night mode can enhance your moon shots. |
| Zoom In | Use the digital zoom for a closer look. |
| Keep Steady | Use a tripod to avoid blurry images. |
Creative Techniques For Unique Shots
Capturing the moon with your iPhone can be exciting. Use creative techniques to make your photos stand out. Learn to play with silhouettes and experiment with long exposure.
Playing With Silhouettes
Silhouettes can make your moon photos dramatic. Position objects between your iPhone and the moon. Trees, buildings, or people work well.
Follow these steps:
- Find an object to use as a silhouette.
- Position the moon behind the object.
- Tap the screen to focus on the moon.
- Adjust the exposure by sliding your finger up or down.
- Take the shot.
This technique highlights the moon and creates a stunning effect.
Experimenting With Long Exposure
Long exposure can capture more light. Use this to show the moon’s path or stars. You will need a tripod or a stable surface.
Here are the steps:
- Open the camera app and go to “Night mode”.
- Place your iPhone on a tripod or stable surface.
- Set the timer to avoid shaking.
- Tap the moon to focus.
- Adjust the exposure by sliding your finger.
- Take the picture and keep the iPhone still until done.
This technique captures detailed moon shots. It can also show star trails.
| Technique | Steps |
|---|---|
| Playing with Silhouettes |
|
| Long Exposure |
|
Post-processing Magic
Capturing the moon with your iPhone is just the first step. Post-processing can make your moon photos shine. Enhance details, adjust contrast, and sharpen your image.
Enhancing With Photo Editing Apps
Use photo editing apps to enhance your moon photos. Apps like Snapseed, Adobe Lightroom, and VSCO are great choices.
- Snapseed: Offers detailed editing tools and filters.
- Adobe Lightroom: Provides professional-grade adjustments and presets.
- VSCO: Known for its beautiful filters and easy interface.
Open your moon photo in any of these apps. Use the available tools to enhance the brightness and reduce noise.
Adjusting Contrast And Sharpness
Adjusting contrast can make your moon photo pop. Increase the contrast to make the moon stand out against the dark sky.
Sharpening is also crucial. It can bring out fine details on the moon’s surface. But don’t overdo it, or your photo might look artificial.
| Adjustment | Recommended Setting |
|---|---|
| Contrast | +20 to +30 |
| Sharpness | +10 to +15 |
Experiment with these settings. Every photo is unique. Trust your eye to find the best balance.
Sharing Your Lunar Imagery
You’ve captured stunning moon photos with your iPhone. Now, it’s time to share them. Sharing your lunar imagery can be fun and rewarding. You can showcase your work to a broad audience and engage with other moon enthusiasts.
Best Platforms For Showcasing Moon Photos
Choosing the right platform can make your moon photos shine. Here are some of the best platforms:
- Instagram: Instagram is perfect for sharing high-quality images. Use relevant hashtags like #moonphotography and #nightphotography to reach a wider audience.
- Flickr: Flickr is great for photographers. It allows you to upload high-resolution images and join photography groups.
- 500px: 500px is ideal for serious photographers. It provides a platform to showcase your best work and get feedback.
- Facebook: Share your moon photos on Facebook. Join photography groups and engage with other members.
- Pinterest: Pinterest is excellent for creating a visual portfolio. Pin your best moon shots to your photography board.
Engaging Your Audience With Stories
Engage your audience by telling stories behind your moon photos. Share your experience, the challenges you faced, and what inspired you. Stories make your photos more relatable and memorable.
- Describe the moment: Explain what made the moment special.
- Share your technique: Talk about the settings and techniques you used.
- Include fun facts: Add interesting facts about the moon or the night sky.
Use captions and comments to interact with your audience. Ask questions and encourage them to share their experiences. This engagement builds a community around your lunar photography.
Troubleshooting Common Issues
Taking pictures of the moon with an iPhone can be tricky. You might face issues like overexposure and blurriness. This section will help you solve these common problems.
Dealing With Overexposure
Moon photos often suffer from overexposure. The moon appears too bright, losing details. Here are some tips to handle it:
- Lower the exposure: Tap on the moon in your camera app. Slide the sun icon down to reduce brightness.
- Use HDR: Turn on HDR (High Dynamic Range) in your camera settings. This helps capture more details.
- Adjust white balance: Go to settings and tweak the white balance. This can help in reducing the brightness.
Reducing Blurriness In Night Shots
Night shots can often appear blurry. Follow these steps to get clear moon photos:
- Use a tripod: A tripod keeps your iPhone steady. This prevents blurriness caused by hand movements.
- Enable Night Mode: Night Mode on iPhone helps in low-light conditions. It reduces blur and captures clear images.
- Use the timer: Set a timer for your shots. This avoids shaking the phone when you tap the shutter button.
By following these tips, you can capture stunning moon photos. Troubleshoot common issues for better results.
Expanding Your Skills
Capturing the moon with your iPhone can be a rewarding hobby. As you progress, it’s essential to expand your skills. This can be achieved through workshops and communities.
Advanced Iphone Photography Workshops
Joining advanced iPhone photography workshops can elevate your skills. These workshops often cover:
- Advanced camera settings
- Editing techniques
- Lighting tips
Workshops provide hands-on experience with expert guidance. They help you master the art of capturing the moon.
Joining Online Communities For Feedback
Online communities are valuable for constructive feedback. You can share your moon photos and get tips from experienced photographers. Popular online communities include:
- Photography forums
- Social media groups
- Photo-sharing apps
Feedback helps you identify areas for improvement. It also inspires you to try new techniques.
Conclusion
Capturing the moon with your iPhone is easier than you think. Follow these tips for stunning lunar photos. Experiment with settings, use a tripod, and find the right location. With practice, your moon photography will improve. Enjoy the process and share your beautiful moon shots with friends and family.