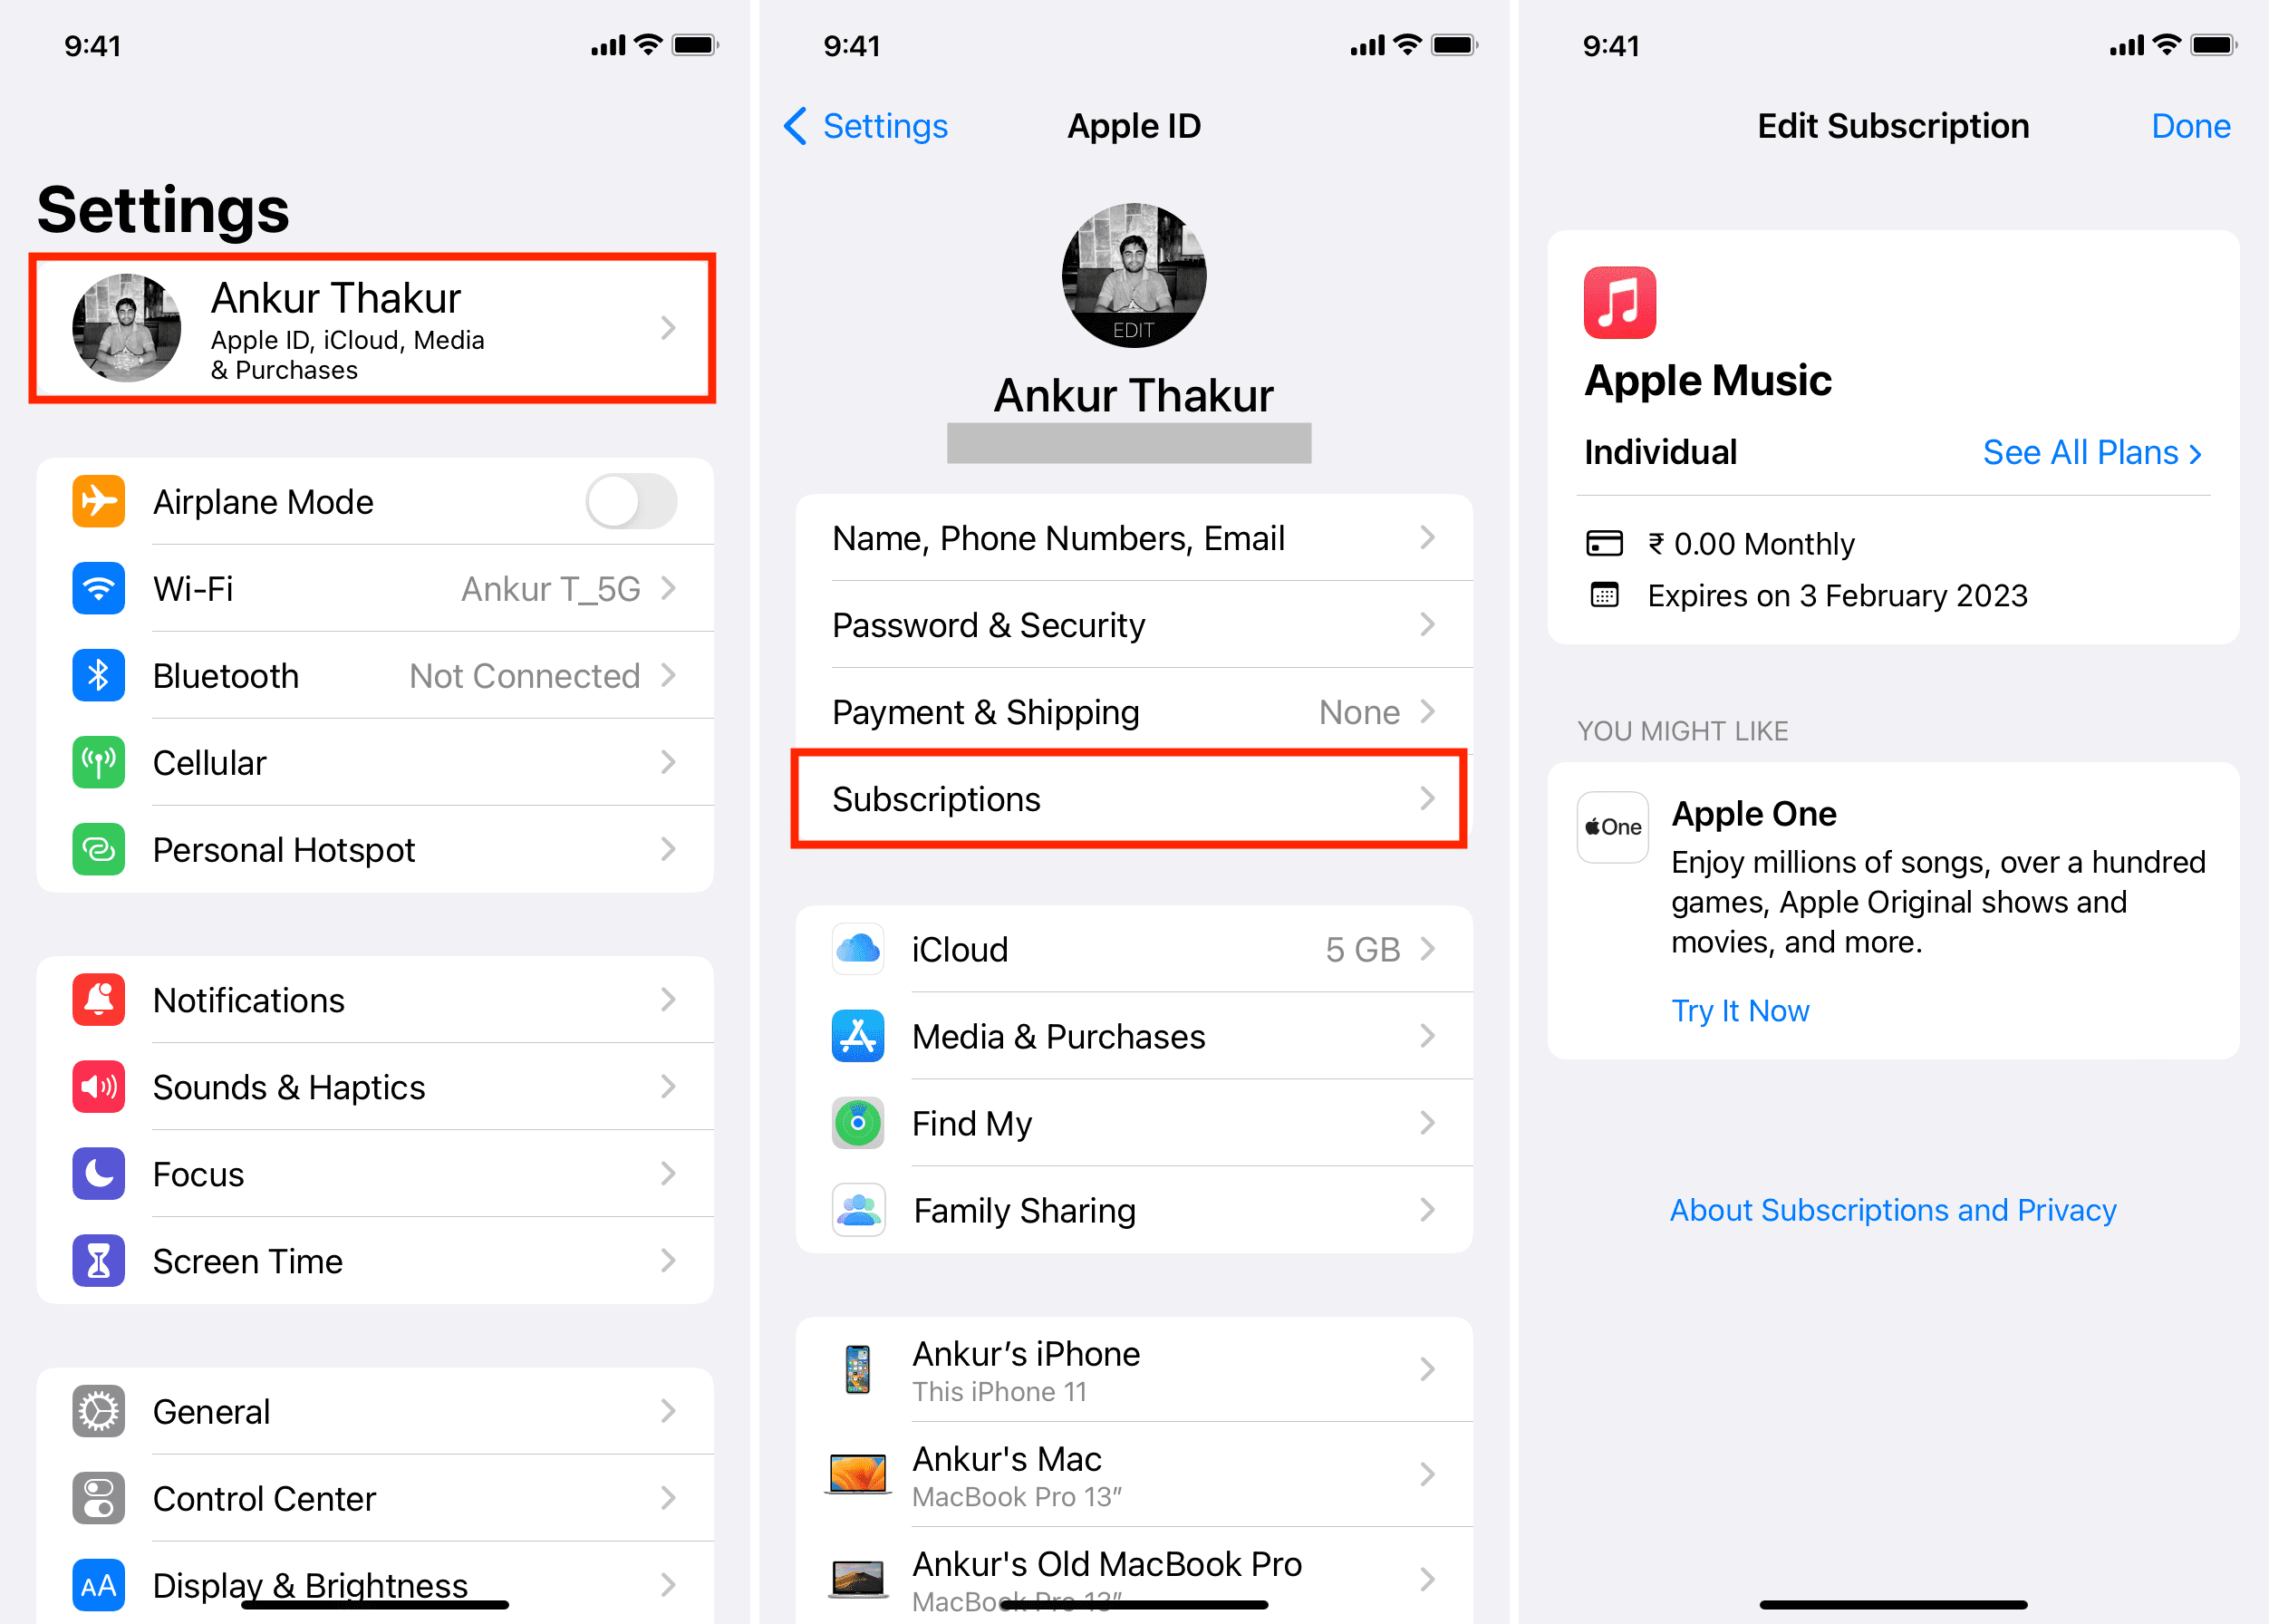
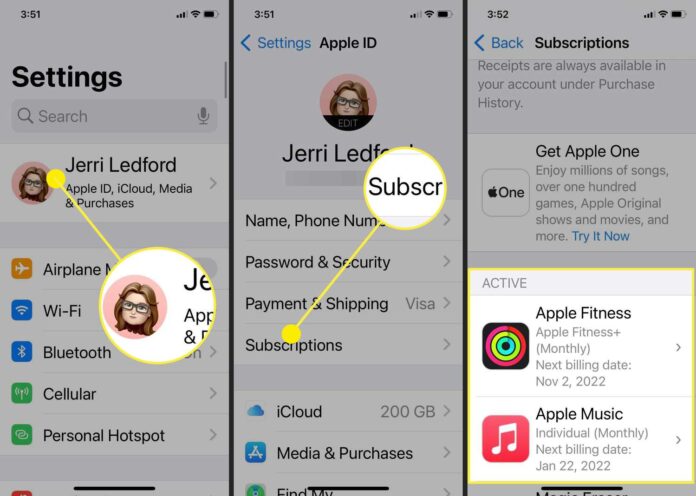
How to see subscriptions on iPhone, open Settings, tap your name, then tap Subscriptions. Manage your active and expired subscriptions there.
Subscriptions on an iPhone are easy to access and manage. Knowing where to find them can help you avoid unwanted charges and keep track of your spending. Apple provides a straightforward way to view and manage all your active and expired subscriptions.
This feature is particularly useful for keeping tabs on trial periods and renewals. By regularly checking your subscriptions, you can ensure you’re only paying for the services you actually use. This quick guide will help you navigate through your iPhone settings to locate and manage your subscriptions efficiently, saving you both time and money.
How to See Subscriptions on iPhone?

Introduction To Iphone Subscriptions
Managing subscriptions on your iPhone can be tricky. This guide will help you find and manage them easily. Let’s dive into the basics of iPhone subscriptions.
The Importance Of Tracking Subscriptions
Tracking your subscriptions is crucial. It helps you avoid unwanted charges. Many apps offer free trials that turn into paid subscriptions. Keeping an eye on them prevents unwanted expenses.
Another reason is budgeting. Knowing your subscriptions helps manage your monthly expenses better. It keeps your finances in check.
What To Expect From This Guide
In this guide, you’ll learn how to find your iPhone subscriptions. We’ll show you step-by-step instructions. You’ll also get tips on managing and canceling subscriptions.
Here is what we’ll cover:
- Accessing your subscriptions through the Settings app
- Viewing active and expired subscriptions
- Canceling unwanted subscriptions
This guide is simple. Even kids can follow it. Let’s get started!
| Step | Action |
|---|---|
| 1 | Open the Settings app. |
| 2 | Tap on your Apple ID at the top. |
| 3 | Select Subscriptions from the list. |
These steps will guide you through the process. Follow along carefully for best results.
Navigating To Settings
Understanding how to manage your subscriptions on your iPhone is crucial. The first step is to navigate to the Settings app. This section will guide you through the process.
Starting At Your Home Screen
Your journey begins at the Home Screen. Look for the familiar icons and layout.
- Unlock your iPhone to access the Home Screen.
- Make sure you can see all your app icons.
Finding The Settings App
Next, locate the Settings app. This app is essential for managing all your iPhone settings.
- Look for the gear icon. This is the Settings app.
- Tap on the gear icon to open the Settings app.
Once inside the Settings app, you are one step closer to viewing your subscriptions. Keep following the instructions to manage your iPhone subscriptions effectively.
Accessing Your Apple Id
To manage your subscriptions on an iPhone, you need to access your Apple ID. Your Apple ID holds the key to all your subscriptions. It’s simple to find this section and view your active subscriptions.
Locating The Apple Id Section
First, unlock your iPhone and go to the home screen. Tap on the Settings app. At the top, you will see your name and Apple ID. Tap on your name to enter the Apple ID section.
Here, you can see various options related to your Apple account. Look for the option named Subscriptions. Tap on it to view all your active and expired subscriptions.
Why Your Apple Id Is Central To Subscriptions
Your Apple ID is crucial because it links all your services. From apps to music, everything is tied to this ID. This makes it easy to manage payments and renewals.
With your Apple ID, you can monitor subscription statuses and cancel those you no longer need. This helps you save money and avoid unwanted charges.
By accessing your Apple ID, you ensure that you have control over your subscriptions. This is essential for managing your digital expenses effectively.
Exploring The Subscriptions Tab
The Subscriptions tab on your iPhone is a powerful tool. It helps you manage all your active subscriptions in one place. This section will guide you through the Subscriptions tab. Learn where to find it and understand its layout and information displayed.
Where To Find The Subscriptions Tab
First, open the Settings app on your iPhone. Scroll down and tap on your name at the top. This will open your Apple ID settings. Next, look for the “Subscriptions” option. Tap on it to open the Subscriptions tab.
Layout And Information Displayed
The Subscriptions tab is user-friendly. It displays all your active and expired subscriptions. Each subscription is listed with its name, price, and renewal date.
| Subscription Name | Price | Renewal Date |
|---|---|---|
| Apple Music | $9.99/month | 15th of each month |
| Netflix | $13.99/month | 20th of each month |
| Hulu | $5.99/month | 25th of each month |
You can also see the status of each subscription. Active subscriptions are listed first, followed by expired ones. This clear organization makes it easy to track all your services.
To manage a subscription, simply tap on it. This will open a new screen with more options. You can change the subscription plan or cancel it. Managing subscriptions on your iPhone is simple and straightforward.
- Open Settings app
- Tap on your name
- Select “Subscriptions”
- View and manage your subscriptions
This tab ensures you never miss a renewal date. It helps you keep track of all your subscriptions easily. Stay organized and save money by avoiding unwanted renewals.
Managing Active Subscriptions
Managing your active subscriptions on your iPhone is crucial. It helps you keep track of your expenses. It’s easy to review, change, or cancel subscriptions. This guide will help you manage them effectively.
Reviewing Your Current Subscriptions
To review your current subscriptions:
- Open the Settings app on your iPhone.
- Tap on your name at the top of the screen.
- Select Subscriptions.
You will see a list of all your active and expired subscriptions. Each subscription will show the service name, renewal date, and price. This is an excellent way to see where your money goes each month.
Changing Or Canceling Subscriptions
If you want to change or cancel a subscription:
- In the Subscriptions section, tap on the subscription you wish to modify.
- Choose Cancel Subscription to stop the service.
- To change a subscription plan, select a different option under Options.
Make sure you confirm your changes. Your subscription will either end at the end of the billing cycle or immediately, depending on the service.
Managing your subscriptions can save you money and avoid unnecessary charges. Check them regularly to ensure you are only paying for what you use.
Handling Expired Subscriptions
Expired subscriptions can clutter your iPhone. Cleaning them up helps you stay organized and save money. This section will show you how to handle expired subscriptions effectively.
Viewing Past Subscriptions
To view past subscriptions on your iPhone:
- Open the Settings app.
- Tap on your Apple ID at the top.
- Select Subscriptions.
- Scroll down to find the Expired section.
Here, you can see a list of all expired subscriptions. This list helps you review what you no longer need.
Deciding Whether To Renew
Now you need to decide if you want to renew any expired subscriptions. Ask yourself these questions:
- Did you use the service often?
- Does the service provide good value?
- Will you miss the service if you don’t renew it?
If you answer “yes” to any of these questions, it might be worth renewing. To renew, simply tap on the subscription and follow the on-screen instructions.
Remember, only renew services you really need. This helps you save money and avoid clutter on your iPhone.
Tips For Subscription Management
Managing subscriptions on your iPhone can be tricky. Effective management ensures you don’t overspend or miss important renewals. Here are some useful tips to help you stay on top of your subscriptions.
Setting Reminders For Renewal Dates
It’s crucial to set reminders for your subscription renewal dates. This helps you avoid unexpected charges. Follow these steps to set reminders:
- Open the Calendar app on your iPhone.
- Tap the “+” icon to create a new event.
- Enter the subscription name and renewal date.
- Set an alert for a week before the renewal date.
By doing this, you will receive a notification in advance. This gives you enough time to decide whether to renew or cancel the subscription.
Budgeting For Subscription Costs
Budgeting helps you manage your expenses better. Track your subscriptions and their costs. Here’s a simple table to help you:
| Subscription Name | Monthly Cost |
|---|---|
| Music Streaming | $9.99 |
| Video Streaming | $12.99 |
| Cloud Storage | $2.99 |
Summarize your total monthly subscription costs. Ensure it fits within your budget. This helps you avoid overspending.
Also, review your subscriptions regularly. Cancel those you no longer need. This helps you save money and stay organized.

Troubleshooting Common Issues
Sometimes, checking your subscriptions on an iPhone can be tricky. Issues may arise, making it hard to manage them. This guide helps troubleshoot common problems.
What To Do If Subscriptions Aren’t Showing
If your subscriptions aren’t showing, try these steps:
- Restart your iPhone: Press and hold the power button. Slide to power off. Wait a few seconds, then turn it back on.
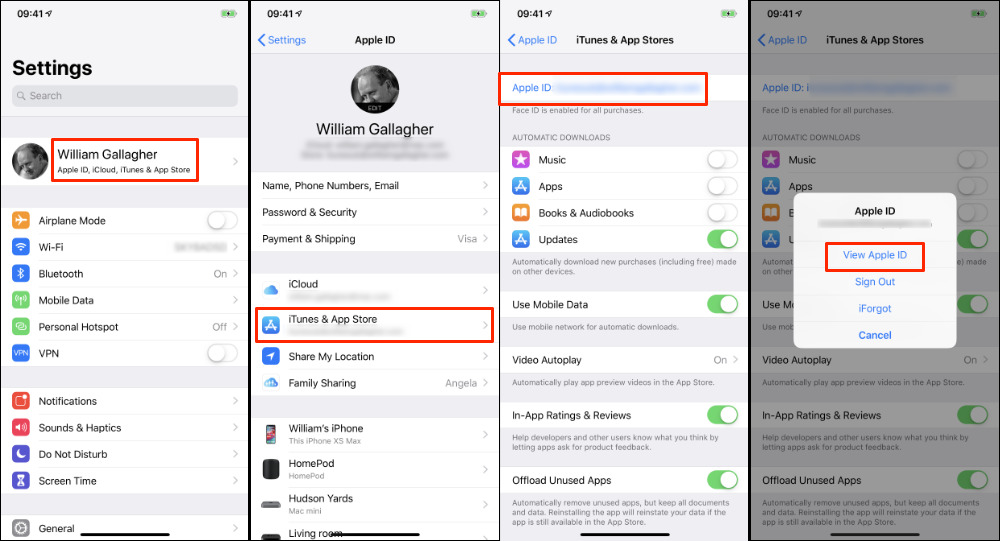
- Check your Apple ID: Go to Settings > [your name]. Ensure you’re signed in with the correct Apple ID.
- Update iOS: Go to Settings > General > Software Update. Install any available updates.
- Sign out and back in: Go to Settings > [your name] > Sign Out. Then, sign back in.
Resolving Accidental Subscriptions
Accidental subscriptions can happen. Follow these steps to resolve them:
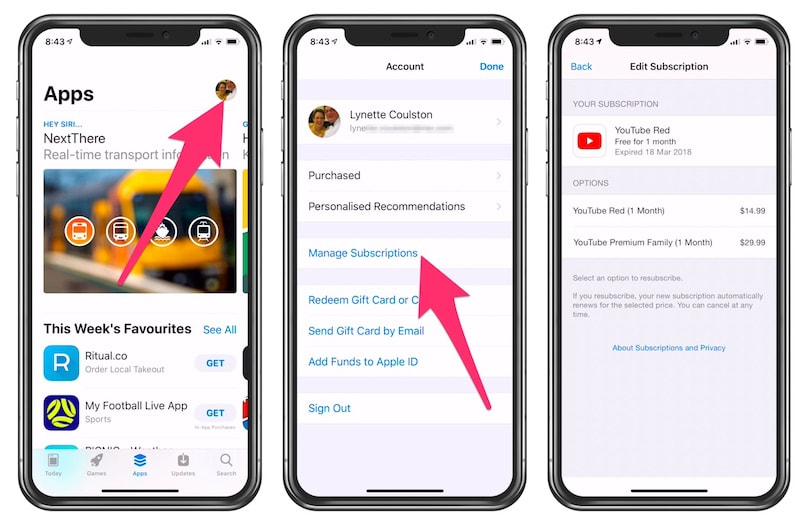
- Open the App Store: Tap on your profile picture in the top right.
- Tap on Subscriptions: Find the subscription you want to cancel.
- Cancel the subscription: Tap on the subscription, then tap Cancel Subscription.
- Contact Apple Support: If you need help, reach out to Apple Support.
| Step | Action |
|---|---|
| 1 | Open the App Store |
| 2 | Tap on Subscriptions |
| 3 | Cancel the subscription |
| 4 | Contact Apple Support |
By following these steps, you can manage and see your iPhone subscriptions easily. Resolving issues becomes simple with the right approach.
Leveraging Family Sharing For Subscriptions
Apple’s Family Sharing feature allows you to share subscriptions with family members. This can save you money and keep everyone connected. In this section, we will explore how to set up and use Family Sharing for subscriptions on your iPhone.
Understanding Family Sharing Settings
First, you need to understand your Family Sharing settings. Open the Settings app on your iPhone. Tap on your name at the top of the screen to access your Apple ID.
Next, select Family Sharing. Here, you can see all the family members in your group. You can also add or remove members as needed. Make sure all family members have an Apple ID and are signed in on their devices.
Family Sharing allows up to six people to share purchases, including subscriptions. This includes apps, music, movies, and more. Ensure your payment method is up to date to avoid any issues.
Sharing Subscriptions With Family Members
Sharing subscriptions is simple once Family Sharing is set up. Go to the Subscriptions section under your Apple ID settings. You will see a list of your active subscriptions.
Select the subscription you want to share. Make sure the option to share with family is enabled. Some subscriptions may not support sharing, so check the details.
Family members can now access shared subscriptions from their devices. They just need to sign in with their Apple ID linked to the Family Sharing group. This feature is especially useful for services like Apple Music and Apple TV+.
| Step | Action |
|---|---|
| 1 | Open Settings |
| 2 | Tap your name |
| 3 | Select Family Sharing |
| 4 | Add or remove family members |
| 5 | Go to Subscriptions |
| 6 | Enable sharing for subscriptions |
With Family Sharing, managing subscriptions becomes easier and more cost-effective. Ensure everyone in your family stays connected and enjoys the benefits of shared subscriptions.
Conclusion: Staying In Control Of Your Subscriptions
Managing subscriptions on your iPhone can save you money. Regularly checking subscriptions helps avoid unwanted charges. Learn how to stay in control of your subscriptions.
Summarizing Key Takeaways
- Check your subscriptions: Go to Settings > Your Name > Subscriptions.
- Cancel unwanted services: Select a subscription and tap Cancel Subscription.
- Review regularly: Make it a habit to check every month.
- Use reminders: Set a calendar alert to review subscriptions.
Encouraging Proactive Subscription Management

Proactively managing your subscriptions can save time and money. Follow these steps to stay on top of your services:
- Create a list of all your active subscriptions.
- Set a monthly reminder to review this list.
- Cancel any subscriptions you no longer use.
- Explore free alternatives before subscribing to new services.
- Monitor your bank statements for unexpected charges.
By managing subscriptions, you avoid unwanted expenses. Stay in control and keep your finances healthy.
Conclusion
Easily managing your iPhone subscriptions keeps your finances in check. Follow the steps outlined to view and cancel subscriptions. Regularly check subscriptions to avoid unwanted charges. Staying informed helps maintain control over your expenses and optimize app usage. Enjoy a seamless experience with your iPhone by keeping your subscriptions updated.


