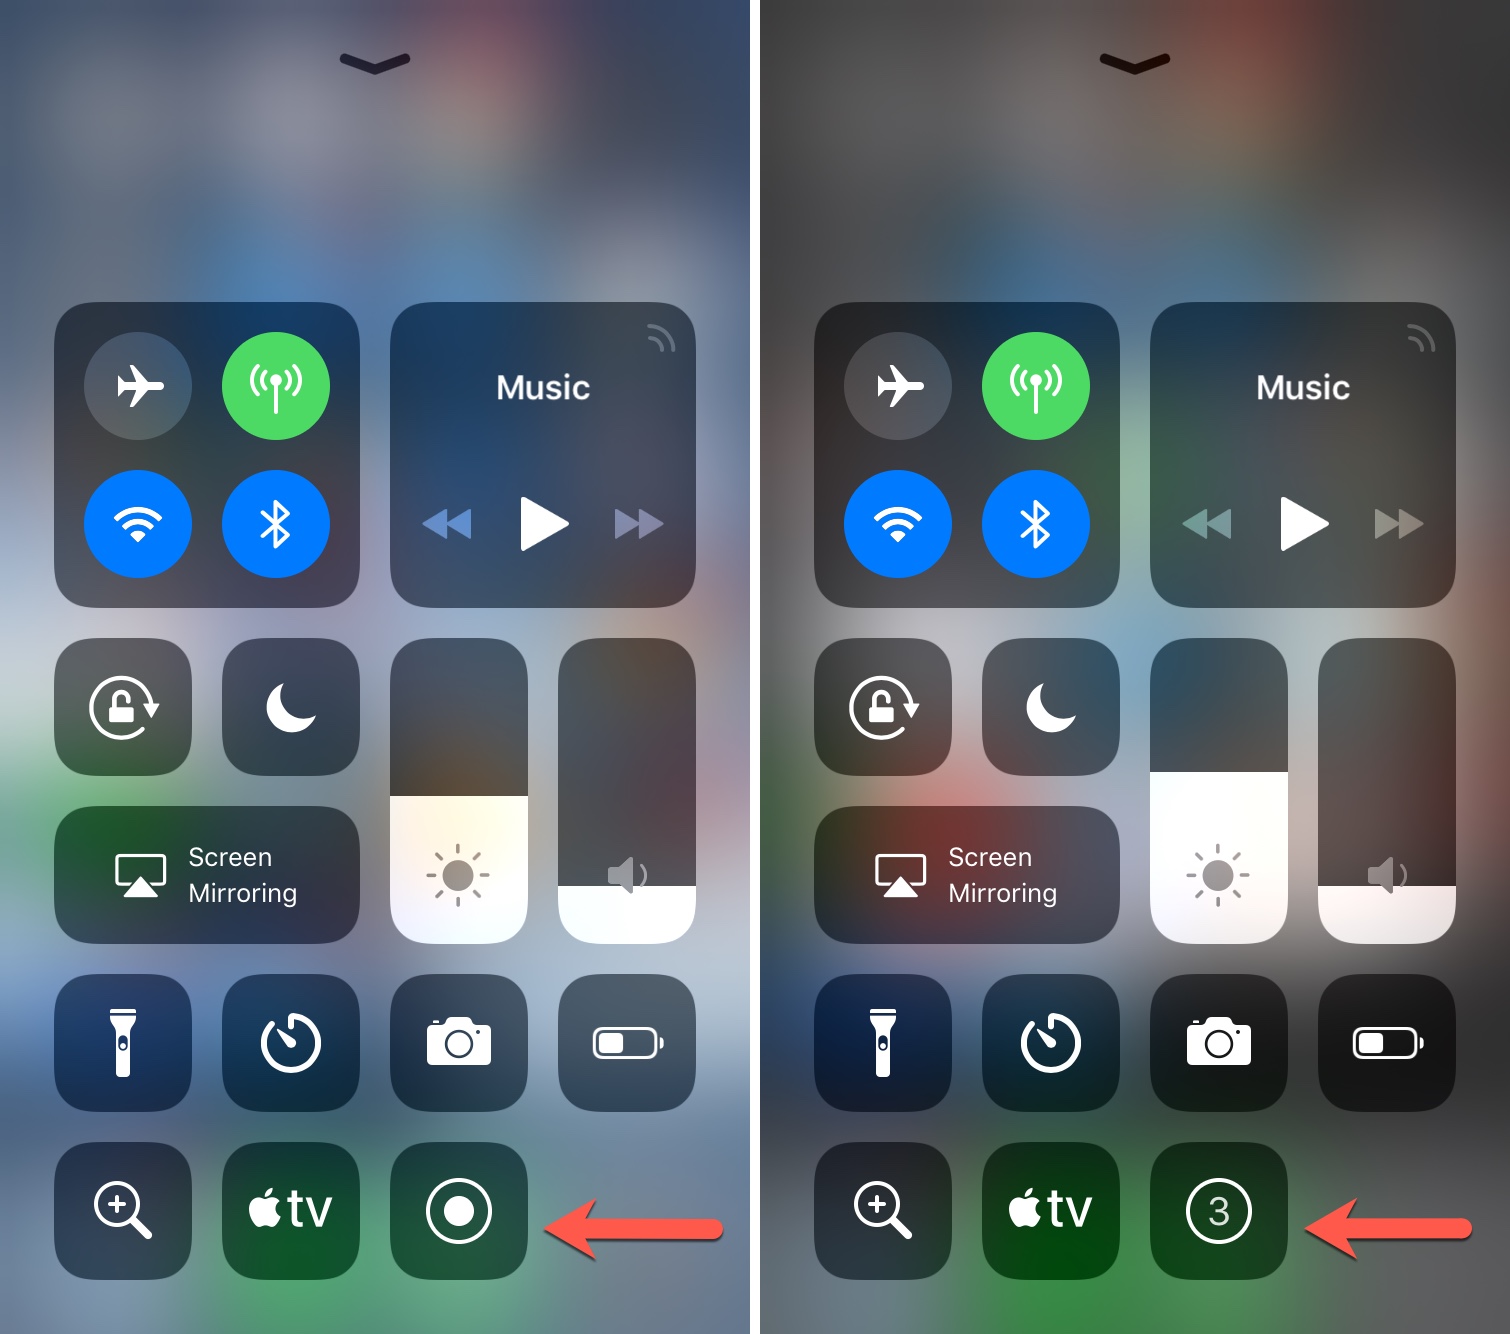
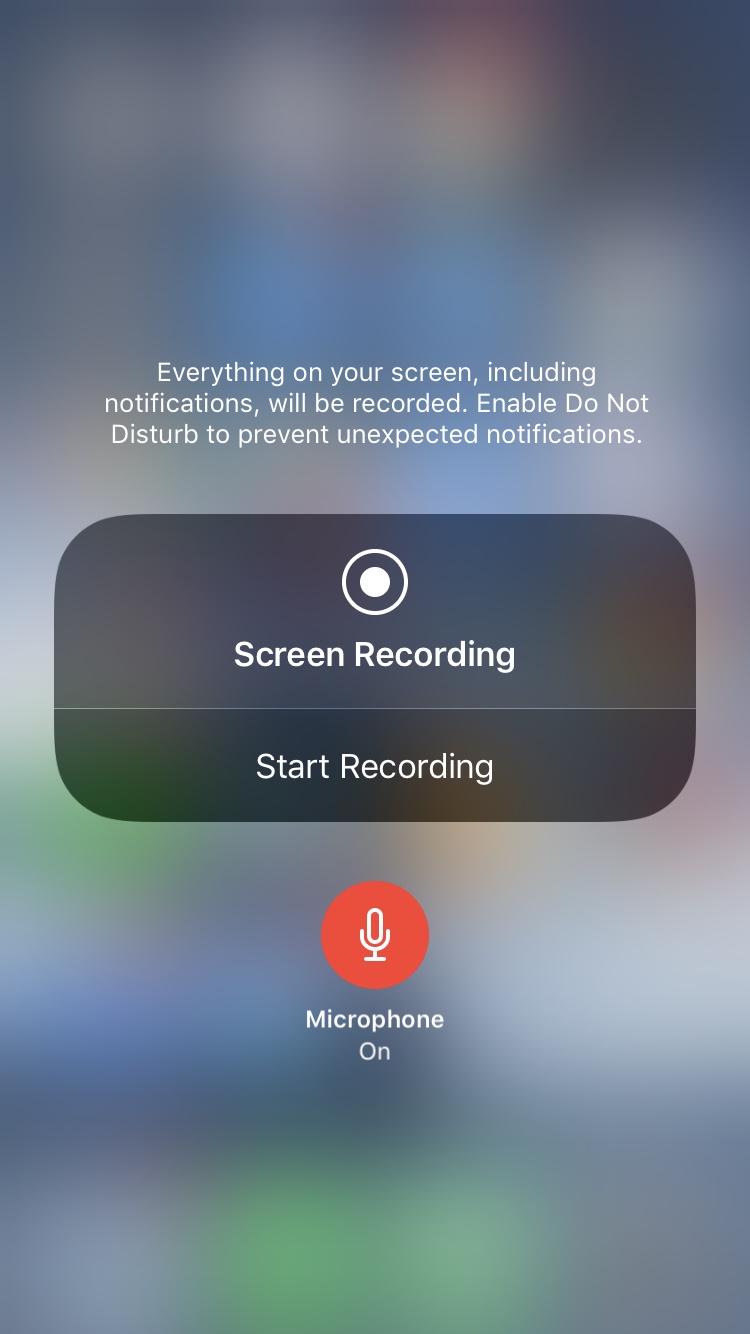
How to Screen Record With Sound on iPhone, enable the microphone in the Control Center. Then, start your screen recording.
Screen recording on an iPhone is a valuable feature, allowing users to capture video of their screen activity. This is useful for tutorials, demonstrations, and saving important information. With the added capability to record sound, you can narrate your actions or capture in-app audio.
Activating this feature is simple and enhances the functionality of your recordings. By following a few easy steps, you can create comprehensive, high-quality screen recordings that include audio. This guide will help you make the most of your iPhone’s screen recording capabilities.
How to Screen Record With Sound on iPhone?

Preparing Your Iphone
Before you start screen recording with sound, prepare your iPhone. This ensures a smooth recording experience. Follow these steps to get ready.
Check Ios Version
Ensure your iPhone runs the latest iOS version. This helps with compatibility and performance.
Follow these steps to check:
- Open the Settings app.
- Tap on General.
- Select Software Update.
- If an update is available, tap Download and Install.
Updating ensures you have the latest features and fixes. Always keep your iPhone updated.
Free Up Storage Space
Screen recordings can take up significant space. Ensure you have enough storage available.
Follow these steps to free up space:
- Open the Settings app.
- Tap on General.
- Select iPhone Storage.
- Review the storage usage.
- Delete unused apps, photos, and videos.
Consider moving files to cloud storage. This helps in freeing up more space on your iPhone.
Accessing Screen Recording
Screen recording with sound on your iPhone is simple. You need to access the right settings. This guide will show you how to enable and locate the screen recording feature.
Enable Screen Recording In Control Center
First, you need to enable screen recording in the control center. Follow these steps:
- Open the Settings app on your iPhone.
- Scroll down and tap on Control Center.
- Select Customize Controls.
- Find Screen Recording and tap the green plus (+) icon to add it.
Now, the screen recording button is added to your control center.
Locate Screen Recording Button
To start recording, you need to locate the screen recording button:
- Swipe down from the top-right corner of the screen.
- Look for the Screen Recording button, which looks like a circle inside a circle.
- Tap and hold the button to access more options.
Make sure the microphone is turned on for sound recording. Tap the microphone icon to enable it.
Recording With Sound
Screen recording on an iPhone is a great feature. Adding sound makes it even better. This guide will show you how to record with sound on your iPhone.
Enable Microphone Audio
To record with sound, you must enable the microphone. Follow these steps:
- Open the Control Center on your iPhone.
- Press and hold the Screen Record button.
- Tap the Microphone Audio button to turn it on. It should turn red.
- Tap Start Recording. Your iPhone will now record with sound.
Adjust Volume Settings
Ensure your volume settings are correct:
- Open Settings on your iPhone.
- Go to Sounds & Haptics.
- Adjust the Ringer and Alerts slider to your desired level.
- Use the Volume Up and Volume Down buttons to adjust media volume.
These settings help you record clear sound.
Starting Your Screen Recording
Screen recording on your iPhone is a great way to capture activities. Whether you want to record a tutorial or save a video call, it’s simple. Follow these steps to start your screen recording with sound.
Begin Recording Process
- Open the Control Center on your iPhone.
- Find the Screen Recording icon. It looks like a dot inside a circle.
- Press and hold the Screen Recording icon. A menu will appear.
- Tap the Microphone icon to enable sound recording.
- Tap Start Recording. A countdown of three seconds begins.
- Your screen recording starts after the countdown.
You are now recording your screen with sound. The red bar at the top indicates recording.
Stop And Save Recording
- To stop recording, open the Control Center again.
- Tap the Screen Recording icon. Your recording stops.
- A notification will appear confirming that the recording saved.
- Find your recording in the Photos app.
You can now view and share your recording. It includes both video and sound.
Editing Your Recording
After you finish recording your screen on an iPhone, you may want to make some adjustments. Editing your recording can help you create a polished and professional video. Here are some steps to help you edit your screen recording effectively.
Trim Unwanted Sections
Sometimes your recording might have unnecessary parts at the start or end. You can easily trim unwanted sections to make your video more concise.
- Open the Photos app on your iPhone.
- Find and select your screen recording.
- Tap Edit at the top right corner.
- Use the sliders to trim the beginning and end.
- Tap Done and then select Save as New Clip.
Add Annotations And Effects
Adding annotations and effects can make your video more engaging. You can highlight important parts and add fun elements.
- Use the Markup tool to draw on your video.
- Add text annotations to explain key points.
- Use apps like iMovie for advanced effects.
Save And Share
Once you are happy with your edits, save your video. You can then share it with friends or on social media.
- Tap Done to save your edits.
- Go to the share menu.
- Select how you want to share your video.
Sharing Your Recording
Once you’ve recorded your screen on your iPhone, the next step is to share it. You have several options for sharing, making it easy to show others what you’ve captured. Below, we’ll explore how to save your recording to Photos and share it via social media or email.
Save To Photos
Your screen recording is automatically saved to the Photos app. This makes it simple to access and share. Follow these steps to find your recording:
- Open the Photos app.
- Go to the Albums tab.
- Scroll down to Media Types and tap Screen Recordings.
- Select your recording to view, edit, or share.
Share Via Social Media Or Email
Sharing your screen recording on social media or through email is straightforward. Here’s how you can do it:
- Open the Photos app.
- Find and select your screen recording.
- Tap the Share button (a box with an arrow pointing up).
- Choose your preferred sharing option:
- To share via social media, select the relevant app (e.g., Facebook, Instagram, Twitter).
- To share via email, choose the Mail app.
- Follow the on-screen instructions to complete the sharing process.
Troubleshooting Tips
Screen recording on an iPhone is a great feature. But sometimes, you may face issues or poor quality recordings. Here are some troubleshooting tips to help you out.
Fix Common Issues
Many users encounter common problems with screen recording. Here are some quick solutions:
- No Sound: Ensure the microphone is on. Go to Control Center. Press the screen recording button. Make sure the microphone is on.
- Recording Stops Unexpectedly: Check your storage. You need enough space for screen recordings.
- App Crashes: Update your iPhone. Install the latest iOS version.
- Laggy Recordings: Close background apps. Free up some system resources.
Optimize Recording Quality
For the best quality, follow these tips:
- Use Do Not Disturb: Turn on Do Not Disturb. This prevents notifications during recording.
- Record in a Quiet Place: Reduce background noise. This improves sound quality.
- Keep Your Phone Steady: Use a tripod or stand. This prevents shaky videos.
- Check Settings: Ensure high-quality settings. Go to Settings > Camera > Record Video. Choose the highest resolution.
If you follow these tips, your screen recordings will be smooth and clear. Happy recording!

Credit: recorder.itopvpn.com
Conclusion
Mastering screen recording with sound on your iPhone is simple and useful. Follow the steps outlined to capture important moments. Whether for tutorials, gameplays, or demonstrations, this feature enhances your content creation. Enjoy seamless recordings and elevate your digital experience.
Happy recording!


