
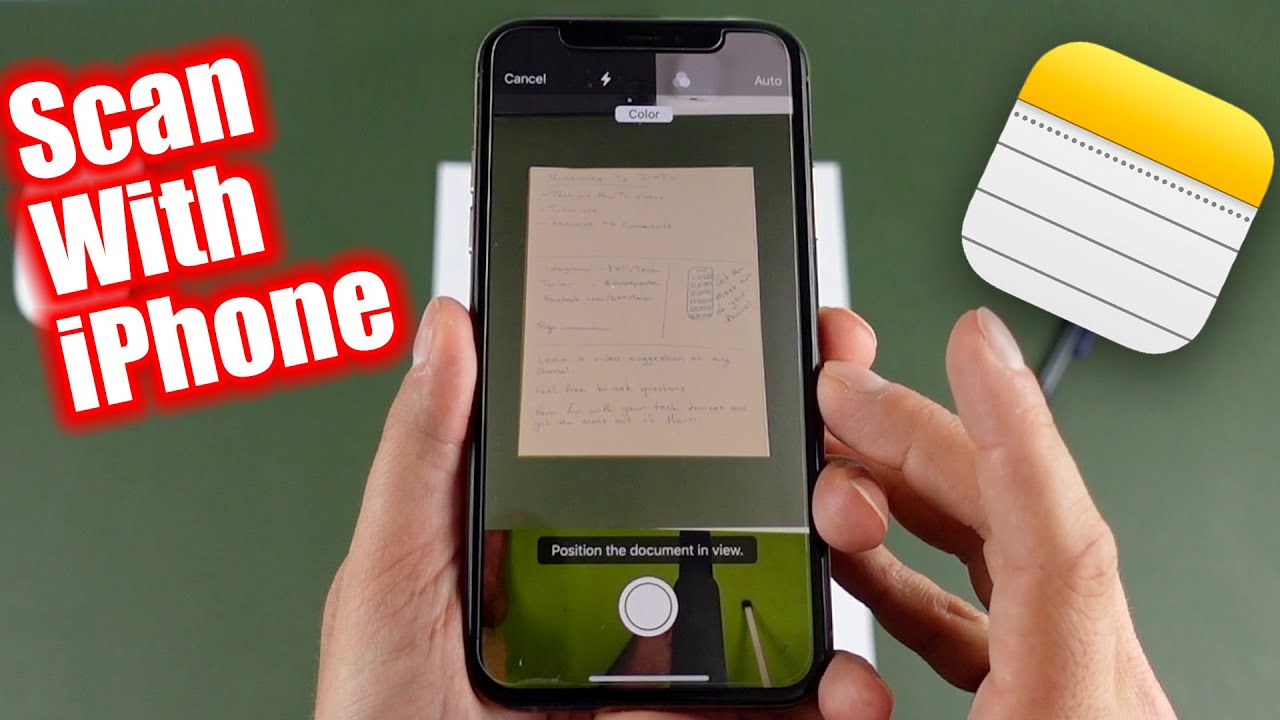
How to Scan With My iPhone, open the Notes app and tap the camera icon. Select “Scan Documents” and follow the prompts.
Scanning documents with your iPhone is simple and efficient. The built-in Notes app offers a seamless way to digitize paper documents. This feature is especially useful for business professionals, students, and anyone needing to keep digital copies of important papers.
Scanned documents can be easily shared via email or saved to cloud storage. The iPhone’s camera ensures high-quality scans, making sure every detail is captured clearly. With just a few taps, you can convert physical documents into digital format, streamlining your workflow and reducing clutter. This convenient tool transforms your iPhone into a portable scanner, ready to use anytime, anywhere.
How to Scan With My iPhone?
Preparing Your Iphone
Before you start scanning with your iPhone, you need to prepare it. This ensures a smooth scanning experience. Follow these steps to get your iPhone ready.
Checking Compatibility
First, check if your iPhone supports scanning. Most iPhones with iOS 11 or later have this feature.
| iPhone Model | Compatible |
|---|---|
| iPhone 6s | Yes |
| iPhone 7 | Yes |
| iPhone 8 | Yes |
| iPhone X and newer | Yes |
Ensure your model is listed above. If it is, you can proceed to the next step.
Updating Ios
Make sure your iPhone has the latest iOS version. This helps in using the scanning feature smoothly.
- Open the Settings app on your iPhone.
- Scroll down and tap General.
- Tap Software Update.
- If an update is available, tap Download and Install.
Updating your iOS ensures you have the latest features and bug fixes.
Once updated, your iPhone is ready to scan documents efficiently.
Setting Up The Notes App
Using your iPhone to scan documents is easy and convenient. The Notes app is a powerful tool for this purpose. Let’s set up the Notes app for scanning.
Finding The Notes App
First, locate the Notes app on your iPhone. It usually comes pre-installed.
- Look for a yellow icon with a white notepad.
- If you don’t see it, swipe down on the home screen.
- Use the search bar and type “Notes.”
Creating A New Note
Once you find the Notes app, open it. You need to create a new note for scanning.
- Tap the compose button (a square with a pencil).
- This will open a blank note.
Next, you need to access the camera icon.
- Tap the camera icon at the bottom of the screen.
- Choose “Scan Documents” from the options.
Now, you are ready to scan your document. Hold your iPhone steady and capture the document. The app will automatically detect the edges and scan it.
Scanning Documents
Scanning documents with your iPhone is easy and quick. You can use the built-in Camera app for this task. Follow these simple steps to get started.
Opening The Camera
First, unlock your iPhone. Find the Camera app on your home screen. Tap the Camera app to open it.
Once the Camera app is open, you will see the main camera interface. Ensure your document is ready to be scanned.
Adjusting The Document
Place the document on a flat surface. Make sure it’s well-lit and free from shadows.
- Hold your iPhone steady above the document.
- The camera will try to detect the document automatically.
- Adjust the distance to fit the document within the screen.
If the camera does not detect the document, you can manually adjust it. Tap the screen to focus and align the document properly.
Once the document is well-positioned, tap the capture button to scan.
Your scanned document will be saved in the Photos app. You can edit, share, or print it from there.
| Step | Action |
|---|---|
| 1 | Unlock your iPhone |
| 2 | Open the Camera app |
| 3 | Place document on a flat surface |
| 4 | Hold iPhone steady above document |
| 5 | Adjust distance to fit document |
| 6 | Tap capture button to scan |
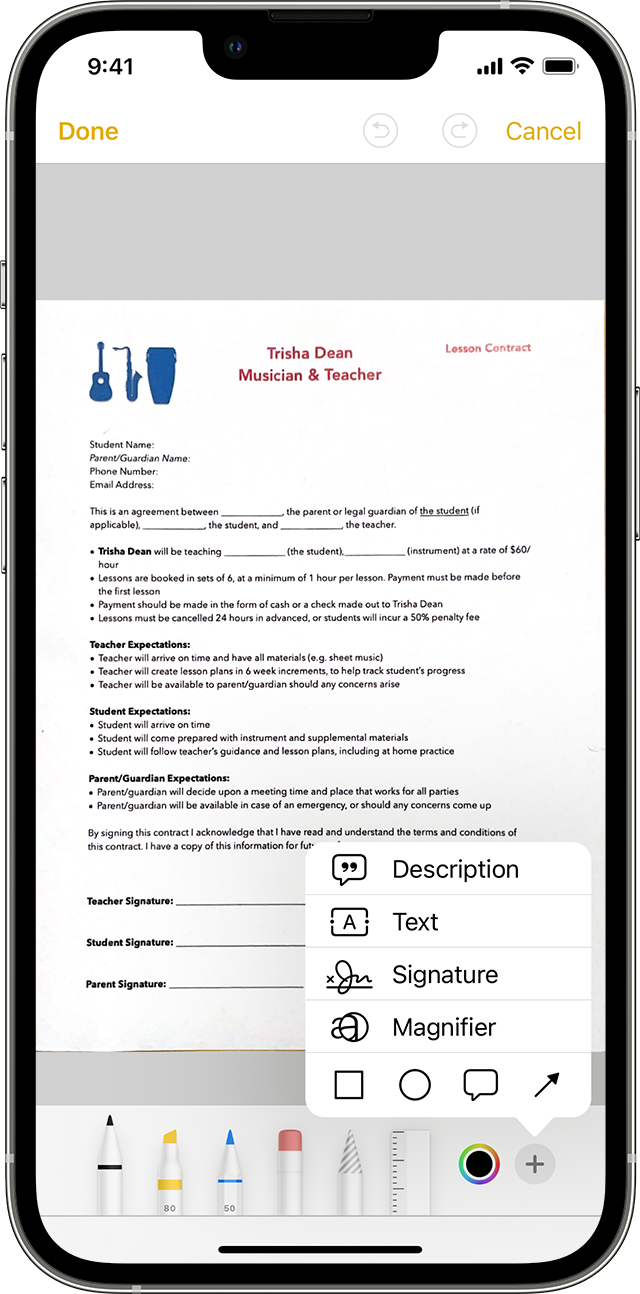
Editing The Scan
Once you have scanned a document with your iPhone, it’s time to make it perfect. You can enhance the scan by cropping, applying filters, and adjusting other settings. Here, we will show you how to edit your scanned images effectively.
Cropping The Image
After scanning, you might need to crop the image. Cropping helps to remove unwanted parts of the scan.
- Open the scan in the Photos app.
- Tap on the Edit button.
- Select the Crop tool.
- Adjust the borders to include only what you need.
- Tap Done to save the changes.
Applying Filters
Filters can make your scanned documents look more professional. Here’s how to apply them:
- Open the scan in the Photos app.
- Tap on the Edit button.
- Select the Filters icon.
- Choose from options like Mono, Silvertone, or Noir.
- Tap Done to apply the filter.
Use these features to make your scanned documents look their best. Your iPhone makes it easy to edit and enhance scanned images.
Saving And Sharing
Scanning documents with your iPhone is incredibly convenient. After scanning, you can save and share your documents in various ways. This section will guide you on how to save and share your scanned files efficiently.
Saving To Files
Once you’ve scanned your document, you can save it to your iPhone’s Files app. This allows you to access it anytime. Follow these simple steps:
- Open the scanned document.
- Tap the share icon at the bottom.
- Select Save to Files.
- Choose a folder or create a new one.
- Tap Save.
Now, your document is saved and accessible through the Files app. You can organize it by renaming or moving to different folders.
Sharing Via Email
Sharing your scanned documents via email is quick and easy. Here’s how you can do it:
- Open the scanned document.
- Tap the share icon.
- Select Mail from the options.
- Enter the recipient’s email address.
- Add a subject and message if needed.
- Tap Send.
Your document will be sent as an email attachment. It’s a fast way to share important information.
By following these steps, you can easily save and share your scanned documents. This makes managing and distributing your important files simple and efficient.
Using Third-party Apps
Scanning with your iPhone is easy with third-party apps. These apps offer various features that can enhance your scanning experience. They provide better quality, more options, and cloud integration.
Popular Scanning Apps
There are several popular scanning apps available for iPhone. Each app offers unique features to make scanning easier and more efficient.
- CamScanner: This app is very user-friendly. It offers high-quality scans and editing options.
- Adobe Scan: Adobe Scan is another excellent app. It provides great quality and integrates well with other Adobe products.
- Scanner Pro: This app is known for its simplicity and speed. It also offers great OCR (Optical Character Recognition) features.
Integrating With Cloud Services
Many scanning apps allow integration with cloud services. This makes it easy to save and share your scanned documents.
| App | Cloud Services |
|---|---|
| CamScanner | Google Drive, Dropbox, iCloud |
| Adobe Scan | Adobe Document Cloud, Google Drive |
| Scanner Pro | iCloud, Google Drive, OneDrive |
Using cloud services ensures that your documents are always accessible. You can access them from any device at any time.
Troubleshooting Common Issues
Scanning documents with your iPhone is simple and quick. But sometimes, you may face issues. Here, we will guide you through common problems. We will also provide solutions to fix them.
Blurry Scans
Blurry scans can be frustrating. They often make text unreadable. Here are some common reasons and solutions:
| Issue | Solution |
|---|---|
| Shaky Hands | Hold your iPhone steady. Use both hands for better stability. |
| Low Lighting | Ensure you have good lighting. Use natural light if possible. |
| Dirty Lens | Clean your iPhone camera lens. Use a soft cloth for this. |
| Incorrect Focus | Tap on the document to focus. Wait until it becomes clear. |
Incomplete Documents
Sometimes, your scans might miss parts of the document. This can be due to various reasons. Here are some quick fixes:
- Document Size: Ensure the entire document fits in the frame. Move your iPhone to include all edges.
- Frame Edges: Align the document edges with the screen’s edges. This helps in capturing the full document.
- Auto-Crop Issues: Manually adjust the crop if the app auto-crops incorrectly. This ensures no part is left out.
- Multiple Pages: For multi-page documents, scan each page separately. Combine them using the app.
By following these tips, you can ensure clear and complete scans. Your documents will be readable and professional.
Advanced Scanning Tips
Scanning with your iPhone is easy. But you can do more. Here are some advanced tips. These will make your scans better.
Scanning Multi-page Documents
Sometimes you need to scan many pages. Your iPhone can do that. Here’s how you do it:
- Open the Notes app and create a new note.
- Tap the camera icon and choose Scan Documents.
- Position your camera over the first page.
- Tap the capture button. The iPhone will auto-capture each page.
- After capturing, adjust the corners if needed.
- Tap Keep Scan to add it to the document.
- Repeat for each page.
- When done, tap Save to store your multi-page scan.
Using this method keeps all pages in one file. This is helpful for long documents.
Organizing Your Scans
Keeping your scans organized is important. Here are some tips:
- Use Folders: Create folders in the Notes app. This helps separate different types of scans.
- Rename Scans: Give each scan a clear name. This makes it easy to find later.
- Tagging: Add tags to your notes. This way, you can search for tags to find specific documents quickly.
- Backup: Ensure your scans are backed up. Use iCloud or another service to keep them safe.
Organizing scans saves time. It keeps your documents easy to find.
Conclusion
Mastering the art of scanning with your iPhone is simple and convenient. Follow these steps to digitize documents effortlessly. Enjoy the benefits of having a portable scanner in your pocket. Embrace this technology to enhance productivity and organization. Now, you can scan, save, and share documents with ease.