
How to scan documents on iPhone, use the Notes app and tap the camera icon. Select “Scan Documents” and follow the prompts.
Scanning documents on an iPhone has never been easier. The built-in Notes app provides a seamless way to digitize paper documents. This feature is especially useful for storing receipts, forms, and other important papers. You don’t need any third-party apps; the Notes app offers everything you need.
Open the app, tap the camera icon, and choose “Scan Documents. ” Position your document, and the app will automatically capture it. You can adjust the corners and save the scan as a PDF. This method is quick, efficient, and perfect for anyone looking to go paperless. Save time and keep your documents organized with this simple process.
How to Scan Documents on iPhone?
Introduction To Iphone Document Scanning
Scanning documents with an iPhone is simple and efficient. No need for bulky scanners. With your iPhone, you can quickly turn physical documents into digital files. This helps in reducing paper clutter and improving organization. Scanning documents with your iPhone also allows for easy sharing and storage.
Benefits Of Mobile Scanning
- Convenience: Scan documents anywhere, anytime.
- Portability: No need to carry a bulky scanner.
- Speed: Quickly scan and save documents.
- Organization: Keep digital copies of important files.
- Sharing: Easily share scanned documents via email or cloud services.
Tools Needed For Scanning On Iphone
To scan documents on your iPhone, you’ll need the following tools:
- iPhone: Any model with a camera.
- Notes App: Pre-installed on iPhones, useful for scanning.
- Scanning App: Apps like Adobe Scan or CamScanner enhance scanning capabilities.
- Good Lighting: Ensures clear and readable scans.
Using these tools, you can scan documents quickly and efficiently. The Notes App is a great starting point. It offers basic scanning features that are easy to use. For more advanced options, third-party apps can be helpful.
Preparing Your Document For Scanning
Scanning documents on your iPhone can be quick and easy. To get the best results, prepare your document carefully. Follow these steps to ensure a clear and accurate scan.
Choosing The Right Environment
Choose a well-lit area to scan your document. Natural light works best, but use a lamp if needed. Avoid shadows or glares on the document. Place your document on a flat surface. A clean, clutter-free background helps the scanner focus on the document.
Optimizing Document Placement
Align your document properly. Make sure all edges are visible. Keep the document steady to avoid blurring. Use a paperweight if the document curls. For multiple pages, arrange them neatly. Ensure each page is flat and aligned.
| Step | Description |
|---|---|
| 1 | Choose a bright, well-lit area. |
| 2 | Place the document on a flat surface. |
| 3 | Make sure there are no shadows or glares. |
| 4 | Align the document edges properly. |
| 5 | Keep the document steady while scanning. |
Follow these tips for a perfect scan every time. Your iPhone will capture clear, high-quality images.
Using The Iphone Camera For Scanning
The iPhone camera is a powerful tool for scanning documents. It provides high-quality scans quickly and easily. With just a few adjustments, you can achieve clear and crisp document scans.
Camera Settings For Clear Scans
To get the best results, adjust your camera settings. Follow these steps:
- Open the Camera app.
- Tap the settings icon.
- Select 4:3 aspect ratio for a balanced frame.
- Turn on the grid to align the document properly.
- Ensure HDR is enabled for better color and detail.
Capturing The Document
Follow these steps to capture your document:
- Place the document on a flat, well-lit surface.
- Open the Camera app on your iPhone.
- Align the document within the camera frame.
- Ensure the entire document is visible.
- Hold the camera steady and tap the shutter button.
For best results, avoid shadows and reflections. Use a steady hand or a tripod for stability. Zoom in if necessary to capture finer details.
With these tips, you can create high-quality document scans using your iPhone camera. Happy scanning!
Leveraging The Notes App
The Notes app on iPhone is a powerful tool for scanning documents. It offers an easy way to digitize paperwork, receipts, and important documents. This feature is especially useful for quick scanning and organization.
Creating A New Note For Scanning
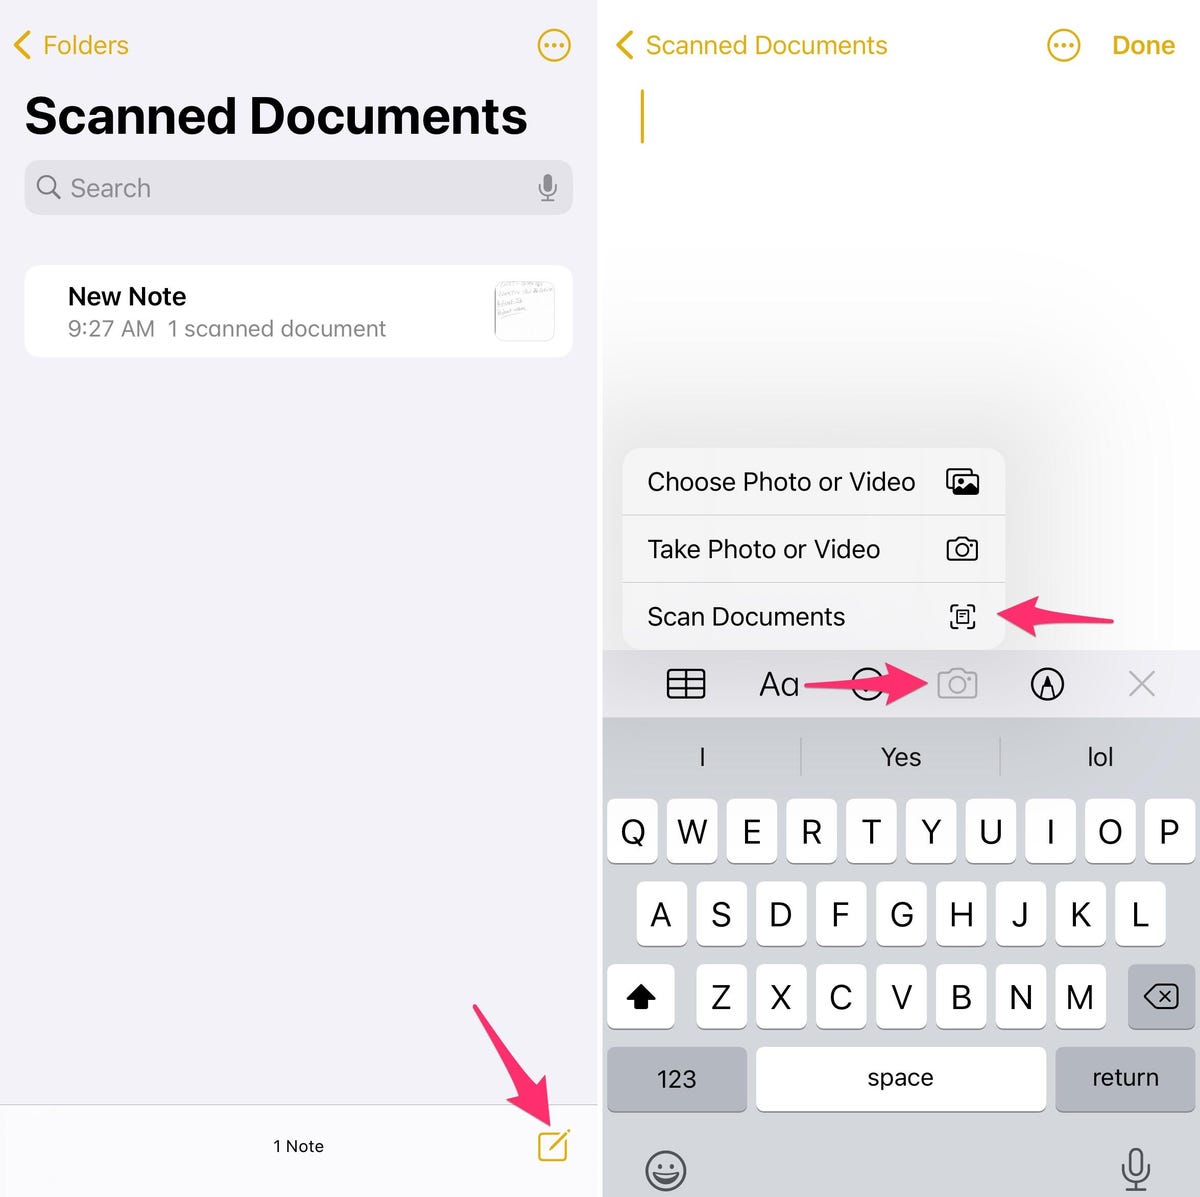
To start, open the Notes app on your iPhone. Tap the create new note button, usually a square with a pencil icon. This will open a new blank note.
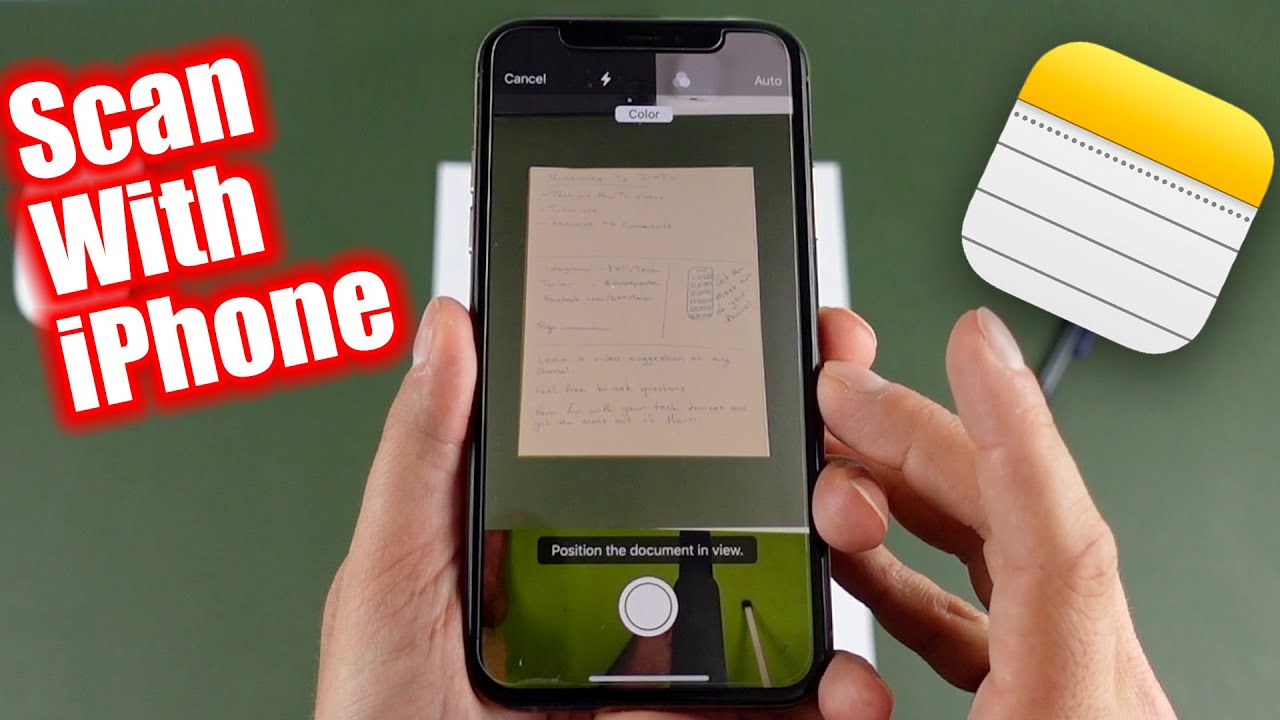
Next, tap the camera icon at the bottom of the screen. A menu will appear with options like “Take Photo or Video”, “Photo Library”, and “Scan Documents”. Select Scan Documents.
Position your iPhone’s camera over the document you want to scan. The app will automatically detect the edges and take the scan. If needed, adjust the corners for a perfect fit. Tap Keep Scan to save each page. When finished, tap Save to add the scans to your note.
Inserting Scans Into Notes
Once you have your scans, they will appear in your new note. You can add more content by typing below the scanned images. This is helpful for adding comments or additional details.
To move or organize your scans, tap and hold a scan. Drag it to the desired location within the note. You can also share the note by tapping the share button at the top right of the screen. Choose how you want to share your note, such as via email or messaging apps.
By leveraging the Notes app for document scanning, you streamline your workflow. It’s a simple, built-in solution for managing digital documents.
Third-party Scanning Apps
Scanning documents with an iPhone has become a necessity. While the built-in Notes app offers basic scanning, third-party apps provide advanced features. These apps are user-friendly and offer high-quality scans. Let’s explore some popular scanning apps and compare their features.
Popular Scanning Apps
Here are some popular third-party scanning apps:
- CamScanner: Known for its versatility and high-quality scans.
- Adobe Scan: Offers seamless integration with Adobe’s suite.
- Microsoft Office Lens: Ideal for scanning documents into Office apps.
- Scanbot: Offers advanced features like OCR and cloud integration.
Comparing App Features
Let’s compare the features of these popular scanning apps:
| Feature | CamScanner | Adobe Scan | Microsoft Office Lens | Scanbot |
|---|---|---|---|---|
| OCR | Yes | Yes | Yes | Yes |
| Cloud Integration | Yes | Yes | Yes | Yes |
| PDF Export | Yes | Yes | Yes | Yes |
| Free Version Available | Yes | Yes | Yes | Yes |
| In-App Purchases | Yes | Yes | Yes | Yes |
These apps offer a range of features to meet different needs. CamScanner and Scanbot are great for advanced users. Adobe Scan and Microsoft Office Lens are perfect for those using their respective suites. Choose the app that best fits your workflow and enjoy seamless document scanning.
Editing Scanned Documents
Scanning documents on an iPhone is simple. But, editing them adds more value. With the right tools, you can adjust scanned documents for better clarity. Below are some tips to help you edit your scanned documents effectively.
Adjusting Color And Brightness
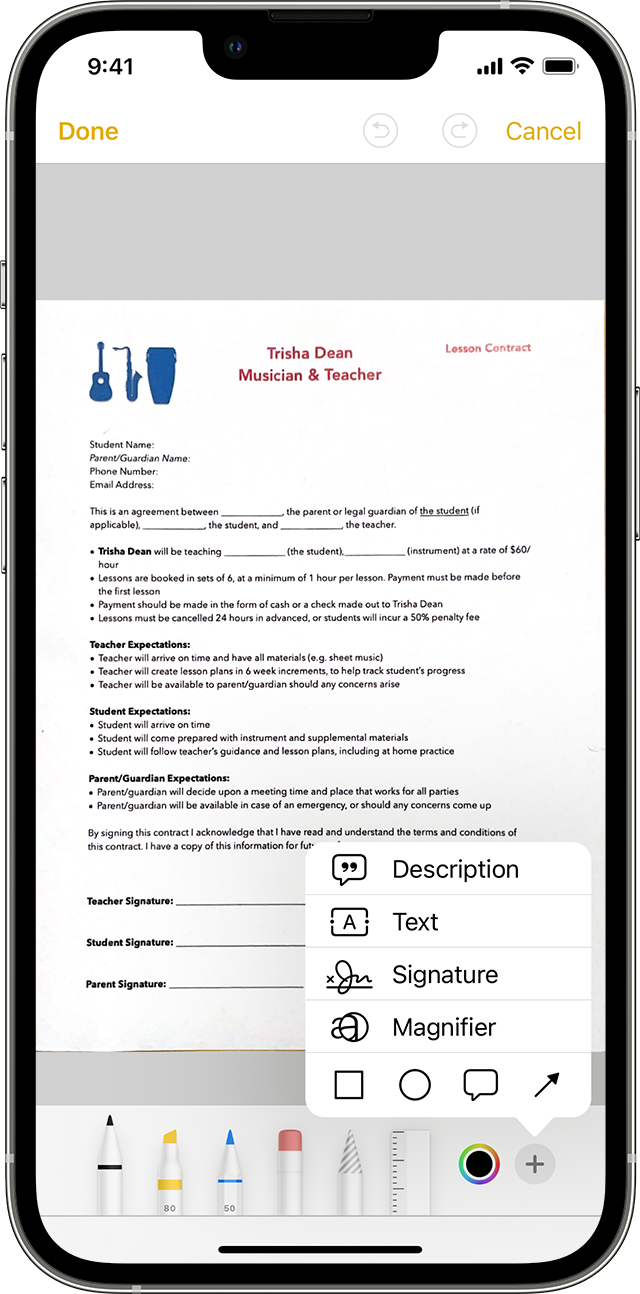
Once you have scanned a document, you might need to tweak its appearance. Adjusting the color and brightness can make text clearer. Follow these steps:
- Open the scanned document in the Photos app.
- Tap the Edit button at the top-right corner.
- Select the Adjust icon, which looks like a dial.
- Choose Brightness and slide to adjust it.
- Go to Color and tweak the saturation or contrast as needed.
Cropping And Orientation Tips
Sometimes, your document might not be aligned properly. Cropping and adjusting the orientation can fix this. Here’s how:
- Open the scanned document in the Photos app.
- Tap the Edit button.
- Choose the Crop icon at the bottom.
- Drag the corners to crop the document.
- If the document is tilted, use the Rotate tool to correct it.
Proper cropping and orientation make your document look professional. Ensure you save the changes after editing.
Sharing And Storing Scanned Documents
Once you have scanned a document on your iPhone, you might need to share or store it. Your iPhone provides many ways to share and store scanned documents. Here are some simple steps to help you.
Sending Scans Via Email
Sending your scanned documents via email is easy. Follow these steps to share your scans:
- Open the scanned document in the Notes app.
- Tap the Share icon.
- Select the Mail option.
- Enter the recipient’s email address.
- Tap Send.
Your scanned document will be sent as an attachment. Make sure your email is correctly entered before sending.
Using Cloud Storage Services
Storing your scanned documents in cloud storage is very useful. It keeps your documents safe and accessible. Here are steps to store your scans in the cloud:
- Open the scanned document in the Notes app.
- Tap the Share icon.
- Select your preferred cloud service (e.g., iCloud, Google Drive).
- Choose the folder where you want to save the document.
- Tap Save.
Your scanned document will now be saved in your chosen cloud storage. This makes it easy to access from any device.
Troubleshooting Common Issues
Scanning documents on an iPhone is convenient. But sometimes, you might face issues. Here, we will address common problems and their solutions. This ensures your scans come out perfect every time.
Dealing With Blurry Scans
Blurry scans can be frustrating. Here are some tips to fix them:
- Hold your phone steady. Use both hands for better control.
- Use a flat surface. Place the document on a stable, flat area.
- Ensure proper focus. Tap the screen to focus on the document.
- Clean your camera lens. A dirty lens can cause blurry images.
Follow these steps to get clear, sharp scans.
Fixing Lighting Problems
Lighting can affect the quality of your scans. Here’s how to handle it:
- Use natural light. Scan near a window for the best results.
- Avoid shadows. Ensure no shadows fall on the document.
- Adjust your position. Move around to find the best lighting angle.
- Turn on the flash. Use the camera flash if the lighting is poor.
Good lighting makes your scans look professional and clear.
Advanced Scanning Tips
Scanning documents on your iPhone can be simple and effective. You can elevate your scanning game with some advanced tips. Here, we explore advanced scanning tips to help you get the best results.
Batch Scanning Multiple Pages
Batch scanning multiple pages can save a lot of time. Follow these steps to batch scan effectively:
- Open the Notes app on your iPhone.
- Tap the camera icon and select Scan Documents.
- Position your camera over the document, and it will auto-capture.
- After the first scan, tap Keep Scan.
- Repeat the process for each page.
Batch scanning keeps all your pages in one file. This makes it easier to manage your documents.
Protecting Sensitive Information
Protecting sensitive information is crucial. Your iPhone has built-in features to help:
- Open the scanned document in the Notes app.
- Tap the Share button and select Lock Note.
- Set a password or use Face ID to lock the note.
This ensures only authorized people can access your sensitive documents. For extra protection, consider using third-party apps that offer encryption.
By following these advanced tips, you can make the most of your iPhone’s scanning capabilities. Efficiently scan multiple pages and keep your sensitive information secure.
Conclusion
Scanning documents on your iPhone is simple and efficient. With built-in features and apps, you can digitize papers quickly. Now, you can easily manage and share your documents. Start scanning today and enjoy a clutter-free life. Embrace the convenience and keep your important files at your fingertips.