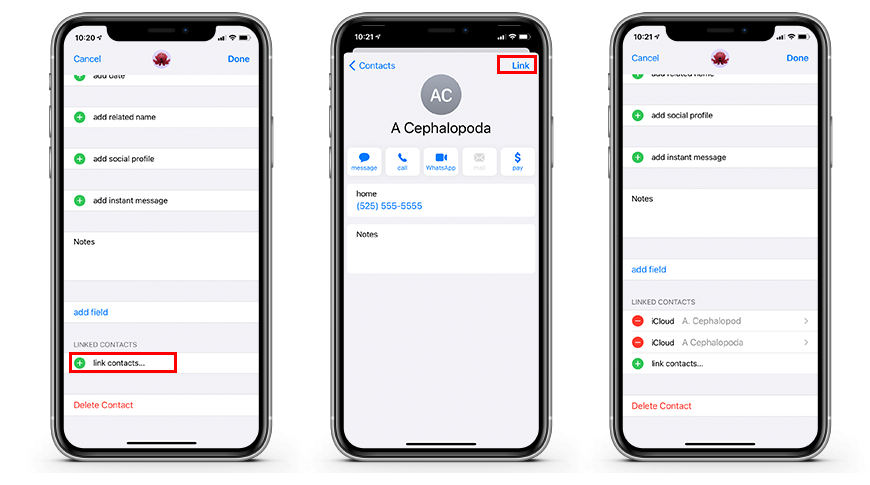
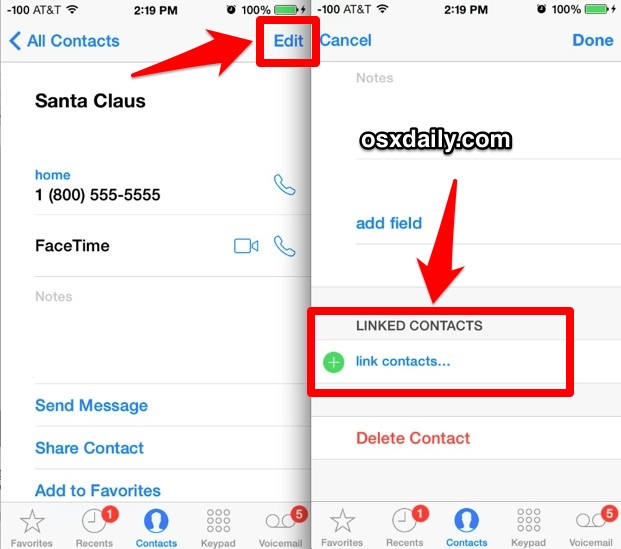
How to merge contacts on iPhone, open the Contacts app and select the duplicate contacts. Choose “Link Contacts” to merge them.
Managing contacts on your iPhone can sometimes be challenging, especially when you have duplicate entries. Duplicate contacts can clutter your address book and make finding the right contact difficult. Fortunately, iPhone provides a simple way to merge these duplicates, ensuring a more organized and efficient contact list.
By merging contacts, you can consolidate information and avoid confusion. This process is straightforward and can be completed in just a few steps. Whether you have a few duplicates or many, merging them will enhance your user experience and make your contacts easier to navigate.
How to Merge Contacts on iPhone?

Introduction To Contact Management On Iphone
Managing contacts on your iPhone is essential. It keeps your contact list organized and easy to navigate. A well-maintained contact list saves time and reduces stress. Merging contacts can be a helpful way to keep things tidy.
The Importance Of Organized Contacts
An organized contact list is easy to use. It helps you find information quickly. Here are some reasons why it is important:
- Time-saving: Quickly find the person you need to contact.
- Efficiency: Avoid confusion with multiple entries for the same person.
- Professionalism: Keep your contacts up-to-date and accurate.
Common Issues With Duplicate Contacts
Duplicate contacts can cause several issues. They make it hard to find the right contact. Here are some common problems:
- Confusion: Multiple entries for the same person can be confusing.
- Errors: You might contact the wrong person by mistake.
- Wasted Space: Duplicate contacts take up unnecessary space on your device.
Preparations Before Merging
Merging contacts on your iPhone can streamline your communication. Before diving into the merging process, a few preparations ensure a smooth transition.
Backing Up Your Contacts
It’s crucial to back up your contacts to avoid any data loss. Follow these steps to back up your contacts:
- Open the Settings app on your iPhone.
- Tap on your Apple ID at the top.
- Select iCloud.
- Toggle on Contacts if not already enabled.
- Scroll down and tap on iCloud Backup.
- Tap on Back Up Now.
Backing up ensures your contacts are safe.

Reviewing Contacts For Merging
Before merging, review your contacts list. This helps in identifying duplicates. Follow these steps:
- Open the Contacts app on your iPhone.
- Scroll through your contacts list.
- Look for contacts with similar names or details.
- Make a note of these duplicates.
Reviewing contacts helps ensure you merge the right ones.
| Step | Description |
|---|---|
| 1 | Open Contacts app and scroll through the list. |
| 2 | Identify duplicates and make notes. |
These preparations are key steps before merging your iPhone contacts.
Using The Contacts App For Merging
Merging contacts on your iPhone can save you time and reduce clutter. The Contacts app offers a straightforward way to combine duplicate entries. This section will guide you through the process of finding and merging duplicates.
Locating Duplicate Contacts
To start merging, first locate the duplicate contacts. Open the Contacts app on your iPhone.
- Tap the Contacts icon on your home screen.
- Scroll through your contact list to find duplicates.
- Use the search bar to quickly identify duplicate names.
Manual Merging Step-by-step
Once you locate duplicates, follow these steps to merge them manually:
- Open the first duplicate contact.
- Tap Edit in the top right corner.
- Scroll down and select Link Contacts….
- Search for the duplicate contact to link.
- Tap the duplicate contact to select it.
- Tap Link to merge the contacts.
- Tap Done to save the merged contact.
Repeat these steps for all duplicates to ensure a tidy contact list.
Third-party Apps To Aid In Merging
Merging contacts on an iPhone can be a hassle. Third-party apps make this task easier. They offer features that the default Contacts app lacks.
Selecting The Right App
Choosing the right app is crucial. Each app offers unique features. Some apps are free, while others cost money. Check the app’s reviews and ratings. Look for apps that are user-friendly.
A good app should have a simple interface. It should also support bulk merging. This saves time and effort. Popular apps like Contacts+ and FullContact are great choices. They offer reliable merging tools.
Privacy Considerations
Privacy is a big concern. These apps access your personal data. Make sure the app you choose values your privacy. Read their privacy policies carefully.
Look for apps that do not store your data. Ensure the app uses encryption. This keeps your data safe. Always check user reviews for any privacy issues.
| App Name | Key Feature | Cost |
|---|---|---|
| Contacts+ | Easy bulk merge | Free with in-app purchases |
| FullContact | Advanced search options | Subscription-based |
Using third-party apps makes merging contacts easier. Always consider the app’s features and privacy policies before installing. This ensures a smooth and secure experience.
Cleaning Up After Merging
Merging contacts on your iPhone helps keep your address book organized. After merging, it’s important to clean up any leftover mess. This ensures your contacts are accurate and up-to-date.
Verifying Merged Contacts
First, open your Contacts app. Scroll through and check each merged contact. Look for duplicate entries and ensure all information is correct.
- Check names for proper spelling.
- Ensure phone numbers are accurate.
- Verify email addresses are current.
If you find mistakes, edit the contact immediately. This saves time later and keeps your contacts reliable.
Removing Obsolete Information
Next, remove any obsolete information from your contacts. This includes outdated phone numbers, old addresses, or unused email accounts.
- Tap on the contact to edit.
- Scroll down to find old information.
- Tap the “-” icon to delete obsolete details.
Clearing out old information makes your contacts cleaner. It also helps you find current details quickly.
| Step | Action |
|---|---|
| 1 | Open the Contacts app |
| 2 | Verify merged contacts |
| 3 | Remove obsolete information |
Syncing Contacts Across Devices
Syncing contacts across devices can make your life easier. You can access your contacts from any Apple device. This is especially helpful if you use multiple devices. Let’s explore how to do this using iCloud and solve any sync issues.
Using Icloud For Synchronization
iCloud is Apple’s cloud service. It helps you keep your contacts up to date across all devices. Here is how you can use iCloud for syncing contacts:
- Open the Settings app on your iPhone.
- Tap on your Apple ID at the top.
- Select iCloud.
- Make sure the Contacts switch is turned on.
Once done, your contacts will sync across all devices linked with the same Apple ID. This includes your iPad and Mac. You can also access them via iCloud.com.
Troubleshooting Sync Issues
Sometimes, contacts may not sync properly. Here are some steps to solve common sync issues:
- Check Internet Connection: Ensure your device is connected to the internet.
- Restart Your Device: A simple restart can fix many problems.
- Check iCloud Storage: Make sure you have enough iCloud storage available.
- Log Out and In: Go to Settings > Apple ID, log out, and then log back in.
If you follow these steps, your sync issues should be resolved. For more help, you can visit the Apple Support page.
Best Practices For Future Contact Management
Managing contacts on your iPhone can be easy with some best practices. Here are effective ways to keep your contact list organized and up-to-date. Implement these tips to ensure your contacts are always accurate and easy to find.

Regular Maintenance Tips
Regularly review your contact list. Delete any duplicate or outdated contacts. This keeps your list clean and easy to navigate.
- Weekly review: Check for duplicate contacts every week.
- Monthly updates: Update any new information or delete old contacts monthly.
- Use tools: Utilize apps designed to help manage and clean contacts.
Creating A Consistent Naming Scheme
Having a consistent naming scheme helps you find contacts quickly. Use first and last names for every contact. Avoid nicknames unless necessary.
| Contact Type | Example |
|---|---|
| Friends | John Smith |
| Family | Jane Doe |
| Work | Mark Johnson |
Consistency helps in searching and managing contacts effectively.
Implement these best practices to maintain a well-organized contact list on your iPhone. Stay consistent and proactive in managing your contacts.
Conclusion
Merging contacts on your iPhone is simple and efficient. Follow the steps to keep your contacts organized. This process saves time and eliminates duplicates. By maintaining a clean contact list, you enhance your phone’s functionality. Enjoy a streamlined experience with your iPhone’s contact management features.


