How to make a PDF on iPhone, use the Files app or a third-party app. Open the document and select “Share” to convert.
Creating PDFs on an iPhone is simple and convenient. With the built-in Files app, you can quickly convert documents, images, and more into PDF format. This functionality is ideal for professionals, students, and anyone needing to share documents securely. The iPhone’s intuitive interface makes the process straightforward.
Third-party apps also offer advanced features like editing and annotating PDFs. These tools enhance productivity and ensure your documents are accessible and well-presented. Whether for work, school, or personal use, making PDFs on an iPhone is an essential skill. It keeps your digital life organized and efficient.
How to Make a PDF on iPhone?

Introduction To Pdf Creation On Iphone
Creating PDFs on your iPhone is simple and handy. Mobile devices offer convenience and speed for document management. Let’s explore the ease of making PDFs on an iPhone.
The Convenience Of Mobile Document Management
Managing documents on an iPhone is incredibly convenient. Smartphones are always with us, making them perfect for quick tasks. With a few taps, you can create, edit, and share documents.
Imagine needing to convert a photo to a PDF. Your iPhone can do this in seconds. This feature is helpful for school, work, and personal projects.
Mobile document management saves time. You don’t need a computer for simple tasks. Everything can be done right from your pocket.
Why Pdf Is A Popular Format
PDF stands for Portable Document Format. It’s widely used because it’s versatile and secure. PDFs look the same on every device. This makes them reliable for sharing and printing.
People use PDFs for many reasons. They preserve the layout of documents. They also support images, text, and links. This makes them ideal for reports, resumes, and e-books.
Security is another reason PDFs are popular. You can add passwords to protect sensitive information. This keeps your documents safe from unauthorized access.
Compatibility is key. PDFs work on all devices and operating systems. Whether you’re using a phone, tablet, or computer, PDFs are accessible.
Creating PDFs on an iPhone combines convenience with a powerful format. It’s a skill worth mastering for anyone on the go.
Prerequisites For Making A Pdf
Creating a PDF on your iPhone is simple. But first, you need to prepare a few things. This section will guide you through the prerequisites for making a PDF. Let’s make sure you have everything ready.
Essential Apps And Tools
To create a PDF on your iPhone, you’ll need some essential apps and tools.
- Files App: This app is built into your iPhone. It helps you manage documents.
- Notes App: Another built-in app. It allows you to create and edit notes which can be converted to PDFs.
- Third-party Apps: Apps like Adobe Acrobat Reader or Scanner App can be very useful.
Make sure these apps are installed and updated. They will help you create and manage PDFs with ease.
Ensuring Your Iphone Is Updated
Before you start, ensure your iPhone is running the latest iOS version. New updates often bring better features and improved functionalities.
- Go to Settings.
- Scroll down and tap General.
- Tap Software Update.
- If there’s an update, tap Download and Install.
Updating your iPhone ensures you have the latest features for creating PDFs.
With these prerequisites in place, you’re ready to start making PDFs on your iPhone. Remember, having the right tools and an updated device makes the process smoother.
Using The Photos App To Create Pdfs
Creating a PDF on your iPhone can be simple and quick. You can use the Photos app to convert images into a PDF. This method is handy and efficient. Below are the steps to achieve this.
Selecting Images To Convert
Open the Photos app on your iPhone. Browse through your photos and find the images you want to convert. Tap on Select at the top-right corner of the screen. Now, tap on each photo you want to include in your PDF.
Saving As Pdf From The Share Sheet
Once you have selected the images, tap on the Share icon at the bottom-left corner of the screen. Scroll down in the Share Sheet menu and select Print. This action will open a new window with a preview of your images.
Use a pinch-out gesture on the preview thumbnails. This gesture will convert the images into a PDF format. A new screen will appear showing the PDF version of your selected images.
Tap on the Share icon again. Now, choose where to save or share the PDF. You can save it to your Files app or send it via email or messaging apps.
| Step | Action |
|---|---|
| 1 | Open Photos app |
| 2 | Select images |
| 3 | Tap Share icon |
| 4 | Select Print |
| 5 | Pinch-out to create PDF |
| 6 | Save or share PDF |
By following these steps, you can easily create a PDF using the Photos app on your iPhone.
Leveraging Notes App For Pdf Generation
Leveraging the Notes App for PDF generation on your iPhone is a simple process. This method is both efficient and user-friendly. It eliminates the need for third-party apps. Below, you’ll learn how to create a new note and export it as a PDF file.
Creating A New Note With Desired Content
Open the Notes App on your iPhone. Tap the create new note icon. Enter the content you wish to convert to a PDF. You can add text, images, and even drawings. Use the camera icon to scan documents directly into your note. This feature is handy for digitizing physical documents.
To format your note, tap the ‘Aa’ icon. Use it to change font styles and add bullet points or checklists. This makes your note neat and organized.
Exporting Note As A Pdf File
Once your note is ready, tap the three dots in the upper-right corner. Select Send a Copy from the menu. Choose Markup to add annotations if needed. After marking up, tap Done.
Next, choose the Save to Files option. Select your desired location in iCloud or on your iPhone. Tap Save to finalize the process. Your note is now saved as a PDF.
You can also share the PDF directly via email or messaging apps. Tap the share icon, choose the app, and send your file. This makes sharing your new PDF quick and easy.
Third-party Apps For Enhanced Pdf Creation
Creating PDFs on your iPhone can be easy with the right tools. While Apple’s built-in features are good, third-party apps offer more. These apps provide advanced options and customization. Here, we explore the best PDF converter apps and their additional features.
Popular Pdf Converter Apps
| App Name | Key Features | User Rating |
|---|---|---|
| Adobe Acrobat Reader | Merge, convert, and edit PDFs | 4.7 |
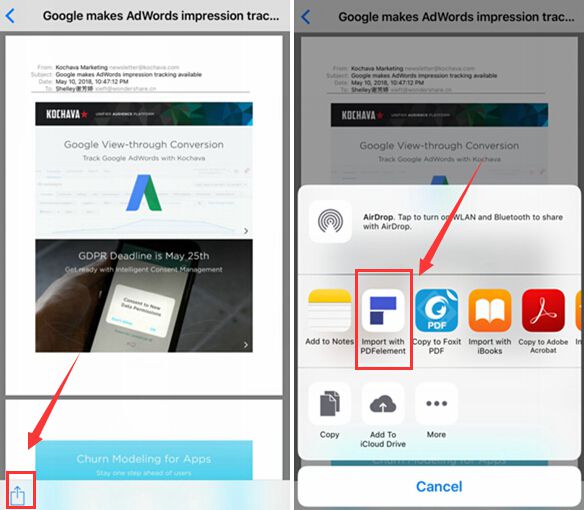
| PDFelement | Annotate, sign, and share PDFs | 4.6 |
| Smallpdf | Compress, convert, and edit | 4.5 |
Additional Features Worth Considering
- OCR Technology: Converts images and handwritten text to editable text.
- Cloud Integration: Syncs with Google Drive, Dropbox, and iCloud.
- Security: Password protection and encryption for sensitive documents.
- Annotation Tools: Highlight, underline, and add notes.
- Multi-Format Support: Converts various file types to PDF.
Choosing the right app depends on your needs. Some apps offer better editing tools. Others focus on file conversion and compression. Make sure to read reviews and test a few apps. This way, you find the one that suits you best.
Converting Web Pages To Pdf
Converting web pages to PDF on your iPhone can be very helpful. This feature lets you save important information for offline reading. In this section, we will guide you on how to do it.
Using Safari For Pdf Conversion
Safari makes it easy to convert web pages into PDFs. Follow these steps:
- Open the Safari app on your iPhone.
- Visit the web page you want to save.
- Tap the Share button at the bottom.
- Scroll down and select Create PDF.
- Tap Done in the top-left corner.
- Choose Save File To… to store the PDF.
Storing And Sharing Web Page Pdfs
Once you have created the PDF, you can store and share it. Here are the steps:
- Open the Files app on your iPhone.
- Navigate to the location where you saved the PDF.
- To share, tap the PDF file to open it.
- Tap the Share icon at the bottom.
- Select the app or method to share the PDF.
Storing your PDFs in the iCloud Drive ensures they are backed up. You can access them from any Apple device. Sharing PDFs is just as easy, whether through email or messaging apps.
Email To Pdf Conversion
Converting emails to PDFs on your iPhone is simple. This guide will show you how to save, manage, and share your email content as PDFs.
Printing Emails As Pdfs
Start by opening the Mail app on your iPhone. Select the email you want to convert to PDF. Tap the Reply button, then choose Print.
In the Printer Options, use the pinch-out gesture to preview the email as a PDF. Tap the Share button on the top right corner. Choose Save to Files to save your PDF. You can also select other sharing options like AirDrop or Messages.
Managing Pdf Attachments
Managing your email PDFs is just as easy. Open the Files app to find your saved PDFs. To organize your PDFs, create folders and move files accordingly.
To share your PDF, tap on the file and select the Share icon. Choose your preferred method, whether it’s email, message, or another app.
Here’s a quick summary of the steps:
- Open Mail app.
- Select email and tap Reply.
- Choose Print.
- Pinch-out to preview as PDF.
- Tap Share, then Save to Files.
Organize your PDFs using the Files app:
- Create folders.
- Move files.
- Share via Share icon.
Converting emails to PDFs on an iPhone is straightforward. Save and manage your important emails with ease.

Organizing And Managing Pdf Files
Organizing and managing PDF files on your iPhone is crucial. It helps you find important documents quickly. With the right tools, you can keep everything in order. Below, we explain how to use the Files app for storage, and how to rename, move, and share PDFs.
Using Files App For Storage
The Files app is a great tool for storing your PDFs. It allows you to keep all your documents in one place. You can create folders to categorize your PDFs. This makes it easy to locate any document. To store a PDF, open the Files app and tap “On My iPhone.” Then, drag your PDF into a folder.
| Step | Action |
|---|---|
| 1 | Open the Files app |
| 2 | Tap “On My iPhone” |
| 3 | Drag your PDF into a folder |
Renaming, Moving, And Sharing Pdfs
Renaming PDFs helps you identify them easily. To rename a PDF, tap and hold the file. Then, select “Rename” from the menu. Enter the new name and tap “Done.” Moving PDFs between folders is also simple. Tap and hold the PDF, then drag it to the new folder.
Sharing PDFs is just as easy. Tap the PDF to open it. Then, tap the share icon. You can share via email, message, or other apps. This makes it easy to send documents to friends or colleagues.
- Renaming: Tap and hold the file, select “Rename.”
- Moving: Tap and hold, then drag to a new folder.
- Sharing: Open the PDF, tap the share icon.
Advanced Tips And Tricks
Once you’ve mastered the basics, it’s time to explore advanced tips and tricks for making PDFs on your iPhone. These techniques will help you streamline your workflow and make the most out of your device. Let’s dive into some advanced features that can enhance your productivity.
Merging Multiple Pdfs
Merging multiple PDFs can save you time and effort. Here’s how to do it:
- Open the Files app on your iPhone.
- Select the PDFs you want to merge.
- Tap the three dots at the bottom right corner.
- Choose “Create PDF” from the options.
This will combine the selected PDFs into one file. It’s a simple process that can make document management easier.
Using Shortcuts For Automation
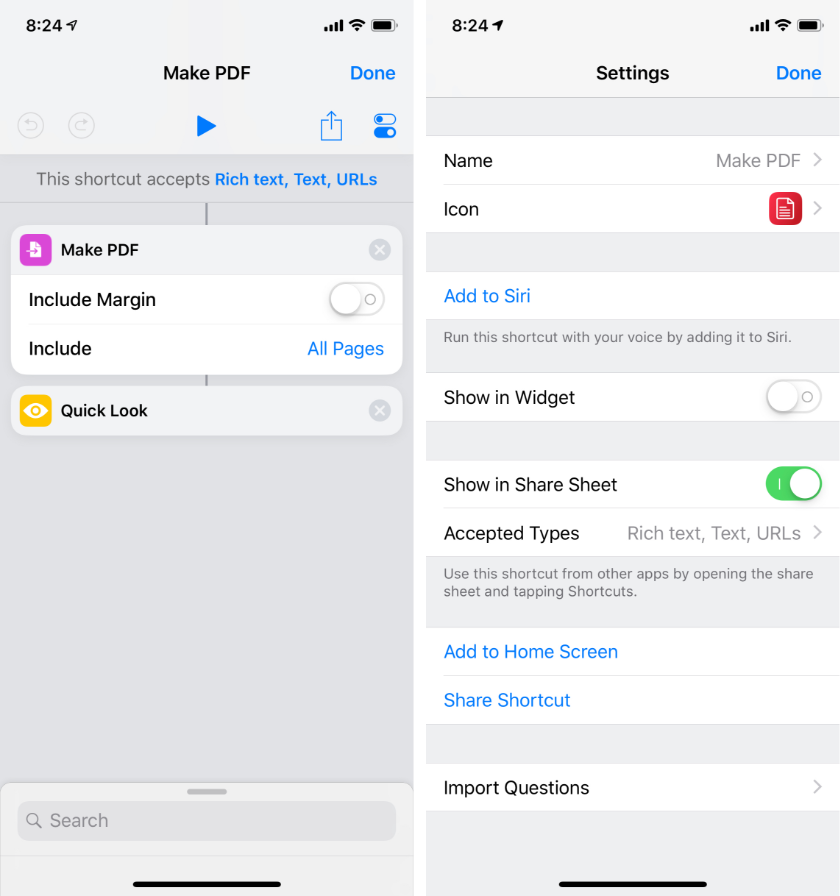
Using Shortcuts can automate your PDF tasks. Here’s a quick guide:
First, ensure you have the Shortcuts app installed. Then follow these steps:
- Open the Shortcuts app.
- Tap the “+” icon to create a new shortcut.
- Search for “Make PDF” in the search bar.
- Add the “Make PDF” action to your shortcut.
- Customize the shortcut as needed.
Now, you can run this shortcut to automate your PDF creation process. It’s a powerful tool for saving time.
| Feature | Benefit |
|---|---|
| Merging PDFs | Combines multiple documents into one. |
| Using Shortcuts | Automates PDF creation and management. |
Using these advanced tips and tricks, you can take your PDF management to the next level on your iPhone. Merging PDFs and using shortcuts are just the beginning.
Troubleshooting Common Issues
Creating a PDF on an iPhone can sometimes lead to issues. Understanding how to troubleshoot common problems can help. Let’s address two frequent issues: conversion errors and when PDFs won’t open or share.
Dealing With Conversion Errors
Conversion errors can be frustrating. Here’s how to handle them:
- Check your app: Ensure the app you use supports PDF conversion. Apps like Microsoft Office or Adobe Acrobat are reliable.
- Update the app: An outdated app may cause errors. Visit the App Store to update.
- File compatibility: Ensure the file type is supported. Some formats may not convert well.
- Internet connection: A stable connection is crucial for online conversions. Ensure your Wi-Fi or mobile data is working.
When Pdfs Won’t Open Or Share
If your PDFs won’t open or share, try these steps:
- Restart your iPhone: A simple restart can resolve many issues.
- Check app permissions: Ensure the app has the necessary permissions. Go to Settings > Privacy.
- Reinstall the app: Deleting and reinstalling the app can fix bugs. Long-press the app icon, tap ‘Delete’, then reinstall from the App Store.
- Clear app cache: Clearing the cache can improve app performance. Go to Settings > General > iPhone Storage, and select the app to clear cache.
| Issue | Solution |
|---|---|
| Conversion errors | Update app, check file type, ensure stable connection |
| PDFs won’t open or share | Restart iPhone, check permissions, reinstall app, clear cache |

Conclusion
Creating a PDF on your iPhone is simple and convenient. Follow these steps to save time and effort. Whether for work or personal use, you can easily convert files to PDFs. Enjoy the flexibility and efficiency of managing your documents on the go.
Thank you for reading, and happy PDF creating!


