
How to Disable Call Forwarding in iPhone, To disable call forwarding on an iPhone, open the Phone app, then go to Settings > Call Forwarding and turn it off. This stops all forwarded calls.
Call forwarding is a useful feature, but sometimes you need to disable it. Whether you’re switching devices, experiencing issues, or just prefer to manage your calls differently, turning off call forwarding is straightforward. You can easily do this through your iPhone’s settings.
Knowing how to navigate these settings ensures you maintain control over your call management. This guide helps you quickly disable call forwarding, ensuring you receive calls directly. Mastering such features enhances your user experience and keeps your communication seamless. Stay connected without unnecessary diversions by following simple steps to disable call forwarding on your iPhone.
How to Disable Call Forwarding in iPhone?
Locating Call Forwarding Settings
Call forwarding can be helpful, but sometimes you need to turn it off. If you’re wondering how to disable call forwarding in iPhone, you’re in the right place. The first step is locating the call forwarding settings. This guide will help you find and disable call forwarding on your iPhone with ease.
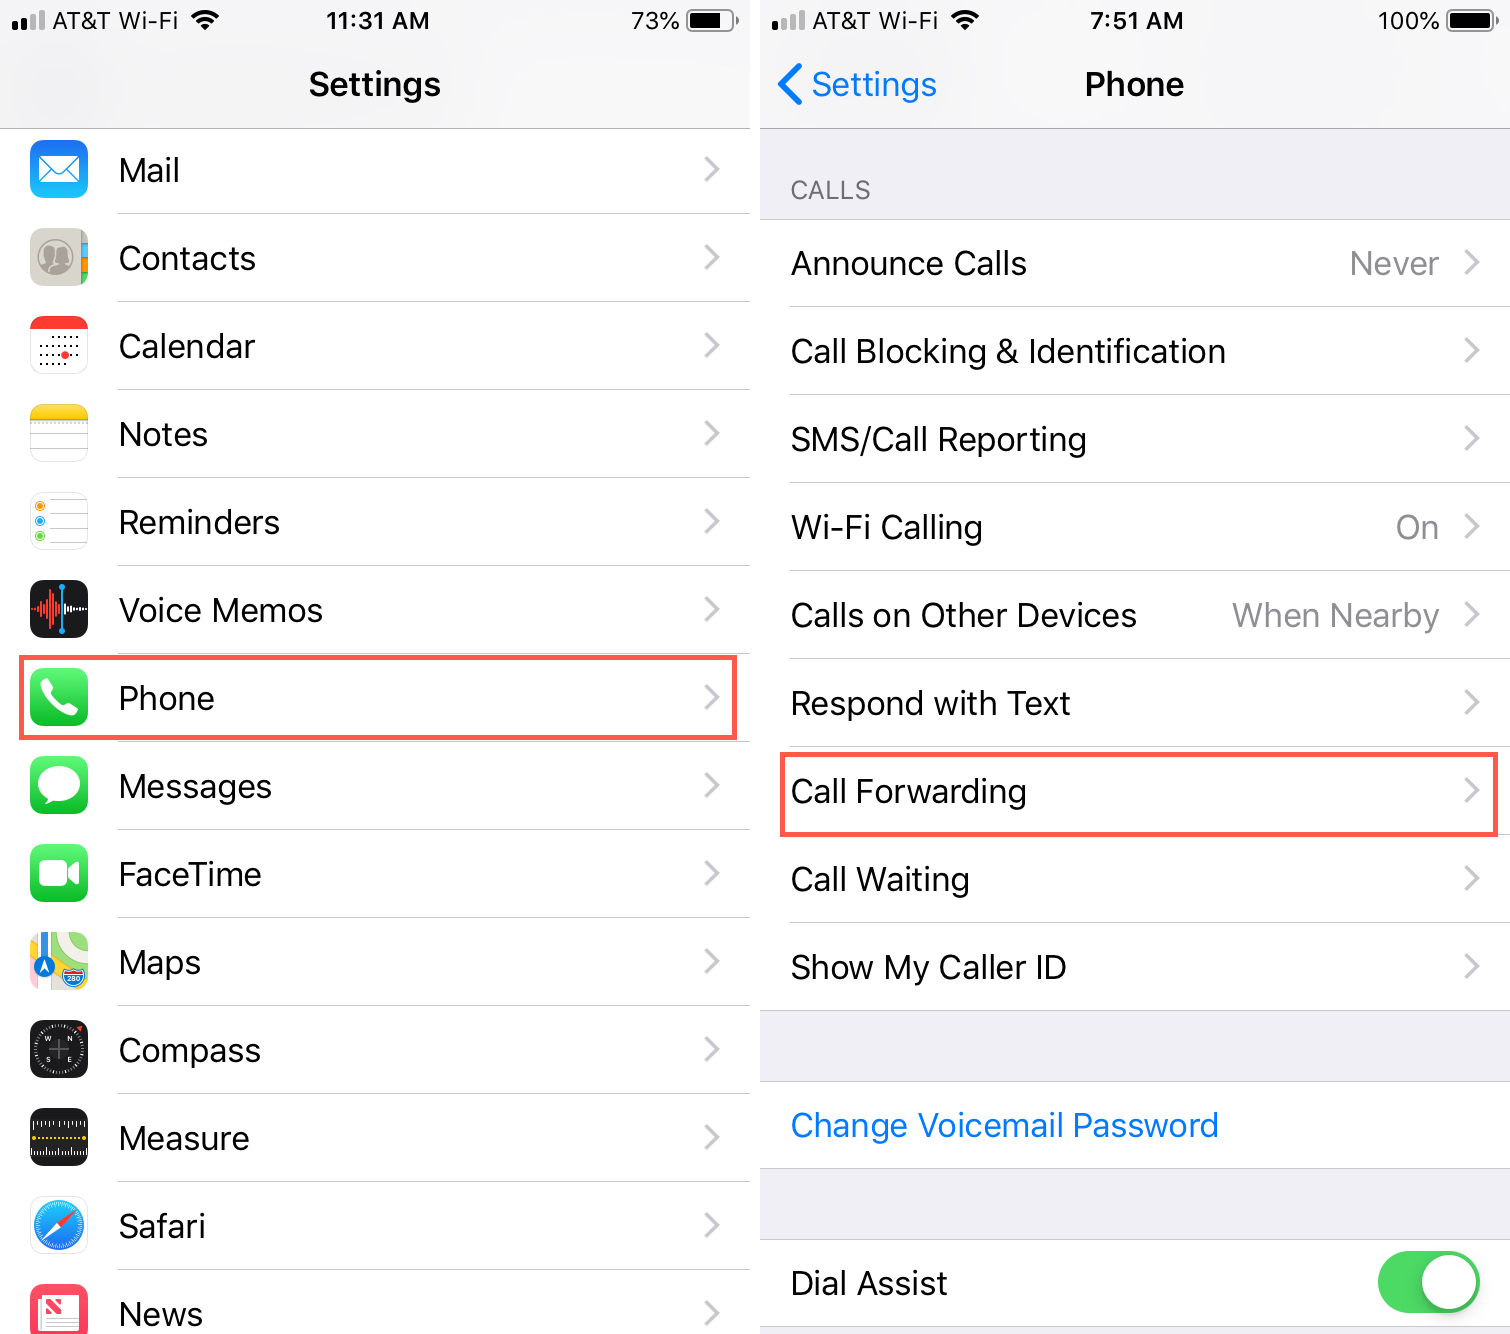
Accessing Phone Settings
To start, you’ll need to access the phone settings on your iPhone. Follow these simple steps:
- Unlock your iPhone and go to the home screen.
- Look for the Settings app, which looks like a gear icon, and tap on it.
Once you’re in the Settings app, you’ll see a list of options. Scroll down until you find the option labeled Phone. This is where you’ll find the call forwarding settings.
Here’s a quick overview of the steps in a table format:
| Step | Action |
|---|---|
| 1 | Unlock iPhone |
| 2 | Open Settings app |
| 3 | Tap on Phone |
By following these steps, you’ll be ready to locate the call forwarding option. The next section will guide you through finding and disabling call forwarding.
Finding Call Forwarding Option
:max_bytes(150000):strip_icc()/002_how-to-turn-off-call-forwarding-4689017-dfb55d7fa4134ea0b2bdd880bf213b38-4e64dcbabcd44a8584c18ad86d20d251.jpg)
After accessing the Phone settings, the next step is to find the call forwarding option:
- In the Phone settings, look for the Call Forwarding option.
- Tap on Call Forwarding to access its settings.
Once inside the call forwarding settings, you’ll see a toggle switch. If call forwarding is enabled, the switch will be green. To disable call forwarding, simply tap the switch to turn it off. The switch should turn gray, indicating that call forwarding is now disabled.
Here’s a step-by-step breakdown:
- Open Phone settings.
- Find and tap on Call Forwarding.
- Tap the toggle switch to disable call forwarding.
This process is quick and straightforward. By following these steps, you’ll know how to disable call forwarding in iPhone. It’s always good to check your settings to ensure everything is set as you like.
Disabling Call Forwarding
Call forwarding can be a handy feature, but sometimes, you might need to disable it. Whether you’ve set it up by mistake or no longer need it, turning off call forwarding on your iPhone is simple. This guide will walk you through the steps to disable call forwarding, ensuring you won’t miss any calls again.
Turning Off Call Forwarding
To turn off call forwarding on your iPhone, follow these steps:
- Open the Settings app on your iPhone.
- Scroll down and tap on Phone.
- Select Call Forwarding from the list of options.
- Toggle the switch next to Call Forwarding to the off position.
If your iPhone call forwarding won’t turn off, try restarting your phone. Sometimes, a simple restart can resolve minor glitches. Additionally, ensure your device software is up to date.
Here’s a quick table to summarize the steps:
| Step | Description |
|---|---|
| 1 | Open Settings |
| 2 | Tap on Phone |
| 3 | Select Call Forwarding |
| 4 | Toggle Call Forwarding off |
Verifying Call Forwarding Is Disabled
After turning off call forwarding, you should verify that the feature is indeed disabled. Follow these steps to ensure call forwarding is off:
- Open the Settings app once again.
- Navigate to Phone and select Call Forwarding.
- Check if the toggle switch is in the off position. If it is, call forwarding is disabled.
To further ensure that call forwarding is off, make a test call to your iPhone. If the call rings through to your device, the call forwarding is successfully disabled. If your iPhone call forwarding won’t turn off, consider resetting network settings:
- Go to Settings.
- Tap on General.
- Select Reset and choose Reset Network Settings.
Resetting network settings can help resolve persistent issues. Remember, this will reset Wi-Fi networks and passwords, so reconnect to your Wi-Fi network afterward.
For specific models like the iPhone 11, the steps remain the same. If you are searching for how to turn off call forwarding on iPhone 11, follow the instructions above. The process is consistent across most iPhone models.
Alternative Methods
Disabling call forwarding on your iPhone can be essential to ensure you don’t miss important calls. While the settings menu provides a straightforward approach, there are alternative methods that can be just as effective. These include using USSD codes and contacting your carrier for assistance. Let’s dive into these methods to help you manage your call settings efficiently.
Using Ussd Codes
USSD codes are quick commands you can dial on your phone to perform various actions, including disabling call forwarding. These codes are easy to use and don’t require internet access. Here’s how you can use them:
- Open the Phone app on your iPhone.
- Dial the call forwarding deactivate code:
##002#. - Press the call button to execute the command.
- You will receive a confirmation message indicating that call forwarding has been disabled.
Different carriers might use different USSD codes. Here’s a quick reference table for some popular carriers:
| Carrier | USSD Code |
|---|---|
| ATT | ##21# |
| T-Mobile | ##004# |
| Verizon | 73 |
Using USSD codes is a fast and effective way to manage your call forwarding settings. Remember to check with your carrier for the exact code if you encounter any issues.
Contacting Carrier For Assistance
If USSD codes don’t work or you prefer speaking with a representative, contacting your carrier can be helpful. Here’s what you should do:
- Find your carrier’s customer service number. This is usually available on their website or your billing statement.
- Call the customer service number and follow the automated prompts to reach a representative.
- Explain that you need to disable call forwarding on your iPhone.
- The representative may ask for your account details to verify your identity.
- Once verified, they will assist you in disabling the call forwarding feature.
Most carriers offer multiple ways to get in touch, including live chat and email support. Here’s a quick reference table for contacting major carriers:
| Carrier | Customer Service Number | Alternative Contact Methods |
|---|---|---|
| ATT | 1-800-331-0500 | Live Chat, Email |
| T-Mobile | 1-800-937-8997 | Live Chat, Email |
| Verizon | 1-800-922-0204 | Live Chat, Email |
Contacting your carrier ensures you get personalized assistance tailored to your specific needs. It’s a reliable method if you’re experiencing technical difficulties or need additional help.
.png)
Troubleshooting
Disabling call forwarding on your iPhone can be crucial, especially if you want to ensure you don’t miss any important calls. Sometimes, though, you might face challenges when trying to disable this feature. This troubleshooting guide will help you navigate common issues and mistakes, ensuring you know how to turn off call forwarding on iPhone 13 and other models.
Issues With Disabling Call Forwarding
Many users encounter various issues when they try to disable call forwarding on their iPhones. These problems can stem from software glitches, incorrect settings, or network issues. Here are some common problems and their potential solutions:
- Settings Not Saving: Sometimes, changes in call forwarding settings do not save. Ensure you have a stable internet connection when making changes.
- Network Issues: Network problems can prevent disabling call forwarding. Try switching to airplane mode and then back to normal mode.
- Software Glitches: Occasionally, software bugs can cause issues. Restart your iPhone or update to the latest iOS version.
If these steps do not resolve the issue, consider contacting your carrier. Network-specific settings might require carrier intervention. Ensure you follow these steps when trying to disable call forwarding:
- Go to Settings.
- Select Phone.
- Tap on Call Forwarding.
- Toggle the switch to off.
Common Mistakes To Avoid
Users often make mistakes when disabling call forwarding. Understanding these common errors can help you avoid frustration:
- Not Checking Call Forwarding Status: Always verify if call forwarding is indeed active before trying to disable it.
- Incorrect Menu Navigation: Users sometimes navigate to the wrong settings menu. Ensure you follow the correct path: Settings > Phone > Call Forwarding.
- Ignoring Software Updates: Outdated software can cause issues. Regularly update your iPhone to the latest iOS version.
Many users also forget to restart their devices after making changes. Restarting can resolve many minor issues. Always double-check if the call forwarding feature is disabled after making changes.
By avoiding these common mistakes, you can ensure a smoother experience. If you still face issues, seeking help from Apple Support or your carrier might be necessary. They can provide additional troubleshooting steps and support.
Additional Tips
Learning how to disable call forwarding on your iPhone is essential to regain control over your calls. If you find yourself frequently forwarding calls, you might want to explore some additional tips to enhance your experience. Here, we delve into setting up Do Not Disturb Mode and exploring call forwarding alternatives.
Setting Up Do Not Disturb Mode
Sometimes, you need some peace without turning off call forwarding entirely. The Do Not Disturb (DND) mode on your iPhone can help. Follow these steps to set it up:
- Open the Settings app on your iPhone.
- Scroll down and tap on Do Not Disturb.
- Toggle the switch to turn on Do Not Disturb.
- Customize your DND settings:
- Scheduled: Set specific times for DND to activate.
- Allow Calls From: Choose contacts who can bypass DND.
- Repeated Calls: Allow a second call from the same person within three minutes to ring.
Setting up DND can be particularly useful during meetings, sleep, or focus time. It ensures that important calls still get through while maintaining your peace.
Exploring Call Forwarding Alternatives
If you need to know how to deactivate call forwarding but still manage your calls effectively, consider these alternatives:
- Voicemail: Allow calls to go to voicemail and check messages at your convenience.
- Auto-Reply Texts: Set up automatic text responses to let callers know you are unavailable but will return their call.
- Third-Party Apps: Use apps like Google Voice or Skype to manage calls and messages.
Here’s a comparison table of these alternatives:
| Alternative | Pros | Cons |
|---|---|---|
| Voicemail | Easy to access; No setup needed | May miss urgent calls |
| Auto-Reply Texts | Immediate response; Customizable | May not suit all situations |
| Third-Party Apps | Advanced features; Flexibility | May require installation; Data usage |
Exploring these alternatives can help you maintain communication without relying solely on call forwarding. Choose what suits your lifestyle best and enjoy uninterrupted moments while staying connected.
Final Thoughts
Disabling call forwarding on your iPhone can help you regain control over your calls and ensure your privacy. Whether you have an iPhone 13 Pro Max or an iPhone 11 Pro Max, the process is straightforward. Here are some final thoughts on how to disable call forwarding and what you should check after doing so.
Ensuring Privacy And Control
Disabling call forwarding is crucial for maintaining privacy and control over your phone calls. When you disable call forwarding, you make sure that no one else can intercept or redirect your calls. Follow these steps to make sure you maintain privacy:
- Open the Settings app on your iPhone.
- Scroll down and select Phone.
- Tap on Call Forwarding.
- Toggle off the switch next to Call Forwarding.
These steps apply to both the iPhone 13 Pro Max and iPhone 11 Pro Max. By turning off call forwarding, you ensure that calls are not being redirected without your knowledge.
Here is a table summarizing the steps:
| Step | Action |
|---|---|
| 1 | Open Settings |
| 2 | Select Phone |
| 3 | Tap on Call Forwarding |
| 4 | Toggle off Call Forwarding |
By following these steps, you take control of your phone’s call settings and ensure that your calls remain private.
Final Checks After Disabling Call Forwarding
After disabling call forwarding, perform a few final checks to make sure everything is set correctly. Here are some steps you can follow:
- Make a test call to your number from another phone.
- Check if your iPhone rings.
- Verify that calls are no longer being forwarded.
Performing these checks ensures that call forwarding is indeed disabled. If your iPhone doesn’t ring, go back to the settings and confirm that the call forwarding toggle is off.
It’s also a good idea to check other call settings:
- Open the Settings app.
- Select Phone.
- Review options like Silence Unknown Callers and Blocked Contacts.
By doing these final checks, you make sure your iPhone is set up the way you want it. Whether you are using an iPhone 13 Pro Max or an iPhone 11 Pro Max, these steps will help you keep your phone secure and your calls private.
Conclusion
Disabling call forwarding on an iPhone is simple and quick. Just follow the steps outlined above. By doing so, you regain control over your incoming calls. Enjoy uninterrupted communication and manage your calls more efficiently. Share this guide with friends who might need it.
Thanks for reading!