
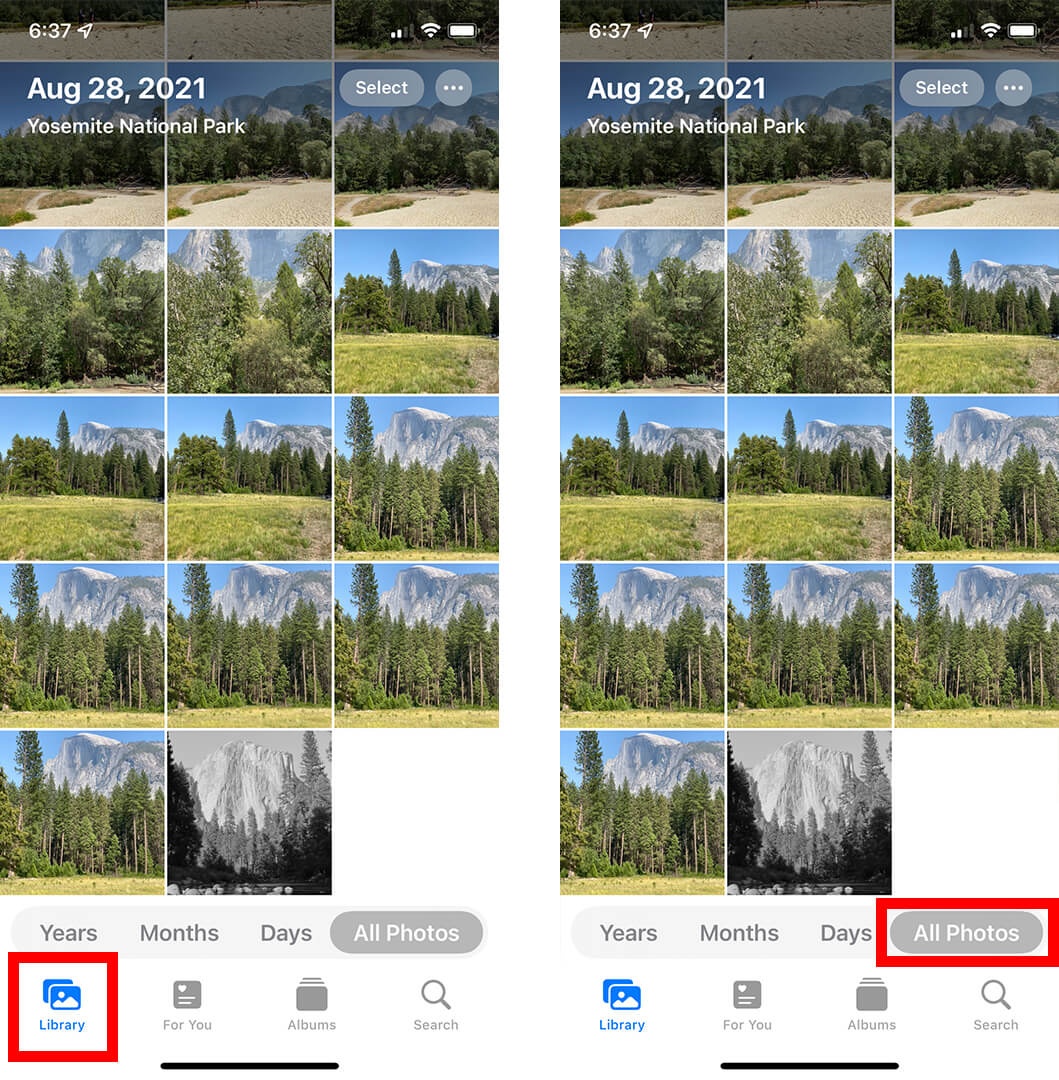
How to delete iPhone all photos, open the Photos app and select “All Photos.” Then, tap “Select,” choose all, and delete.
Deleting all photos on your iPhone can free up valuable storage space and help improve device performance. The process is straightforward, requiring just a few taps in the Photos app. This task can be particularly beneficial if your phone’s memory is running low or you’re preparing to sell or give away your device.
Regularly clearing out your photo library can also make it easier to organize and manage new photos. Understanding how to efficiently delete all photos ensures a clutter-free and more responsive iPhone, contributing to a better user experience.
How to Delete iPhone All Photos?
Preparing Your Iphone
Before you delete all photos from your iPhone, it’s crucial to prepare your device. Proper preparation ensures you don’t lose important data. Let’s dive into the necessary steps.
Back Up Your Photos
First, always back up your photos. This ensures you don’t lose precious memories. There are a few ways to back up your photos:
- Use iCloud to store your photos online.
- Transfer photos to your computer using a USB cable.
- Utilize third-party apps like Google Photos.
To back up using iCloud:
- Open Settings on your iPhone.
- Tap your Apple ID at the top.
- Select iCloud, then Photos.
- Toggle on iCloud Photos.
Check Storage Space
Next, check your iPhone’s storage space. This helps you understand how much space your photos are taking.
To check storage space:
- Open Settings on your iPhone.
- Tap General.
- Select iPhone Storage.
You will see a breakdown of your storage usage. This information is crucial for managing your data effectively.
Deleting Photos Using The Photos App
Deleting photos from your iPhone can help free up storage. Using the Photos app is the easiest way. Follow these steps to delete photos efficiently.
Select All Photos
Open the Photos app on your iPhone. Go to the Albums tab. Tap on All Photos. This will show all your photos.
To select all photos, tap Select at the top right corner. Then, drag your finger across the screen. Scroll down to select multiple photos. Repeat this process until all photos are selected.
Confirm Deletion
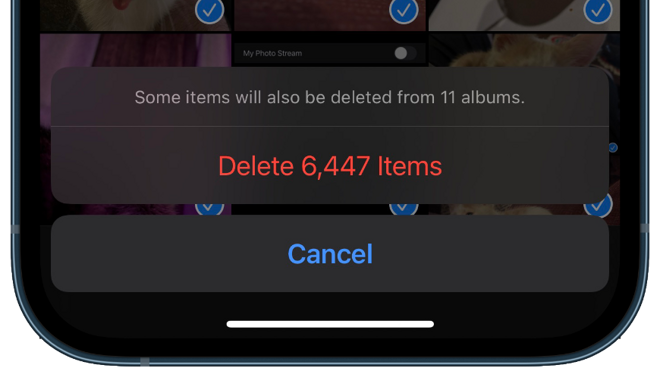
After selecting all photos, tap the Trash Bin icon. A confirmation message will appear. It will ask if you want to delete the selected photos.
Tap Delete [number] Photos to confirm. Your photos will move to the Recently Deleted album. They will stay there for 30 days before being permanently deleted.
To permanently delete them immediately, go to Albums > Recently Deleted. Tap Select, then Delete All. Confirm the deletion to free up space right away.
Using Icloud To Delete Photos
Deleting photos from your iPhone can free up space. Using iCloud makes this process easier. With iCloud, you can manage your photos from any device. This ensures that your photos are synced and deleted across all devices. Follow these steps to delete iPhone photos using iCloud.
Turn Off Icloud Photos
To start, you need to turn off iCloud Photos. This will stop syncing photos between your iPhone and iCloud.
- Open Settings on your iPhone.
- Tap on your name at the top.
- Go to iCloud.
- Select Photos.
- Toggle off iCloud Photos.
Delete From Icloud
After turning off iCloud Photos, you can delete your photos from iCloud.
- Go to iCloud.com on your computer.
- Log in with your Apple ID.
- Click on Photos.
- Select the photos you want to delete.
- Click the Trash icon.
- Confirm deletion by clicking Delete.
Deleting your photos from iCloud ensures they are removed from all devices. This method is effective and saves space on your iPhone.
Deleting Photos From Recently Deleted Folder
Deleting photos from your iPhone involves multiple steps. One important step is to clear the Recently Deleted folder. This folder stores photos for 30 days before permanent deletion. Learn how to access and delete photos from this folder.
Access Recently Deleted
First, open the Photos app on your iPhone. Tap on the Albums tab at the bottom of the screen. Scroll down to find the Recently Deleted album. Tap on it to view all recently deleted photos.
Permanently Delete Photos
Inside the Recently Deleted album, you’ll see all photos marked for deletion. To permanently delete these photos, tap Select at the top right corner. Choose the photos you want to delete by tapping each photo. Once selected, tap Delete All at the bottom.
A confirmation pop-up will appear. Tap Delete Photos to confirm. This action will permanently delete the selected photos from your iPhone.
Using Third-party Apps
Deleting all photos from an iPhone can be daunting. Using third-party apps makes the process easier and faster. These apps provide additional features to manage and delete photos efficiently.
Popular Apps
There are several popular apps for deleting photos on iPhone. Some of the best include:
- Gemini Photos: This app helps find and delete duplicate photos.
- Clean My Photos: It offers easy photo management and deletion.
- Photo Cleaner: This app helps organize and delete unnecessary photos.
Steps To Follow
Here are the steps to delete all photos using third-party apps:
- Download and install the app from the App Store.
- Open the app and grant necessary permissions.
- Use the app’s features to select all photos.
- Tap on the delete option to remove photos.
- Confirm the deletion to finalize the process.
These steps ensure a clean and organized photo library on your iPhone. Using these third-party apps can save time and effort.
Troubleshooting Common Issues
Deleting all photos on your iPhone should be simple. Sometimes issues can arise that prevent photos from being deleted or storage from updating correctly. This section will help you troubleshoot common issues and ensure your iPhone is free of unwanted photos.
Photos Not Deleting
If your photos are not deleting, try the following steps:
- Ensure you have a stable internet connection.
- Check if the photos are in your Recently Deleted album.
- Restart your iPhone to refresh the system.
- Update your iPhone to the latest iOS version.
Still having trouble? It could be a sync issue with iCloud. Disable and re-enable iCloud Photos by going to Settings > [Your Name] > iCloud > Photos and toggling the switch.
Storage Not Updating
Sometimes, your storage may not update after deleting photos. Follow these steps to fix it:
- Empty the Recently Deleted album.
- Go to Settings > General > iPhone Storage.
- Wait for the storage calculation to complete.
- If still not updated, restart your iPhone.
If these steps don’t work, reset your iPhone’s settings. Go to Settings > General > Reset > Reset All Settings. This won’t delete your data but will reset system settings.
Restoring Deleted Photos
Sometimes, you might accidentally delete important photos from your iPhone. Don’t worry! You can restore them easily using backups. Let’s explore two effective ways to restore deleted photos.
Using Icloud Backup
iCloud backups are a lifesaver for restoring deleted photos. Follow these steps:
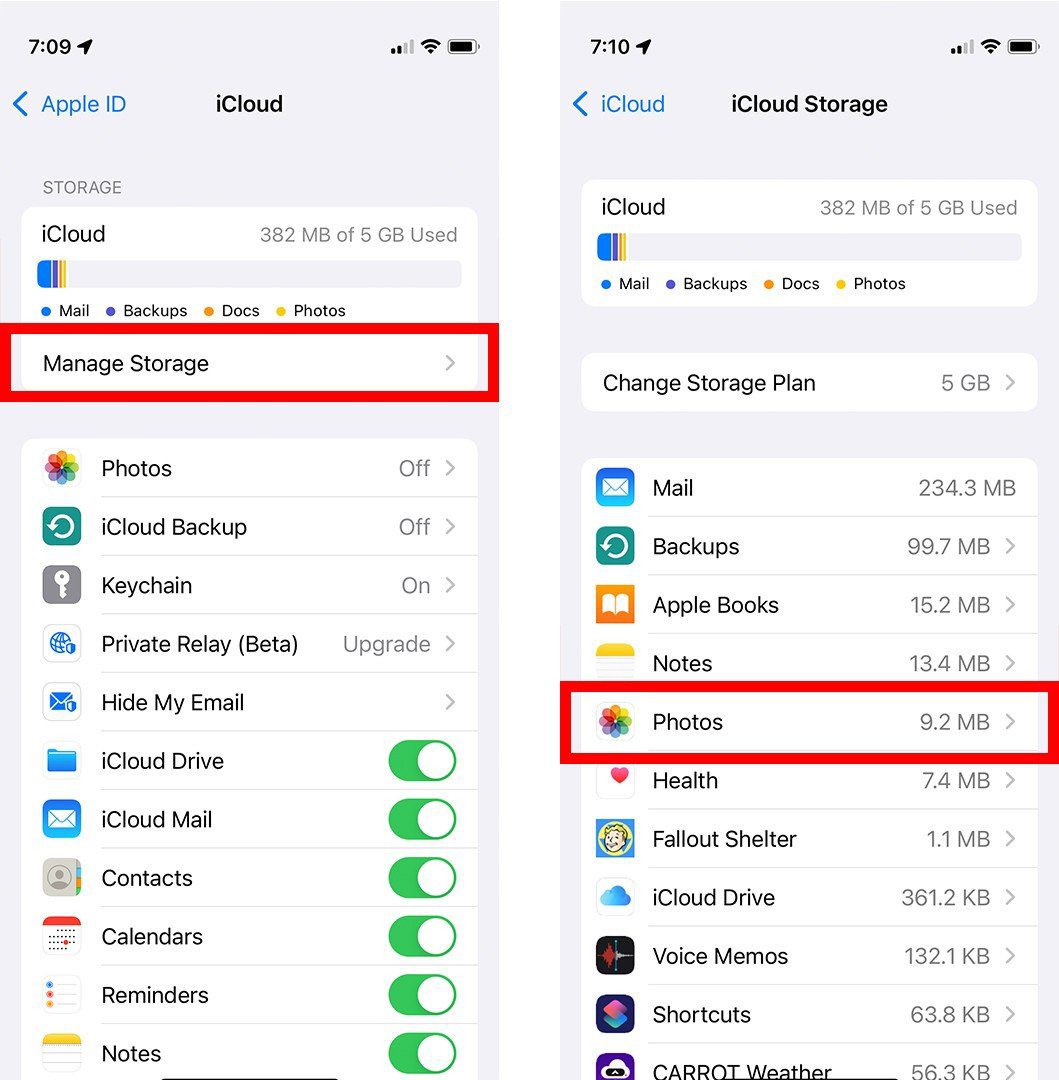
- Check iCloud Backup: Go to
Settings > [your name] > iCloud > Manage Storage > Backups. - Reset Your iPhone: Navigate to
Settings > General > Reset > Erase All Content and Settings. Confirm your action. - Restore from iCloud: During setup, choose
Restore from iCloud Backup. Select the most recent backup.
Your photos will be restored along with other data.
Using Itunes Backup
iTunes backups provide another method to restore deleted photos. Here’s how:
- Connect to iTunes: Open iTunes on your computer. Connect your iPhone using a USB cable.
- Access Device Summary: Select your iPhone icon in iTunes. Go to the
Summarytab. - Restore Backup: Click
Restore Backup. Choose the most recent backup from the list. - Confirm: Click
Restore. Wait for the process to complete.
Once done, your photos and other data will be restored.
| Method | Steps |
|---|---|
| Using iCloud Backup |
|
| Using iTunes Backup |
|
Tips For Managing Photos
Managing your iPhone photos can be a daunting task. Here are some simple tips to keep your photo library organized and clutter-free. These strategies will help you easily find and protect your precious memories.
Organize By Albums
One of the best ways to manage your photos is to organize by albums. Creating albums can help you group similar photos together.
- Open the Photos app on your iPhone.
- Tap on the ‘Albums’ tab at the bottom.
- Press the ‘+’ icon to create a new album.
- Give your album a name and add photos to it.
Albums can help you quickly locate specific photos.
Regularly Backup
Regularly backing up your photos is crucial. This ensures you don’t lose precious memories.
- Connect your iPhone to Wi-Fi.
- Open Settings on your iPhone.
- Tap your name at the top, then select iCloud.
- Tap iCloud Backup.
- Toggle the iCloud Backup switch to on.
- Tap Back Up Now.
Backing up your photos ensures they are safe and can be restored if needed.
Conclusion
Deleting all photos on your iPhone is straightforward with the right steps. Follow our guide for a clutter-free gallery. Ensure you back up important images before proceeding. Regularly clearing photos can optimize your iPhone’s performance. Stay organized and enjoy more storage space on your device.
Happy decluttering!