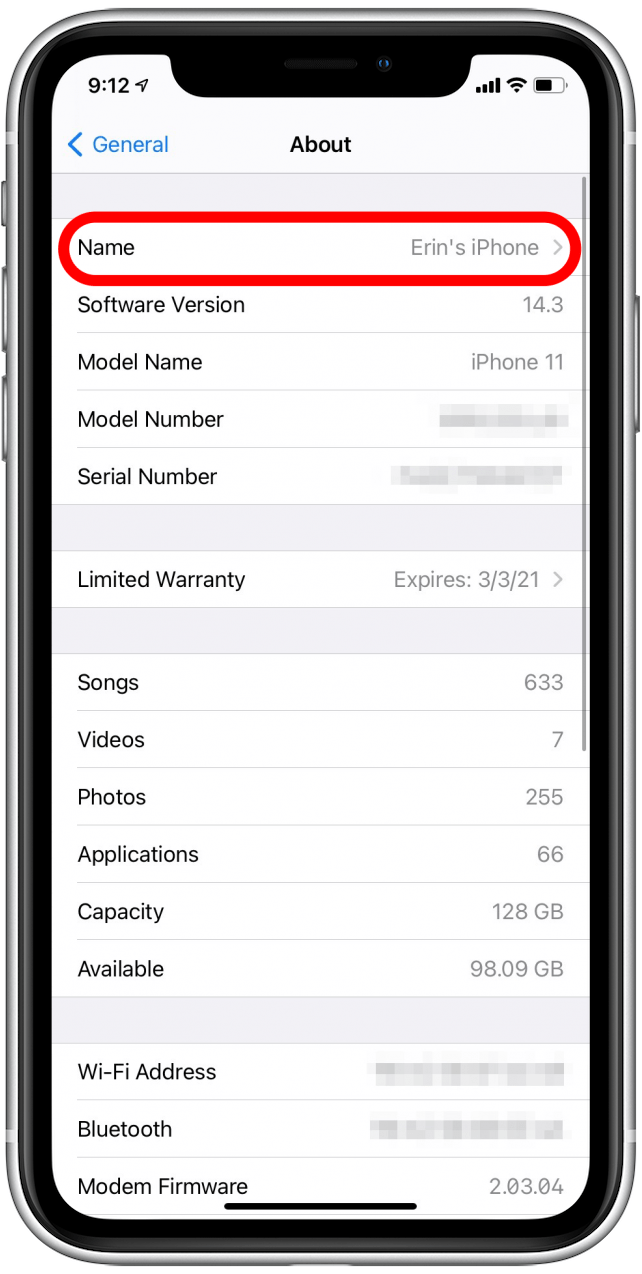
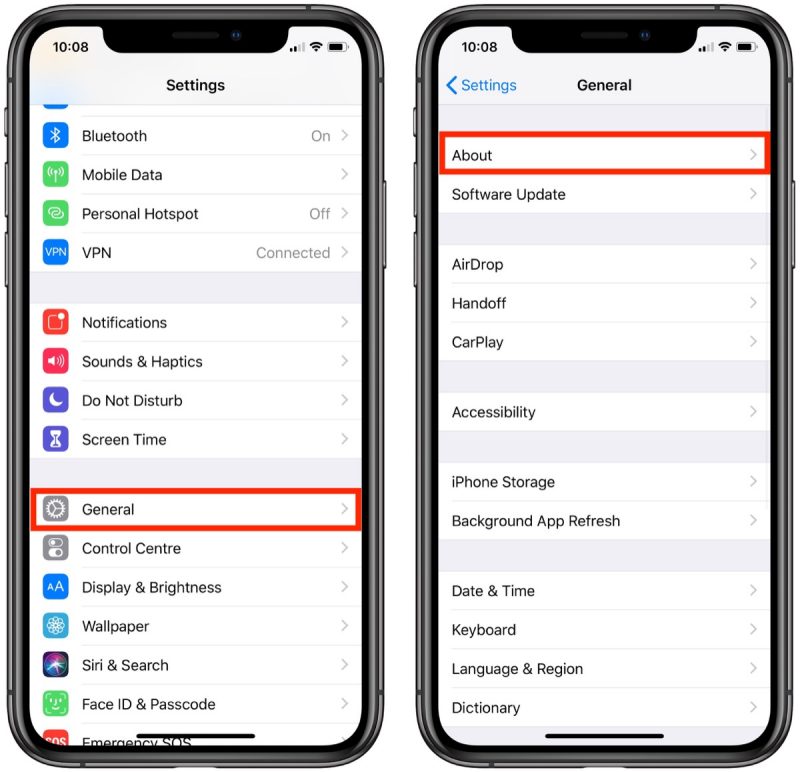
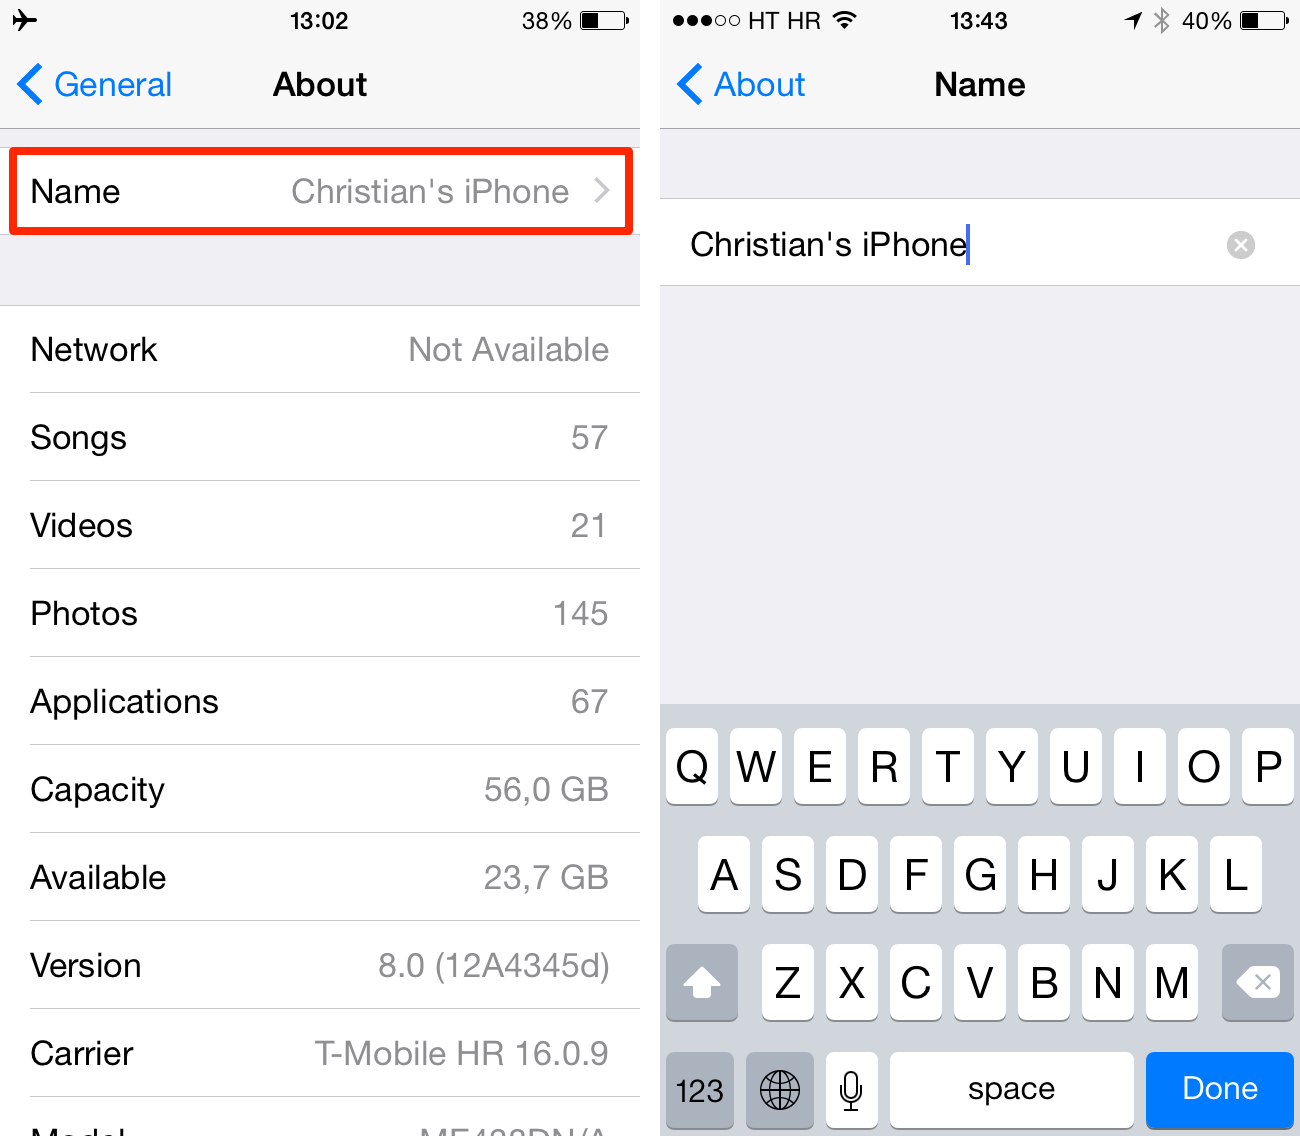
How to Change the Name on the iPhone, go to Settings > General > About > Name. Enter the new name and tap Done.
Changing your iPhone’s name is simple and quick. This customization helps distinguish your device, especially if you own multiple Apple products. It also makes it easier to identify your iPhone when connecting to Bluetooth devices or Wi-Fi networks. Personalizing your device’s name can enhance your user experience by making it uniquely yours.
This guide will show you how to effortlessly change your iPhone’s name in just a few steps. With this adjustment, managing your device becomes more intuitive and organized. Start now to give your iPhone a personalized touch.
How to Change the Name on the iPhone?
Preparing For The Change

Changing the name on your iPhone can be a simple task. Before you start, it’s important to prepare properly. This ensures a smooth transition and avoids potential issues. Here’s a step-by-step guide to help you prepare for the change.
Backup Your Data
Before making any changes, always backup your data. This protects your information if something goes wrong.
- Open Settings on your iPhone.
- Tap on your Apple ID at the top.
- Select iCloud and then iCloud Backup.
- Tap Back Up Now to start the backup process.
Ensure the backup is complete before proceeding to the next steps.
Ensure Software Is Up-to-date
Updating your software can prevent compatibility issues. Here’s how to check for updates:
- Open Settings on your iPhone.
- Scroll down and tap on General.
- Select Software Update.
- If an update is available, tap Download and Install.
Make sure your iPhone is connected to Wi-Fi and has enough battery life.
| Step | Description |
|---|---|
| 1 | Open Settings. |
| 2 | Tap on General. |
| 3 | Tap Software Update. |
| 4 | Tap Download and Install if an update is available. |
Having the latest software ensures your iPhone runs smoothly.
Accessing Settings
To change the name on your iPhone, you must access the settings. The settings app holds all the customization options for your device. Follow these steps to find the right menu.
Opening The Settings App
First, locate the Settings app on your iPhone. It looks like a gear icon and is usually on your home screen. Tap the icon to open it.
Navigating To General
Once inside the Settings app, scroll down until you see the General option. Tap on General to open more settings. This is where you can make many changes to your iPhone.
Locating The Name Option
Changing the name on your iPhone is simple. This guide will help you locate the name option. Follow these easy steps to find and change your iPhone’s name.
Finding About Section
First, you need to access the Settings app on your iPhone. Look for the gear icon on your home screen.
- Open the Settings app.
- Scroll down and tap General.
- In the General menu, tap About.
You are now in the About section. This is where you will find the current name of your iPhone.
Identifying Current Name
Within the About section, look for the Name field. This field displays the current name of your iPhone.
- Tap on the Name field.
- The current name will be highlighted.
- Enter the new name you want.
Once you enter the new name, tap Done. Your iPhone now has a new name.
Changing The Name
Changing the name of your iPhone is very easy. It helps to personalize your device. This guide will show you how.
Tapping On The Name Field
First, open the Settings app on your iPhone. Scroll down and tap on General. Next, find and tap on About. You will see the current name of your iPhone. Tap on it to change it.
Entering The New Name

After tapping on the name field, a keyboard will appear. Simply type the new name for your iPhone. Make sure it is unique and easy to remember. Once you are done, tap Done on the keyboard.
Changing the name of your iPhone can make it easier to identify. This is especially useful if you have multiple Apple devices.
Saving The Changes
After you have changed your iPhone’s name, saving the new name is crucial. This ensures that the new name appears across all devices and services. Here’s a step-by-step guide on how to save these changes effectively.
Confirming The New Name
First, make sure your new name is correct. Double-check the spelling and format. Once you are satisfied with the new name, you need to confirm it.
- Tap “Done” at the top-right corner of the screen.
- Your iPhone will save the new name automatically.
- Go back to the main settings page to ensure the name has changed.
Restarting Your Iphone
Restarting your iPhone helps apply the changes across all services. Follow these steps:
- Press and hold the side button and volume up button.
- Slide to power off your iPhone.
- Wait for a few seconds, then press and hold the side button again to turn it back on.
Once your iPhone restarts, it should display the new name in all settings and services.
| Step | Action |
|---|---|
| 1 | Tap “Done” to save the new name. |
| 2 | Press and hold the side button and volume up button. |
| 3 | Slide to power off your iPhone. |
| 4 | Restart your iPhone to apply changes. |
By following these steps, your iPhone’s new name will be saved and visible across all services.
Verifying The New Name
After changing the name on your iPhone, it’s essential to verify it. Checking the new name ensures that all services recognize the change. We’ll guide you through the process using iTunes and iCloud.
Checking In Itunes
To verify the new name in iTunes, follow these steps:
- Connect your iPhone to your computer using a USB cable.
- Open iTunes on your computer.
- Select your iPhone icon at the top-left corner.
- Check the device name displayed. It should match the new name.
Confirming In Icloud
To ensure the new name appears in iCloud, follow these steps:
- Open the Settings app on your iPhone.
- Tap your name at the top of the screen.
- Select iCloud.
- Scroll down to see the list of devices connected to your iCloud account.
- Verify that your iPhone’s new name is listed correctly.
| Platform | Steps to Verify |
|---|---|
| iTunes |
|
| iCloud |
|
Troubleshooting Common Issues
Changing your iPhone’s name can sometimes lead to issues. Here are solutions to common problems you might face.
Name Not Updating
If your iPhone’s new name doesn’t show, try these steps:
- Ensure your iPhone is connected to the internet.
- Restart your iPhone to refresh settings.
- Update your iOS to the latest version.
Still not working? Reset network settings. Go to Settings > General > Reset > Reset Network Settings.
Reverting To Old Name

If your iPhone reverts to its old name, check these:
- Make sure to save the new name properly.
- Check iCloud sync settings. Go to Settings > Your Name > iCloud.
- Disable and re-enable iCloud if needed.
Another solution is to reset all settings. Go to Settings > General > Reset > Reset All Settings.
Conclusion
Changing the name on your iPhone is simple and straightforward. By following the steps outlined, you can easily personalize your device. This quick customization can enhance your user experience. Remember to save your changes to ensure they take effect. Enjoy your newly named iPhone!


