
How to add screen recording to iPhone, go to Settings, then Control Center, and tap the green “+” next to Screen Recording. Access it via the Control Center.
Screen recording on an iPhone is a valuable feature for capturing on-screen activities. Whether you need to create tutorials, save gameplay, or record video calls, adding screen recording to your device is straightforward. This feature allows users to document and share their screen content effortlessly.
It’s especially useful for educators, content creators, and anyone who needs to share visual information. With just a few taps, you can enable screen recording and start capturing high-quality videos directly from your iPhone. This guide will walk you through the simple steps to activate and use screen recording on your device.
How to Add Screen Recording to iPhone?
Introduction To Screen Recording
Screen recording lets you capture your iPhone screen. It’s useful for many tasks. You can record tutorials or save video calls. Adding this feature is easy. Let’s explore how to do it.
Why Screen Recording Is Useful
- Create Tutorials: Show others how to use apps.
- Save Video Calls: Keep important calls for later.
- Share Gameplays: Record and share your gaming moments.
- Document Issues: Record bugs to show tech support.
Devices Compatible With Screen Recording
Screen recording is available on many Apple devices. Here is a list:
| Device | Operating System |
|---|---|
| iPhone SE (2nd generation) and later | iOS 14 and later |
| iPhone 6s and later | iOS 11 and later |
| iPad (5th generation) and later | iPadOS 14 and later |
| iPad mini 4 and later | iPadOS 11 and later |
Preparing Your Iphone
Before you start screen recording on your iPhone, you need to prepare it properly. This includes checking your iOS version and ensuring you have enough storage space.
Check Ios Version
Screen recording is available on iPhones running iOS 11 and later versions. Follow these steps to check your iOS version:
- Open the Settings app.
- Scroll down and tap General.
- Tap About.
- Look for the Software Version number.
If your iOS version is below 11, you need to update it. Follow these steps to update your iOS:
- Go to Settings.
- Tap General.
- Select Software Update.
- If an update is available, tap Download and Install.
Ensure Sufficient Storage
Screen recordings take up storage space. Make sure you have enough free space on your iPhone. Follow these steps to check your storage:
- Open the Settings app.
- Tap General.
- Select iPhone Storage.
Here you will see a breakdown of your storage usage. If your storage is almost full, consider freeing up space:
- Delete unused apps.
- Remove old photos and videos.
- Clear cache from apps.
Enabling Screen Recording
Screen recording on an iPhone is a handy feature. It allows you to capture and share what’s happening on your screen. This guide will walk you through the steps to enable screen recording.
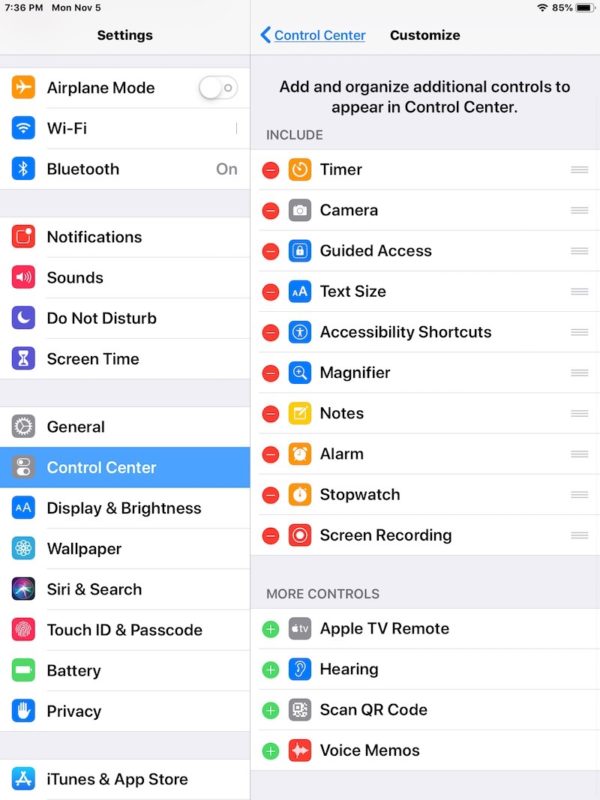
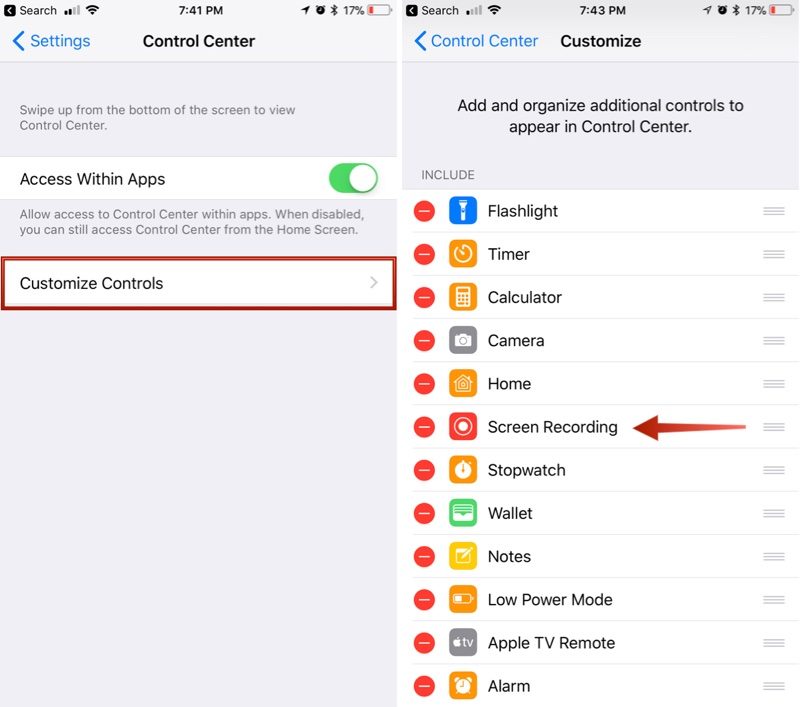
Accessing Control Center
To start, you need to access the Control Center. Follow these simple steps:
- Open your iPhone and go to the Settings app.
- Scroll down and tap on Control Center.
- Select Customize Controls.
Adding Screen Recording Button
Next, we will add the screen recording button to your Control Center. Follow these steps:
- In the Customize Controls section, find the Screen Recording option.
- Tap the green + button next to Screen Recording.
- Now, the screen recording button will appear in your Control Center.
You can now start screen recording easily. Swipe down from the top-right corner of your screen to open the Control Center. Tap the screen recording button to begin recording.
Starting A Screen Recording
Screen recording on an iPhone is very useful. You can capture anything on your screen. This guide will help you start a screen recording easily.
Initiating From Control Center
First, you need to add the screen recording feature. Go to your iPhone’s Settings. Then, tap on Control Center. Next, tap on Customize Controls. Find Screen Recording in the list. Tap the green + button next to it. Now, Screen Recording will be added to the Control Center.
To start recording, swipe down from the top-right corner of the screen. You will see the Control Center. Tap the Screen Recording button. A three-second countdown will begin. Your screen recording will start after the countdown.
Customizing Recording Settings
You can customize your screen recording settings. To do this, go to Settings. Then, tap on Control Center and then Customize Controls. Find Screen Recording and tap the green + button.
To include audio in your recording, press and hold the Screen Recording button in the Control Center. A menu will appear. Tap the Microphone Audio button to turn it on. Now, your recording will include both video and sound.
You can also choose where to save your recording. Tap the Screen Recording button. Then, select a location like Photos or Files. Your recording will be saved to the chosen location.
With these steps, you can easily start and customize screen recordings on your iPhone.
Managing Screen Recordings
Once you have recorded your screen on your iPhone, the next step is to manage these recordings effectively. This section will guide you on how to stop a recording and locate your saved recordings. Managing your screen recordings ensures you can easily find and use them when needed.
Stopping The Recording
Stopping a screen recording on your iPhone is simple. Follow these steps:
- Tap the red status bar at the top of your screen.
- A confirmation prompt will appear.
- Tap Stop to end the recording.
Your screen recording will automatically save to your Photos app. You can also stop the recording by opening the Control Center and tapping the Screen Recording button again.
Locating Saved Recordings
Finding your saved screen recordings is easy. Here’s how:
- Open the Photos app on your iPhone.
- Tap on the Albums tab at the bottom of the screen.
- Scroll down to the Media Types section.
- Select Screen Recordings.
All your saved screen recordings will be in this folder. You can view, edit, and share them from here. This method ensures you can quickly access and manage your recordings.
| Action | Steps |
|---|---|
| Stop Recording |
|
| Locate Recording |
|
Editing Your Screen Recordings
Once you have recorded your screen, you might want to edit it. Editing can help you highlight key moments. You can also remove unnecessary parts. Below are some tips to make your screen recordings look professional.
Trimming Clips
Trimming your clips is the first step in editing. This helps you cut out any unwanted sections. Follow these steps to trim your screen recordings:
- Open the Photos app and find your recording.
- Tap on the video to open it.
- Click on Edit in the top-right corner.
- Use the sliders at the bottom to adjust the start and end points.
- Tap Done to save your changes.
Trimming ensures only the important parts are shown. This keeps your video concise and engaging.
Adding Annotations
Adding annotations can help explain your content better. You can highlight areas or add text to your screen recording. Here’s how to add annotations:
- Open the recording in the Photos app.
- Tap Edit and then click on the Markup icon.
- Select the pen or highlighter tool.
- Draw on your video to highlight important parts.
- Use the text tool to add labels or comments.
Annotations make your video more interactive and informative. They guide the viewer’s attention to key points.
Sharing Your Recordings
After recording your iPhone screen, sharing the recording is the next step. You can share your screen recordings effortlessly. This guide will show you how to share your recordings using AirDrop and uploading to social media.
Using Airdrop
AirDrop is a quick way to share files between Apple devices. To use AirDrop, follow these steps:
- Open the Photos app and find your screen recording.
- Tap the share button at the bottom left.
- Select AirDrop from the share options.
- Choose the device you want to share with.
- Wait for the other device to accept the file.
Make sure both devices have Bluetooth and Wi-Fi turned on. Keep the devices close to each other. AirDrop is fast and secure.
Uploading To Social Media
You can upload your screen recordings to social media platforms. Follow these steps to upload:
- Open the Photos app and select your recording.
- Tap the share button at the bottom left.
- Choose the social media app you want to use.
- Add a caption, tags, or hashtags as needed.
- Tap the Post button to upload.
Popular social media platforms include Facebook, Instagram, Twitter, and YouTube. Ensure your apps are updated. Check privacy settings before uploading.
| Platform | Steps to Upload |
|---|---|
| 1. Select Facebook from share options. 2. Add a caption. 3. Tap Post. | |
| 1. Select Instagram from share options. 2. Choose Feed or Story. 3. Add tags or filters. 4. Tap Share. | |
| 1. Select Twitter from share options. 2. Add a tweet text. 3. Tap Tweet. | |
| YouTube | 1. Select YouTube from share options. 2. Add a title and description. 3. Tap Upload. |
Troubleshooting Common Issues
Screen recording on an iPhone is a handy feature. But sometimes, you might face issues. This section covers common problems and solutions.
Resolving Recording Failures
Screen recording might fail for several reasons. Here are some common causes and fixes:
- Insufficient Storage: Check if your iPhone has enough storage.
- Software Glitches: Restart your iPhone to resolve minor glitches.
- Update iOS: Make sure your iPhone’s software is up to date.
Ensure you have enough storage space. Go to Settings > General > iPhone Storage. Delete unwanted files if needed. Restart your iPhone by holding the power button. Update your iPhone by going to Settings > General > Software Update.
Fixing No Sound Issues
Sometimes, screen recordings might have no sound. Here’s how to fix it:
- Microphone Access: Ensure the microphone is enabled.
- Volume Levels: Check the volume levels on your iPhone.
- Restart Device: Restart your iPhone to refresh the system.
Enable the microphone by long-pressing the screen recording button in the Control Center. Tap the Microphone Audio icon to turn it on. Ensure the volume is not muted. Adjust volume using the side buttons.
If these steps don’t work, restart your iPhone. This often resolves sound issues.
Advanced Tips And Tricks
Screen recording on an iPhone can be simple. But to make the most of it, advanced users often seek more control and features. Here are some advanced tips and tricks to enhance your screen recording experience.
Using Third-party Apps
While the built-in screen recording feature is great, third-party apps offer more capabilities. These apps can provide higher quality recordings and additional editing tools. Here are some popular choices:
- DU Recorder: This app is free and easy to use. It allows you to record your screen and edit the video within the app. You can also livestream your screen to various platforms.
- TechSmith Capture: This is a powerful tool for creating professional-quality screen recordings. It offers a variety of annotation tools and integrates well with other TechSmith products.
- ScreenFlow: This app is known for its robust editing features. It’s perfect for users who need more control over their recordings. It also supports recording from multiple screens simultaneously.
Recording With External Audio
Recording screen with external audio adds a new dimension to your videos. It’s perfect for creating tutorials or presentations. Here’s how you can do it:
- First, connect an external microphone to your iPhone. You can use a lightning to 3.5mm adapter if needed.
- Next, open the Control Center by swiping down from the top-right corner of your screen.
- Press and hold the Screen Recording button.
- Tap the microphone icon to turn on external audio recording.
- Finally, tap Start Recording to begin capturing both your screen and external audio.
Using an external microphone can greatly improve the audio quality of your recordings. Make sure to test your setup before starting your final recording.

Conclusion
Mastering screen recording on your iPhone enhances productivity and creativity. The steps are simple and quick to follow. Customize settings to suit your needs. Capture and share content effortlessly. Start using this feature today and experience its benefits firsthand. Enjoy a seamless screen recording experience on your iPhone.