
How to Add Ringtones to iPhone, use iTunes or GarageBand to transfer custom ringtones. Connect your iPhone to your computer and sync.
Adding custom ringtones to your iPhone personalizes your device and makes it stand out. Apple’s default ringtones can become monotonous over time. Custom ringtones can range from your favorite song to a unique sound effect, providing a refreshing change. The process is straightforward and requires either iTunes or GarageBand, both of which are user-friendly.
By following a few simple steps, you can easily transfer and set new ringtones. This guide will help you navigate through the process, ensuring your iPhone’s sounds are as unique as you are. Enjoy the freedom of customizing your phone’s audio alerts.
How to Add Ringtones to iPhone?
Introduction To Custom Ringtones
Tired of the same old iPhone ringtones? Custom ringtones can make your phone unique. They let you hear your favorite sounds when someone calls.
Adding custom ringtones to your iPhone is easy. This guide will show you how. Follow these simple steps and enjoy your personalized sounds.
Why Personalize Ringtones
Custom ringtones are more than just fun. They help you recognize calls instantly. You can set different tones for friends and family.
Personalizing ringtones also lets you express yourself. Choose sounds that reflect your personality. Make your phone truly yours.
Benefits Of Custom Sounds
- Unique Identity: Stand out with distinctive ringtones.
- Quick Recognition: Know who’s calling without looking.
- Fun and Creative: Enjoy a variety of sounds and music.
Custom sounds can also be practical. Use them for alarms and reminders. Make your iPhone more useful every day.
Choosing The Right Software
Adding ringtones to your iPhone can be a fun process. Choosing the right software is key. It makes the task simple and efficient. Below, we’ll explore two popular options: iTunes for Windows and GarageBand for Mac.
Itunes For Windows
iTunes is a versatile tool for Windows users. It helps manage music and ringtones. Follow these steps to add ringtones using iTunes:
- Download and install iTunes from the official site.
- Open iTunes and connect your iPhone.
- Select the song you want as a ringtone.
- Right-click on the song and select “Get Info”.
- Go to the “Options” tab and set the start and stop time (up to 30 seconds).
- Click “OK” and right-click the song again.
- Select “Create AAC Version”.
- Locate the new file, change its extension from .m4a to .m4r.
- Drag and drop the .m4r file into your iTunes library.
- Sync your iPhone to transfer the ringtone.
Garageband For Mac
GarageBand is perfect for Mac users. It offers a simple way to create ringtones. Follow these steps to use GarageBand:
- Open GarageBand on your Mac.
- Select “New Project” and choose “Ringtone”.
- Drag your chosen song into the project area.
- Edit the song length to 30 seconds or less.
- Click “Share” in the top menu and choose “Ringtone to iTunes”.
- Name your ringtone and export it.
- Connect your iPhone to your Mac.
- Open iTunes and sync your new ringtone.
Preparing Your Audio File
Before you can set a custom ringtone on your iPhone, you need to prepare your audio file. This process includes selecting the perfect clip and trimming the audio to the desired length. Let’s dive into these steps to ensure your ringtone sounds just right.
Selecting The Perfect Clip
Choosing the right audio clip is crucial. The clip should be catchy and recognizable. Follow these steps to select the perfect clip:
- Pick a song or sound you love.
- Make sure it’s high quality.
- Ensure it’s free from copyright issues.
Once you have your audio file, you are ready to trim it to the right length.
Trimming The Audio
Ringtones should be short and sweet. Aim for 30 seconds or less. Use an audio editor to trim the file. Here’s how to do it:
- Open your audio editor.
- Import your chosen audio file.
- Select the start and end points.
- Make sure the clip is under 30 seconds.
- Save the trimmed file in a compatible format.
Popular formats include MP3 and AAC. Ensure the file is clear and loud enough to hear.
With your audio file prepared, you are now ready to add it to your iPhone. Stay tuned for more steps in our next section!
Converting Audio To Ringtone Format
Creating a custom ringtone for your iPhone is fun. You can use your favorite song or a unique sound. First, you need to convert your audio file to the right format. This guide will show you how to do it.
Using Itunes For Conversion
iTunes is a popular tool for converting audio files. Follow these steps to make a ringtone:
- Open iTunes on your computer.
- Find the song you want to use.
- Right-click the song and select Get Info.
- Go to the Options tab.
- Set the start and stop time for your ringtone. The ringtone should be 30 seconds or less.
- Click OK to save the changes.
- Right-click the song again and select Create AAC Version.
- Find the new version in your library.
- Right-click the new version and select Show in Finder (Mac) or Show in Windows Explorer (Windows).
- Change the file extension from .m4a to .m4r.
- Drag the .m4r file back to iTunes under the Tones section.
Alternative Conversion Tools
If you don’t want to use iTunes, you have other options. Here are some alternative tools:
| Tool | Description |
|---|---|
| GarageBand | A powerful music creation app that can also create ringtones. |
| Audacity | A free audio editor that can export files in .m4r format. |
| Online Converters | Websites like Zamzar or Online Audio Converter can convert files online. |
These tools offer flexibility and convenience. Choose one based on your preference.
Transferring Ringtones To Iphone
Adding custom ringtones to your iPhone can be exciting. It lets you personalize your device. There are different ways to transfer ringtones to your iPhone. Let’s explore them step by step.
Syncing With Itunes
First, connect your iPhone to your computer with a USB cable. Open iTunes on your computer. Ensure you have the latest version of iTunes installed.
- Click on the device icon in iTunes.
- Navigate to the Summary tab.
- Click on Tones under Settings.
- Drag and drop your ringtone file into the iTunes window.
- Click the Sync button to transfer the ringtone to your iPhone.
Your custom ringtone should now be available on your iPhone.
Using Finder On Macos
If you are using macOS Catalina or later, Finder replaces iTunes. Connect your iPhone to your Mac with a USB cable. Open Finder on your Mac.
- Click on your iPhone under Locations in Finder.
- Navigate to the Files tab.
- Drag and drop your ringtone file into the Finder window.
- Wait for the file transfer to complete.
- Check your iPhone for the new ringtone.
Your new ringtone should now be available in your iPhone’s sound settings.
| Method | Steps |
|---|---|
| Using iTunes |
|
| Using Finder |
|
Setting Custom Ringtones On Iphone
Custom ringtones make your iPhone unique and fun. They help you identify calls without looking at your phone. Setting custom ringtones on your iPhone is simple and quick. This guide walks you through the steps.
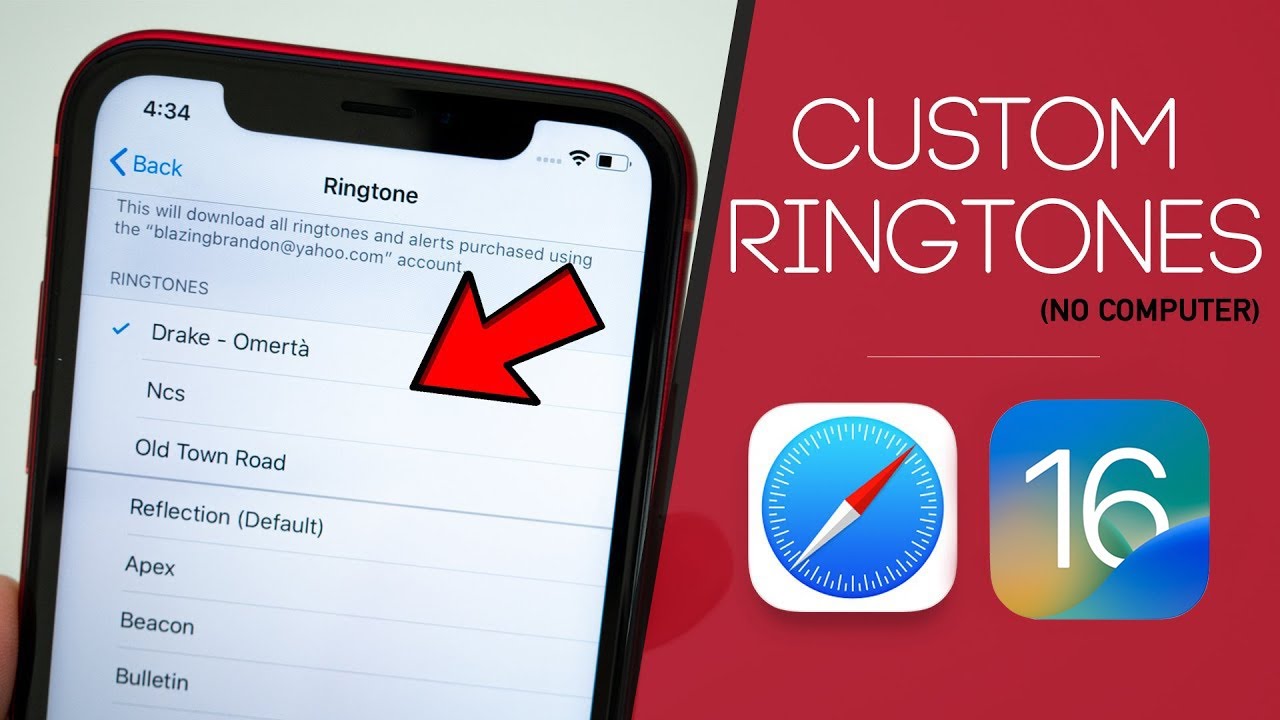
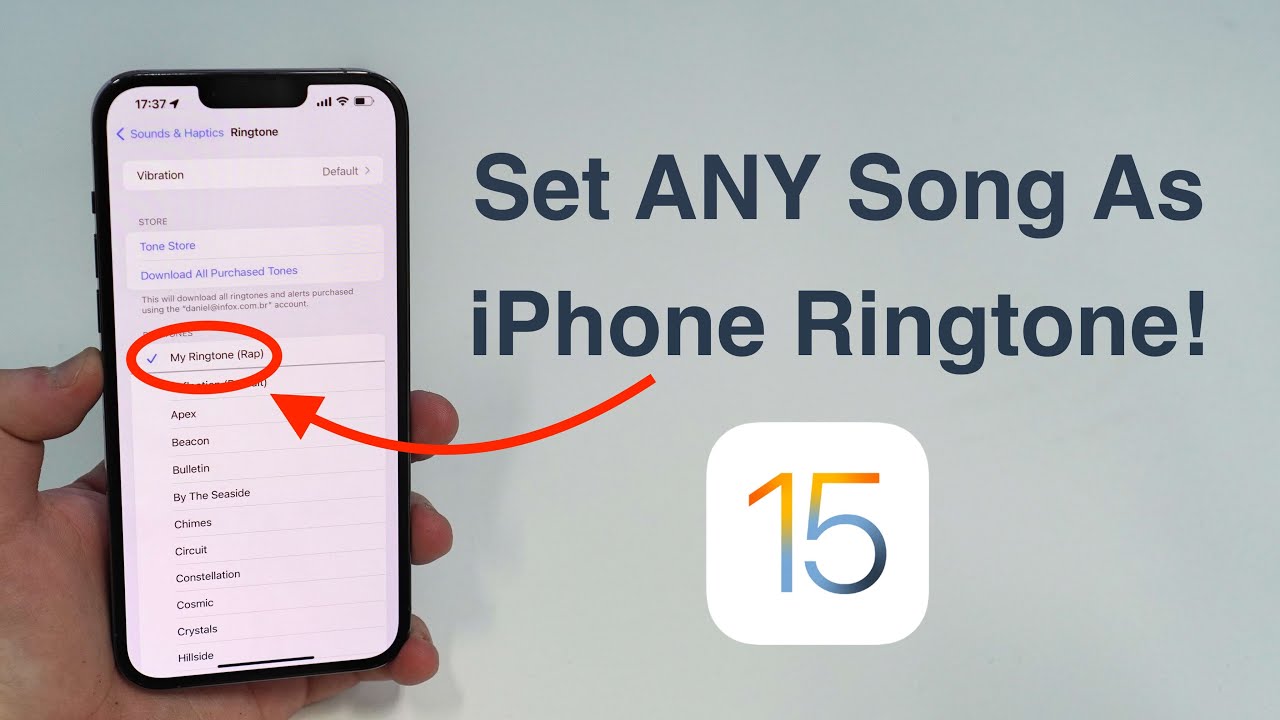
Accessing Sound Settings
To set custom ringtones, start by accessing the sound settings.
- Open the Settings app on your iPhone.
- Scroll down and tap on Sounds & Haptics.
- In the Sounds and Vibration Patterns section, tap on Ringtone.
You will see a list of available ringtones. Here, you can choose a default ringtone or add a new one. Custom ringtones can be added through iTunes or GarageBand.
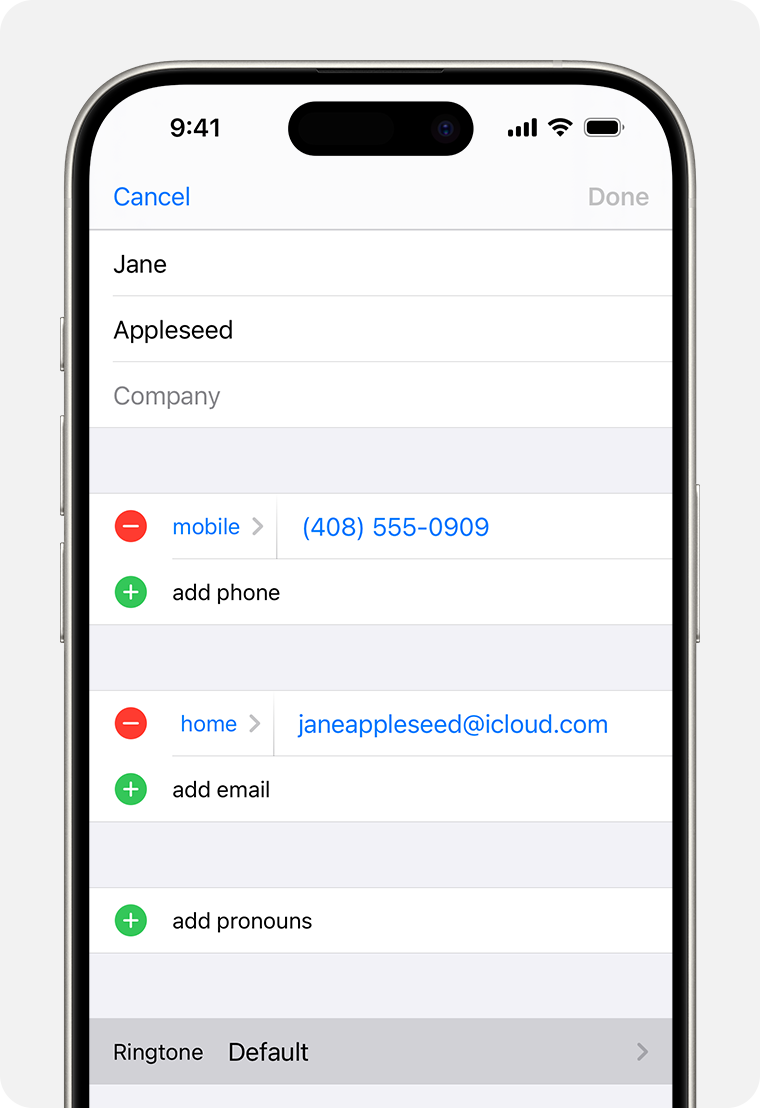
Assigning Ringtones To Contacts
Assigning specific ringtones to contacts helps you know who is calling. Follow these steps:
- Open the Contacts app on your iPhone.
- Select the contact you want to assign a ringtone to.
- Tap on Edit in the top right corner.
- Scroll down and tap on Ringtone.
- Choose the desired ringtone from the list.
- Tap Done to save your changes.
Repeat these steps for other contacts. This way, you can recognize callers by their unique ringtones.
Troubleshooting Common Issues
Adding ringtones to your iPhone can be fun. But sometimes, problems occur. Below are some common issues and their solutions.
Ringtone Not Showing Up
If your ringtone is not showing up, follow these steps:
- Ensure the ringtone is in the correct format: .m4r.
- Check if the ringtone is less than 40 seconds.
- Restart your iPhone after adding the ringtone.
- Go to Settings > Sounds > Ringtone and see if it’s listed.
Sync Problems
Sometimes, syncing issues can cause ringtones not to appear. Try these solutions:
- Ensure you have the latest version of iTunes.
- Check your USB connection. Use a different cable if needed.
- In iTunes, click on your iPhone icon. Then go to Tones.
- Ensure the “Sync Tones” checkbox is checked.
- Click Apply or Sync.
If problems persist, try resetting your iPhone’s sync settings:
- Open Settings on your iPhone.
- Tap General, then Reset.
- Select Reset Network Settings. This will not delete your data.
By following these steps, you can fix common issues. Enjoy your new ringtones!
Exploring Third-party Apps
Adding custom ringtones to your iPhone can be exciting. Third-party apps offer a simple way to customize your device. They provide a variety of tones and sounds to choose from. Let’s explore how these apps can enhance your iPhone experience.
Popular Ringtone Apps
Several apps have gained popularity for offering unique ringtones. Here are some top choices:
- Zedge: Known for its vast library of ringtones and wallpapers.
- Ringtones for iPhone: Offers a range of high-quality tones.
- Tuunes: Features exclusive and trending ringtones.
- Audiko: Allows users to create and share ringtones.
These apps are user-friendly and provide a seamless experience. They often include features like ringtone editors and sound effects.
Safety And Privacy Concerns
Using third-party apps raises safety and privacy issues. It’s important to choose reputable apps. Check app reviews and ratings before downloading. Avoid apps with poor ratings or negative reviews.
Here are some tips to ensure your data stays safe:
- Read Permissions: Be cautious of apps requesting unnecessary permissions.
- Check Privacy Policies: Ensure the app respects your privacy.
- Use Trusted Sources: Download apps from the App Store or known sources.
By following these guidelines, you can enjoy custom ringtones without compromising your security.
Conclusion
Adding ringtones to your iPhone is simple and fun. Follow the steps outlined, and personalize your device effortlessly. Enjoy your new custom ringtones, and make your iPhone truly yours. Stay updated with more tips and tricks to enhance your smartphone experience.
Happy customizing!