
How do i take a screenshot on iPhone, press the Side and Volume Up buttons simultaneously. Release quickly to capture the screen.
Taking screenshots on an iPhone is a straightforward process that allows you to capture and share content quickly. Whether you want to save a conversation, document an error, or share an interesting article, knowing how to take a screenshot efficiently is essential.
This handy feature is available on all iPhone models, with slight variations depending on the model. Mastering this skill can enhance your productivity and streamline your daily tasks. Screenshots can be easily edited, annotated, and shared, making them a versatile tool for both personal and professional use. Follow these simple steps to become proficient at capturing screenshots on your iPhone.
How Do I Take a Screenshot on iPhone?

Different Iphone c
Taking a screenshot on an iPhone can vary by model. Different iPhone models have unique methods for capturing screenshots. Below, we’ll explore the steps for two main types of iPhones: those with Face ID and those with a Home Button.
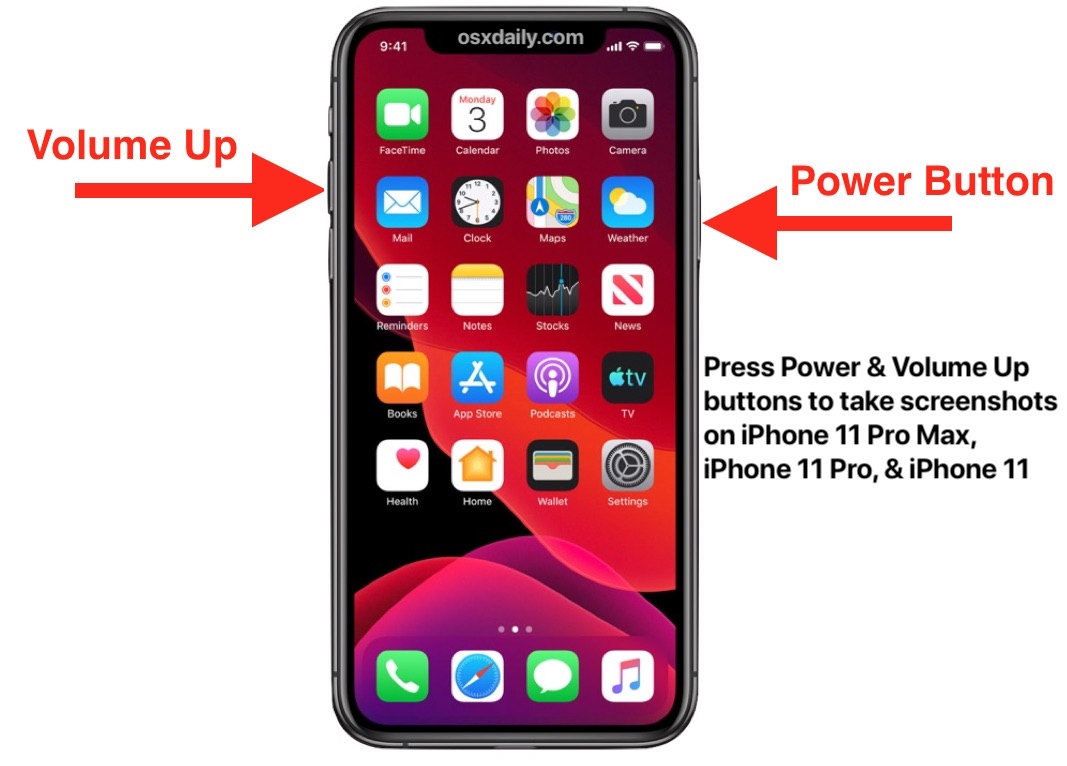
Iphone With Face Id
iPhones with Face ID do not have a Home Button. These models include the iPhone X, XR, XS, 11, 12, 13, and later versions. Follow these simple steps to take a screenshot:
- Locate the Side Button on the right side of your iPhone.
- Locate the Volume Up Button on the left side.
- Press and hold both buttons at the same time.
- Quickly release both buttons.
- A thumbnail of your screenshot will appear in the lower-left corner.
Iphone With Home Button
iPhones with a Home Button include models like the iPhone 8, 7, 6s, SE, and earlier versions. Here are the steps to take a screenshot:
- Locate the Home Button on the front of your iPhone.
- Locate the Side Button on the right side for newer models (iPhone 6 and later). For older models (iPhone 5s and before), locate the Top Button.
- Press and hold both the Home Button and the Side Button (or Top Button) at the same time.
- Quickly release both buttons.
- A thumbnail of your screenshot will appear in the lower-left corner.
Refer to the table below for a quick summary:
| iPhone Model | Button Combination |
|---|---|
| iPhone X, XR, XS, 11, 12, 13+ | Side Button + Volume Up |
| iPhone 8, 7, 6s, SE (2nd Gen) | Home Button + Side Button |
| iPhone SE (1st Gen), 5s, 5, 4s | Home Button + Top Button |
Taking A Screenshot
Knowing how to take a screenshot on your iPhone is useful. You can capture anything on your screen quickly. Whether you want to save a message, a webpage, or an app screen, it’s simple. Below, we will guide you through the process.
Using Physical Buttons
Using the physical buttons is the most common way.
- Ensure the content you want to capture is on the screen.
- Press the Side Button and the Volume Up Button at the same time.
- Quickly release both buttons.
- A thumbnail will appear in the bottom-left corner of your screen.
- Tap the thumbnail to edit or share the screenshot.
- If you ignore the thumbnail, it will save to your Photos app.
| Button | Function |
|---|---|
| Side Button | Locks your screen |
| Volume Up Button | Increases the volume |
Using Assistivetouch
AssistiveTouch is an option for those who prefer not to use physical buttons. Follow these steps:
- Go to Settings on your iPhone.
- Tap Accessibility.
- Select Touch, then tap AssistiveTouch.
- Turn on AssistiveTouch by sliding the switch to green.
- A floating button will appear on your screen.
- Tap the floating button.
- Select Device from the menu.
- Tap More, then tap Screenshot.
- Your screen will flash, and a thumbnail will appear.
- Tap the thumbnail to edit or share, or let it save automatically.
Using AssistiveTouch is an easy alternative.
Editing Screenshots
Editing screenshots on your iPhone can enhance their clarity and usefulness. You can annotate, crop, and share your screenshots easily. This guide will help you access the screenshot editor and show you how to annotate and crop screenshots effectively.
Accessing Screenshot Editor
Once you take a screenshot, a thumbnail appears in the bottom-left corner. Tap the thumbnail to open the screenshot editor. If the thumbnail disappears, go to the Photos app and open the screenshot from the Screenshots album.
Annotating And Cropping
After accessing the editor, use the tools at the bottom to annotate. You can choose from a pen, highlighter, pencil, eraser, and lasso tool. Select the tool you need and start drawing on the screenshot.
To crop the screenshot, tap the crop icon at the bottom. Drag the corners to resize the screenshot as needed. Use the grid lines to help align your cropping. Tap “Done” to save your changes.
- Pen: Draw with a thin line.
- Highlighter: Emphasize important areas.
- Pencil: Create fine, detailed drawings.
- Eraser: Remove unwanted marks.
- Lasso Tool: Move or resize annotations.
| Tool | Description |
|---|---|
| Pen | Draw with a thin line. |
| Highlighter | Emphasize important areas. |
| Pencil | Create fine, detailed drawings. |
| Eraser | Remove unwanted marks. |
| Lasso Tool | Move or resize annotations. |
Editing screenshots on your iPhone is simple and powerful. Use these tools to make your screenshots clear and effective.
Sharing Screenshots
Sharing screenshots on your iPhone is very simple and useful. You can share screenshots through various apps quickly. This guide will show you how to do it easily.
Using Messages And Mail
Sharing a screenshot via Messages or Mail is quick. Follow these steps:
- Take a screenshot by pressing the Side Button and Volume Up button together.
- Tap on the screenshot preview in the bottom-left corner.
- Tap the Share icon in the top-right corner.
- Select Messages or Mail from the share options.
- Enter the recipient’s contact or email address.
- Tap Send to share the screenshot.
Using Social Media Apps
Sharing screenshots on social media apps is also straightforward. Here’s how:
- Take a screenshot by pressing the Side Button and Volume Up button together.
- Tap on the screenshot preview in the bottom-left corner.
- Tap the Share icon in the top-right corner.
- Select the social media app like Facebook, Instagram, or Twitter.
- Follow the app’s prompts to post the screenshot.
These steps make sharing screenshots on your iPhone easy and efficient. Whether you use Messages, Mail, or social media apps, sharing is just a few taps away.
Saving Screenshots
Taking a screenshot on your iPhone is easy. But saving it properly makes it useful. Learn how to save screenshots to different places on your device.
Saving To Photos
By default, screenshots save to the Photos app. This allows easy access and sharing.
- Take a screenshot by pressing the Side and Volume Up buttons together.
- Tap on the thumbnail that appears in the bottom-left corner.
- Tap “Done” in the top left corner.
- Select “Save to Photos”.
Your screenshot now appears in the Photos app. You can find it in the “Screenshots” album.
Saving To Files
Sometimes, you may want to save screenshots directly to the Files app. This helps with better organization.
- Take a screenshot by pressing the Side and Volume Up buttons together.
- Tap on the thumbnail that appears in the bottom-left corner.
- Tap the share icon in the top-right corner.
- Choose “Save to Files” from the options.
- Select the desired folder within the Files app.
- Tap “Save”.
Your screenshot now saves to the Files app. You can locate it in the folder you chose.
Third-party Apps
Taking screenshots on an iPhone can be effortless with third-party apps. These apps offer extra features that the built-in method lacks. Let’s explore some popular screenshot apps and their advanced features.
Popular Screenshot Apps
Many third-party apps make screenshotting easy and fun. Here are some popular ones:
- Lightshot: Simple and easy to use.
- Snagit: Offers advanced editing tools.
- Screenshot Plus: Allows multiple capturing options.
These apps can be downloaded from the App Store. They offer unique tools that enhance your screenshot experience.
Advanced Features
Third-party apps provide advanced features that go beyond basic screenshotting:
| Feature | Description |
|---|---|
| Annotation Tools | Add text, shapes, and highlights to screenshots. |
| Cloud Storage | Save your screenshots directly to the cloud. |
| Scrolling Screenshots | Capture entire web pages or long chats. |
These features make third-party apps a valuable addition to your iPhone. You can annotate, save to the cloud, and capture scrolling content. This makes sharing information easier and more efficient.
Troubleshooting
Sometimes, taking a screenshot on your iPhone may not work. Here are common issues and their fixes.
Common Issues
- Screen not responding when pressing buttons
- Screenshots not saving to Photos
- AssistiveTouch not working
Fixes And Solutions
| Issue | Solution |
|---|---|
| Screen not responding | Restart your iPhone by holding the power button. |
| Screenshots not saving | Check storage space and clear some files. |
| AssistiveTouch not working | Ensure AssistiveTouch is enabled in Settings. |
Restarting your iPhone can solve many problems. Hold the power button until the slider appears. Slide to power off and then turn it on again.
Check storage space if screenshots are not saving. Go to Settings > General > iPhone Storage. Delete some files to free up space.
To enable AssistiveTouch, go to Settings > Accessibility > Touch > AssistiveTouch. Make sure it is turned on.
Additional Tips
Taking a screenshot on your iPhone is a handy feature. There are additional tips to make it even easier. Here, we will explore using Siri and shortcuts for screenshots.
Using Siri
Did you know you can use Siri to take screenshots? Simply say, “Hey Siri, take a screenshot.” Siri will capture the screen for you. This is useful when your hands are busy. Siri makes it quick and easy. Try it next time you need a screenshot.
Using Shortcuts
The Shortcuts app can automate taking screenshots. Follow these steps:
- Open the Shortcuts app.
- Tap the + icon to create a new shortcut.
- Select Add Action.
- Search for Take Screenshot and select it.
- Tap Next and name your shortcut.
- Tap Done to save.
You can now use this shortcut anytime. You can even add it to your Home Screen.
Using shortcuts saves time. It makes taking screenshots more efficient.

Conclusion
Mastering screenshots on your iPhone is simple with these steps. Capture important moments or share information quickly. Practice makes perfect, so try it a few times. Soon, taking screenshots will become second nature. Enjoy the convenience and efficiency it brings to your daily iPhone use.
Happy snapping!