Yes, you can often add more solar panels to your motorhome system. Many motorhome owners want more power for their trips. Adding panels is a great way to get it. But before you start, you need to check a few things. These include your current power system, roof space, and how much power your parts can handle. This guide will help you figure out what you need to do to grow your solar setup.
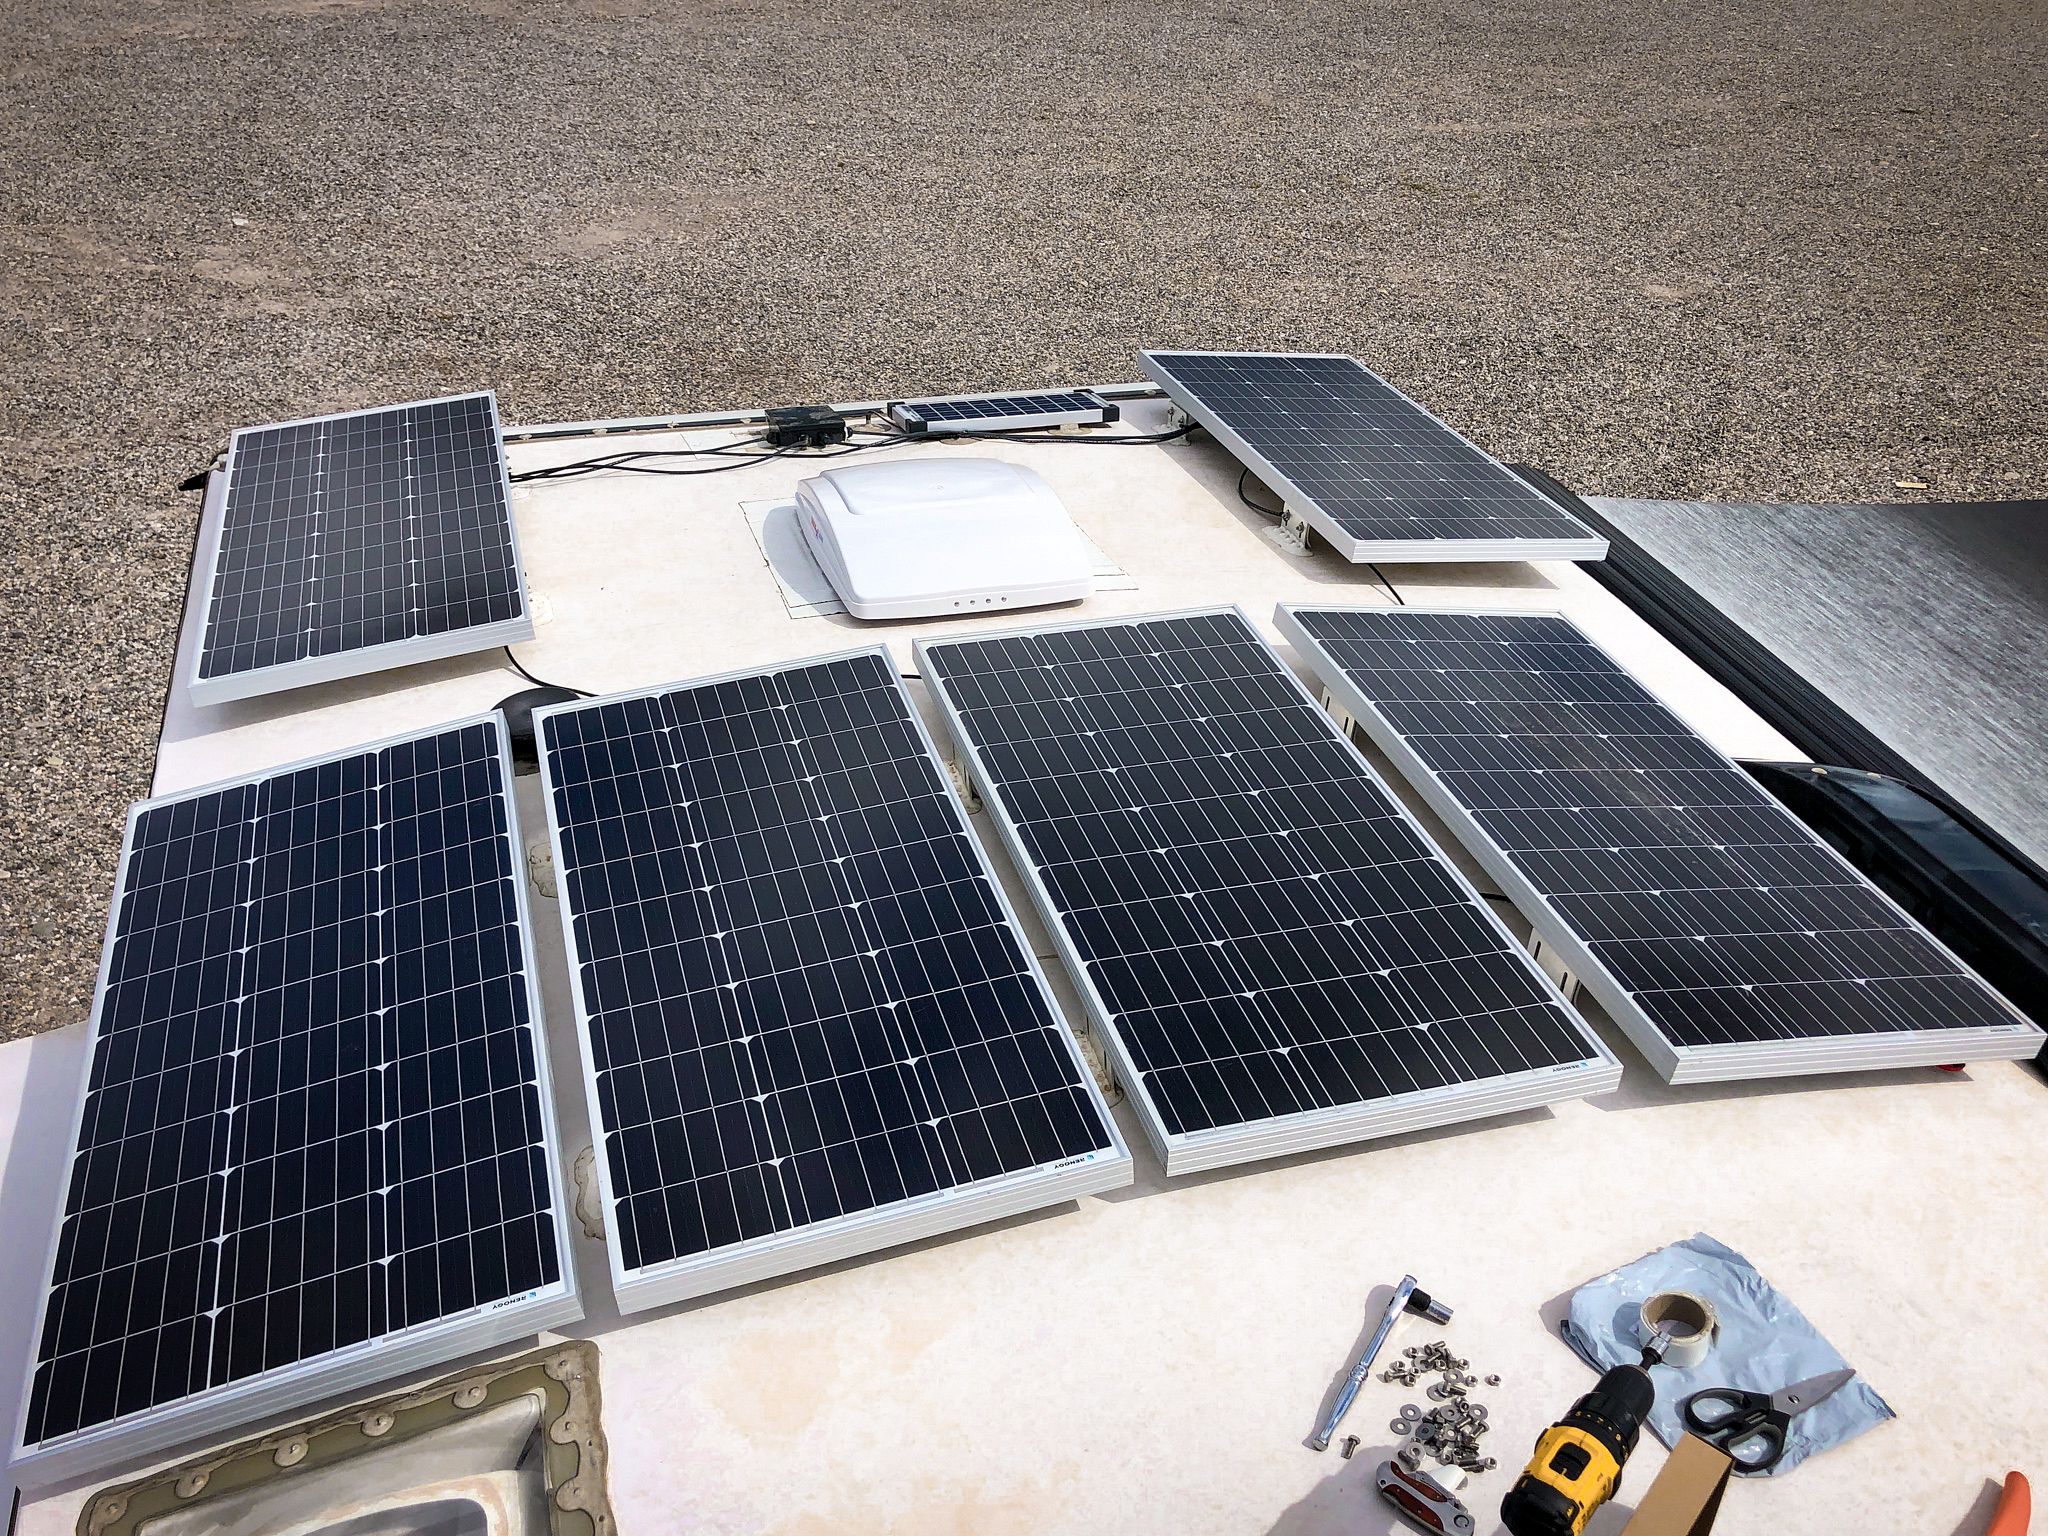
Image Source: www.adventurousway.com
Why Grow Your Motorhome Solar System?
More solar power gives you many good things. It lets you use more of your favorite gadgets. It also lets you stay off the grid for longer. Here are some top reasons to add more solar panels:
- More Power for Appliances: Do you want to run your air conditioner, microwave, or a coffee maker more often? More solar panels can give you the power you need.
- Longer Off-Grid Stays: If you love camping far from hookups, more solar means more time. You won’t run out of battery power as fast.
- Faster Battery Charging: With more sunlight hitting more panels, your batteries fill up quicker. This means less worry about power on cloudy days.
- Future Needs: Maybe you plan to add new devices later. Adding solar now prepares your motorhome for them.
- Less Generator Use: If you have a generator, you might use it less. This saves on fuel. It also means less noise for you and your neighbors.
Important Things to Check First
Before you buy any new solar panels, you need to look at your motorhome’s current setup. This is a very important step. Skipping it can lead to problems or wasted money.
Inspecting Your Current System
Take a good look at what you have now. Find out the details of your solar panels, charge controller, batteries, and inverter.
-
Current Panel Details:
- How many panels do you have?
- What is the power of each panel (in watts)?
- What is the voltage of each panel (Vmp and Voc)?
- What is the current of each panel (Imp and Isc)?
- You can find these numbers on a sticker on the back of your panels. Or check the user manual.
-
Current Charge Controller Details:
- What kind of charge controller do you have? Is it PWM or MPPT? MPPT is usually better for adding panels.
- What is its maximum input voltage?
- What is its maximum input current (amps)?
- What is its maximum output power (watts)?
- This information is often on a label on the controller itself.
-
Current Battery Bank Details:
- What kind of batteries do you have? (Lead-acid, AGM, Lithium Iron Phosphate (LiFePO4)?)
- What is their total storage capacity (in amp-hours, Ah)?
- What is their voltage (12V, 24V)?
- How old are they? Old batteries might not work well with new solar.
-
Current Inverter Details:
- What is the maximum power your inverter can provide (in watts)?
- Is it a pure sine wave or modified sine wave inverter?
- Your inverter changes battery power (DC) into house power (AC). More solar might mean you use more AC power, so your inverter needs to be big enough.
Grasping Motorhome Charge Controller Capacity
Your charge controller is like the brain of your solar system. It takes power from the panels and sends it safely to your batteries. If you add more panels, your controller must be able to handle the extra power.
- Why Capacity Matters: If your controller is too small, it can get damaged. Or, it might just limit the power from your new panels. This means you won’t get the full benefit.
- Checking Current Limits: Look at the controller’s label. It will say things like “Max PV Input Current” (Amps) and “Max PV Input Voltage.”
- MPPT vs. PWM:
- PWM (Pulse Width Modulation) controllers are simpler and cheaper. They are less efficient, especially if panel voltage is much higher than battery voltage. Adding panels to a PWM setup can be tricky. It often means panels must match the battery voltage closely.
- MPPT (Maximum Power Point Tracking) controllers are smarter. They can take higher voltage from panels and turn it into lower voltage for batteries very well. This means they get more power from your panels. If you plan a big upgrade, an MPPT controller is usually the better choice.
Let’s say your current controller is 30 amps. If you add panels that push the total current above 30 amps, you need a bigger controller.
Sizing Your Expandable RV Battery Bank
More solar panels mean more power going into your batteries. Your batteries must be able to hold this extra power. They must also handle the faster charging.
- Battery Type:
- Lead-acid/AGM: These are common. They can take a charge at a certain rate. Too much charge current can harm them.
- LiFePO4 (Lithium Iron Phosphate): These are lighter, last longer, and can charge much faster. They are often a great match for bigger solar systems. They can take a lot of current quickly.
- Total Capacity: If your batteries are small, they will fill up quickly with more solar. If you want to use more power, you will likely need to add more batteries too. This is part of building an expandable RV battery bank.
- Age and Health: If your current batteries are old, they might not hold a charge well. They might also not charge as fast. Adding new solar to old, weak batteries is not a good idea. Consider replacing them or adding new ones that match.
Wiring for Additional RV Solar
The wires in your system carry the power from your panels to your controller and then to your batteries. If you add more panels, you add more power. This means you might need thicker wires.
- Wire Gauge: Wires are sized by “gauge.” A smaller gauge number means a thicker wire (e.g., 8-gauge wire is thicker than 10-gauge). Thicker wires can carry more current safely.
- Voltage Drop: Wires lose some power over distance. This is called “voltage drop.” Longer or thinner wires lose more power. You want to keep this loss very low (under 3%).
- Calculating Wire Size: You need to know the total amps from your panels and the length of your wire runs. There are charts and online calculators to help you pick the right wire size. Too thin a wire can lead to lost power, heat, and even fire risk.
Measuring Roof Space for Motorhome Solar
This is a simple but important step. You can only put as many panels as your roof allows.
- Measure Available Space: Use a tape measure to check the open areas on your motorhome roof.
- Look Out For:
- Air conditioners
- Roof vents
- Antennas
- Skylights
- Ladders
- Other roof-mounted gear
- Panel Dimensions: Get the size of the new panels you want to add. See how they fit into the open spaces.
- Mounting Room: Remember, panels need space around them for mounts and for cleaning.
- Weight: Consider the added weight on your roof. Most RV roofs can handle typical solar panel weight. But check your motorhome’s weight limits if adding many panels.
RV Solar Upgrade Compatibility
This means how well your new parts will work with your old parts.
- Mixing Panel Types:
- It’s best to use panels that are similar in voltage and current when connecting them together.
- If you mix panels with very different specs, the system might only work as well as the weakest panel.
- For example, don’t mix old, weak panels with brand new, strong ones in the same series or parallel string.
- Voltage Matching: New panels should ideally have a similar voltage range to your existing ones. This makes wiring easier and more efficient.
- Charge Controller Compatibility: As discussed, your controller must handle the total power from all panels.
Planning Your New Solar System: Step by Step
Once you know what you have, you can plan what you need. This part helps you think about what kind of power you want to gain. It’s about increasing campervan off-grid power in a smart way.
Figuring Out Your Power Needs
Before adding panels, think about what you want to run.
- List All Appliances: Write down every electrical device you use or want to use.
- Find Their Power Use: For each item, find its wattage (W) or amp draw (A). This is usually on a label or in the manual.
- Estimate Daily Use: How many hours a day do you use each item?
- Calculate Total Watt-Hours (Wh) Per Day:
- (Appliance Watts) x (Hours Used Per Day) = Watt-hours per day for that item.
- Add up all the watt-hours for all items. This is your total daily power need.
Example Power Needs Table:
| Appliance | Power (Watts) | Hours Used/Day | Daily Wh Used |
|---|---|---|---|
| LED Lights | 10 | 5 | 50 |
| Water Pump | 60 | 0.5 | 30 |
| Laptop | 50 | 3 | 150 |
| TV | 40 | 2 | 80 |
| Phone Charging | 10 | 1 | 10 |
| Total Daily Needs: | 320 Wh |
Now, you know how much power you need. Your solar panels need to make enough power to cover this. And your batteries need to store it.
Sizing New Components for Your Upgrade
Based on your current system and new power goals, you can choose new parts.
Picking a New or Bigger Charge Controller
This is often the first thing to upgrade if you add many panels.
- Calculate Total Panel Watts: Add up the watts of your old panels and the new ones.
- Calculate Total Panel Amps: This is often the more critical number.
- If connecting panels in parallel: Add the Imp (Amps at max power) of each panel.
- If connecting panels in series: The Imp stays the same as one panel, but the voltage adds up.
- For MPPT controllers, calculate the Voc (Open Circuit Voltage) for series strings and ensure it’s below the controller’s max input voltage. Then calculate the total Isc (Short Circuit Current) of all parallel strings. Add a safety factor (like 25%).
- Rule of Thumb: For a 12V battery system, a rough estimate for MPPT controller size is: (Total Panel Watts) / 14V = Needed Amps. Then add 25% safety margin.
- Example: If you have 600W of panels, 600W / 14V = 42.8 Amps. Add 25% (42.8 * 0.25 = 10.7). So, you’d need at least a 54 Amp MPPT controller.
- Choose MPPT for Best Results: For bigger systems, MPPT controllers get much more power from your panels, especially in changing light. This helps with optimizing RV solar panel additions.
Choosing the Right Wire Gauge
Proper wiring is key for safety and efficiency. This is vital for wiring for additional RV solar.
- Factors: Total current (amps) and distance of the wire run.
- Wire Gauge Chart (Example – Check a full chart for exact numbers):
| Amps (A) | Max Length (Feet, one way) for 2% Voltage Drop (12V System) | Wire Gauge (AWG) |
|---|---|---|
| 10 | 20 | 10 |
| 20 | 10 | 8 |
| 30 | 10 | 6 |
| 50 | 10 | 4 |
- Panel to Controller Wires: These carry the panel’s full current.
- Controller to Battery Wires: These carry the current from the controller to the battery. This current can be higher than the panel current if the MPPT controller steps down voltage. You must size these wires based on the controller’s max output current.
- Always go one size thicker if unsure. It’s better to have too thick a wire than too thin.
Deciding on Your Expandable RV Battery Bank
More solar means more power can be made. To use that power, you need to store it.
- Lithium Batteries (LiFePO4): These are great for solar upgrades. They charge fast, weigh less, and last a long time. They can also be discharged more deeply without damage.
- Adding Batteries: If you add batteries, make sure they are the same type and age as your current ones. Mixing different types or ages can harm the system.
- Sizing Batteries for Needs: If you use 320 Wh per day and have a 12V system:
- 320 Wh / 12V = 26.7 Ah daily use.
- To last a few days without sun, you’d need much more. For 2 days of power, you need 53.4 Ah. But you can only use a certain percentage of your battery (e.g., 50% for lead-acid, 80-100% for lithium).
- So, for 2 days of lead-acid power at 50% use, you’d need 53.4 Ah / 0.50 = 106.8 Ah total battery capacity.
- For lithium at 80% use, 53.4 Ah / 0.80 = 66.75 Ah total battery capacity.
- This shows how an expandable RV battery bank is often needed with more solar.
Is an Inverter Upgrade Motorhome Solar Necessary?
Your inverter changes DC battery power to AC power for regular household outlets.
- Check Current Inverter: What is its max continuous wattage?
- New Power Needs: If your bigger solar system means you want to run more high-power AC appliances (like a microwave, hair dryer, or air conditioner), you will need a bigger inverter.
- Pure Sine Wave: If you run sensitive electronics, a pure sine wave inverter is always best.
Wiring for More Power: Series Parallel Solar Wiring RV
How you connect your panels affects voltage and current. This is a key part of series parallel solar wiring RV.
-
Series Wiring:
- Connect the positive (+) of one panel to the negative (-) of the next.
- This adds up the voltage of the panels. The current stays the same as one panel.
- Example: Two 100W, 18V panels in series make 200W at 36V. The amps stay the same.
- Pros: Higher voltage means less current for the same power. This lets you use thinner wires over longer distances (from panels to controller). Good for MPPT controllers.
- Cons: If one panel is shaded, the whole string’s output drops a lot. All panels in a series string should be the same type and size.
-
Parallel Wiring:
- Connect all positives (+) together. Connect all negatives (-) together.
- This adds up the current of the panels. The voltage stays the same as one panel.
- Example: Two 100W, 18V panels in parallel make 200W at 18V. The amps double.
- Pros: Better in partial shade (only the shaded panel’s output drops, not the whole system). Allows for mixing panels of different types/sizes (within reason, especially with separate charge controllers or specific combiners).
- Cons: Higher current means thicker wires are needed.
-
Series-Parallel Wiring (Hybrid):
- You can make “strings” of panels in series. Then connect these strings in parallel.
- This is common for larger systems. It balances voltage and current to get the best out of your panels and controller.
Important: For adding panels, consider if your new panels are the same as your old ones.
* Same Panels: If you add more of the exact same panels, you can usually connect them to your existing setup. Just be sure your controller can handle the total power.
* Different Panels: If you add panels with different voltage or current ratings, it’s often best to:
* Connect them in parallel if their voltages are very similar.
* Use a separate charge controller for the new panels. This way, each set of panels has its own “brain” and works at its best. Then, both controllers feed power to the same battery bank.
Installing Your New Solar Panels
Once you have your new panels and parts, it’s time to put them on. Always think safety first!
- Safety First: Disconnect your battery bank from everything before working on wires. Cover your solar panels so they don’t make power.
- Layout on the Roof: Test where panels will go. Make sure they don’t shade each other. Leave room for cleaning. Use sturdy mounts that will hold up to wind and travel.
- Mounting Panels: Attach the mounts to the roof. Use good sealant to prevent leaks. Fasten panels to the mounts securely.
- Wiring Panels:
- Connect your new panels together (series, parallel, or series-parallel).
- Run the main wires from your new panels (or combined old and new system) down into the motorhome. Use a proper roof entry gland to prevent leaks.
- Connecting to the Charge Controller:
- Connect the wires from your panels to the “PV Input” on your charge controller.
- Connect the “Battery Output” from the charge controller to your battery bank. Use a fuse or circuit breaker close to the battery for safety.
- Connecting to the Inverter (if upgraded or added):
- Connect the inverter to your battery bank. Again, use a proper fuse or breaker.
- Reconnect and Test: Once all wires are tight and safe, uncover your panels. Connect your battery bank. Your system should start working. Check voltages and currents on your charge controller display or battery monitoring system RV.
Optimizing RV Solar Panel Additions
Adding panels is a great start. But you can do more to get the most power from your system. These tips are all about optimizing RV solar panel additions.
- Keep Panels Clean: Dust, dirt, leaves, and bird droppings block sunlight. Clean your panels regularly with water and a soft brush or sponge.
- Manage Shade: Even a small shadow on one part of a panel can reduce its output a lot.
- Park in sunny spots.
- Trim tree branches if possible (always be safe!).
- Consider micro-inverters or optimizers for each panel if shade is a big issue. This allows each panel to work at its best, even if others are shaded.
- Monitor Your System: Use a good battery monitoring system RV. This tells you how much power your panels are making, how much power your batteries have, and how much power you are using. This helps you manage your energy use.
- Charge Controller Settings: Make sure your charge controller is set correctly for your battery type (e.g., LiFePO4, AGM). Correct settings ensure proper charging and longer battery life.
- Angle Your Panels: If your panels are not flat-mounted, you can tilt them towards the sun for more power, especially in winter or when the sun is low. This might not be practical for every stop, but it makes a big difference for long stays.
- Reduce Power Use: The best way to have more power is to use less.
- Switch to LED lights.
- Unplug unused devices.
- Use power-hungry appliances only when your solar is making lots of power (mid-day).
- This helps in increasing campervan off-grid power overall, not just by adding panels.
Addressing Common Issues
Even with careful planning, sometimes things don’t work as expected.
- Low Power Output:
- Check for Shade: Are panels partly or fully shaded?
- Clean Panels: Are they dirty?
- Wiring: Are all connections tight? Is wire gauge correct?
- Controller Settings: Are they right for your battery type?
- Panel Health: Are any panels damaged or old?
- Battery Not Charging:
- Controller Error: Is your charge controller showing an error code?
- Battery Health: Are your batteries too old or damaged to accept a charge?
- Connections: Are the wires from the controller to the battery connected properly and securely? Is the fuse blown?
- Controller Overload:
- If the controller is too small for the new panels, it might limit power or even shut down. You’ll need a bigger controller.
- The controller might get very hot.
Conclusion
Adding more solar panels to your motorhome is a great project. It gives you more freedom and power for your adventures. It also means increasing campervan off-grid power in a big way. But it’s not just about bolting on new panels. You must plan carefully. Check your current system’s limits. Make sure your charge controller, batteries, and wires can handle the extra power. Think about your roof space and how you will wire the new panels. By taking the right steps, you can successfully expand your motorhome’s solar system and enjoy more comfort and longer stays wherever the road takes you.
Frequently Asked Questions (FAQ)
Q1: Can I mix different brands or wattages of solar panels?
A1: You can, but it’s often not ideal. If connecting in series, all panels must be identical for best results. If connecting in parallel, panels should have very similar voltages. If they are very different, it’s best to use a separate charge controller for the new panels or for each different set of panels. This ensures RV solar upgrade compatibility and that each panel or set of panels works at its best.
Q2: Do I need a new charge controller when I add more panels?
A2: Maybe. You need to check your existing motorhome charge controller capacity. If the total watts or amps from all your panels (old and new) go over your controller’s limit, then yes, you need a bigger one. It’s often a good time to upgrade to an MPPT controller for better efficiency.
Q3: How do I know if my batteries can handle more solar power?
A3: Your batteries need to be big enough to store the extra power. They also need to be able to accept the charging current from the new panels. Lithium (LiFePO4) batteries are best for large solar systems as they charge fast and can be drained more. Old or small lead-acid batteries might struggle. You might need an expandable RV battery bank with new batteries.
Q4: What’s the difference between series and parallel wiring for solar panels?
A4: Series wiring adds up voltage (good for MPPT controllers, thinner wires). If one panel is shaded, the whole string’s power drops a lot. Parallel wiring adds up current (good in shade, but needs thicker wires). The voltage stays the same. Series parallel solar wiring RV uses a mix to balance things for larger systems.
Q5: Will I need to upgrade my inverter too?
A5: You might. If your inverter upgrade motorhome solar is needed depends on your power use. More solar panels mean you can use more high-power AC appliances. If you plan to run more AC devices, you’ll need an inverter big enough for their total wattage.
Q6: How much roof space do I need for new panels?
A6: You need to physically measure your open roof areas. Account for roof vents, AC units, and other obstacles. Also, factor in space for mounting hardware and for cleaning around the panels. This is crucial for planning roof space for motorhome solar.
Q7: How do I make sure I’m getting the most out of my new solar panels?
A7: To ensure optimizing RV solar panel additions, keep your panels clean, park in sunny spots to avoid shade, and use a good battery monitoring system RV. Make sure your charge controller settings match your battery type. Consider tilting panels if possible for better sun angle.
Q8: What is a battery monitoring system, and why do I need one?
A8: A battery monitoring system RV shows you exactly how much power is going in (from solar), how much is going out (to appliances), and how much charge your batteries have left. It’s like a fuel gauge for your battery. It helps you manage your power use and know how long you can stay off-grid. It’s vital for increasing campervan off-grid power smartly.