
How to Take a Professional Headshot With iPhone, use natural light and a simple background. Position the phone at eye level for best results.
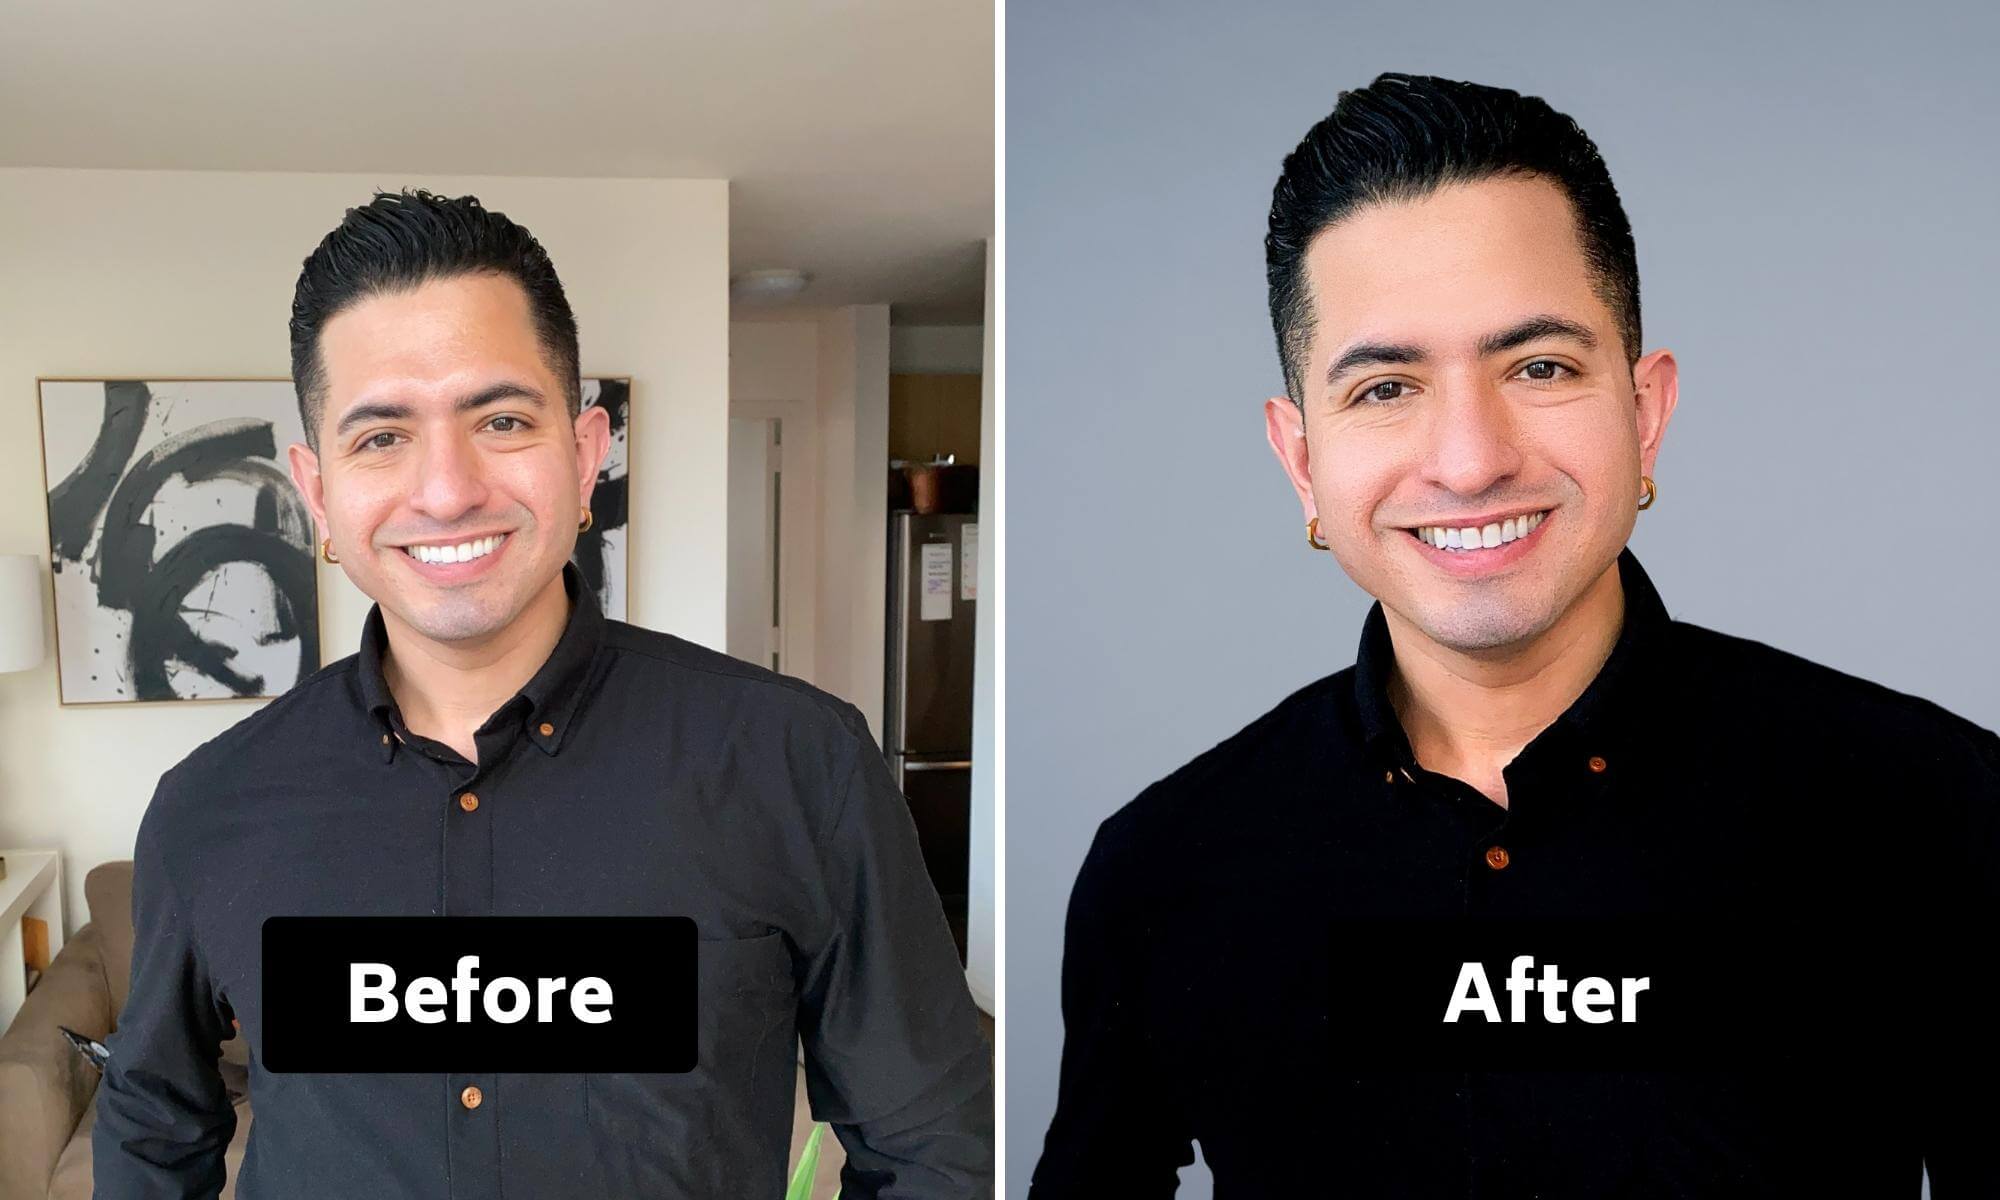
Capturing a professional headshot with an iPhone is easier than you might think. With advancements in smartphone camera technology, you can achieve high-quality results without expensive equipment. Utilizing natural light ensures a flattering and even illumination, enhancing your features. A simple background eliminates distractions, keeping the focus on you.
Positioning the phone at eye level creates a balanced and engaging photo. By following these straightforward tips, you can produce a polished headshot suitable for professional purposes. Whether for LinkedIn, a resume, or social media, a well-executed headshot can make a significant impression.
How to Take a Professional Headshot With iPhone?
Choosing The Right Location
Learning how to take a professional headshot with iPhone can greatly enhance your personal brand. One crucial element is choosing the right location. The location you select can make or break your headshot. A good location can highlight your features and create a professional look. Let’s explore two key factors in choosing the perfect spot: lighting and background selection.
Natural Light Vs Artificial Light
Natural light is often the best choice for headshots. It provides even illumination and creates a natural look. Aim to shoot during the golden hours—early morning or late afternoon. These times offer soft, flattering light.
Consider the following tips for using natural light:
- Find a window: A large window can offer excellent light. Stand facing the window for the best results.
- Avoid direct sunlight: Direct sunlight can create harsh shadows. Opt for shaded areas or cloudy days.
Artificial light can also be effective, especially indoors or at night. It provides control over the lighting conditions. Use LED lights or ring lights for consistent results.
Here are some tips for using artificial light:
- Use a ring light: Ring lights offer uniform light and reduce shadows.
- Adjust the light temperature: Match the light temperature to the natural light setting for a seamless look.
Below is a quick comparison of natural and artificial light:
| Aspect | Natural Light | Artificial Light |
|---|---|---|
| Cost | Free | May require purchasing lights |
| Control | Limited to time of day and weather | Full control over intensity and direction |
| Quality | Soft and natural | Can be harsh or too bright if not set correctly |
Background Selection
Choosing the right background is vital for a professional headshot. A good background highlights you without being distracting. When learning how to take a professional headshot by yourself, consider these background options:
Plain backgrounds work well. They keep the focus on your face. A solid-colored wall or a simple curtain can be effective.
Think about these tips for plain backgrounds:
- Avoid bright colors: Bright colors can distract the viewer. Choose neutral tones like white, gray, or beige.
- Check for shadows: Ensure no shadows fall on the background. Shadows can make the photo look unprofessional.
Natural backgrounds can add a touch of personality. A park, garden, or office setting can be great choices.
Here are some tips for natural backgrounds:
- Keep it simple: Avoid cluttered environments. A clean, organized space works best.
- Blur the background: Use portrait mode on your iPhone. It blurs the background and keeps the focus on you.
When choosing between plain and natural backgrounds, consider your profession and the image you want to convey. A plain background is ideal for corporate settings. Natural backgrounds can work for creative fields.
Preparing For The Shoot
Taking a professional headshot with your iPhone can be a game-changer. You don’t need expensive equipment to achieve stunning results. The key lies in preparing for the shoot. Proper planning ensures your headshot looks polished and professional. This guide will help you with grooming, attire, posing, and body language. Let’s dive in and learn how to take a professional headshot with your phone.
Grooming And Attire
Before your shoot, pay attention to grooming and attire. They play a crucial role in the final look of your headshot. Here are some tips to consider:
- Hair: Make sure your hair is clean and styled. Use a comb or brush to remove any tangles. Consider using a bit of product to keep your hair in place.
- Face: For men, a clean shave or a well-groomed beard is essential. For women, a light touch of makeup can enhance your features. Don’t overdo it; aim for a natural look.
- Clothing: Choose attire that reflects your professional image. Solid colors work best. Avoid busy patterns and logos. A well-fitted shirt or blouse can make a big difference.
Here is a quick checklist for grooming and attire:
| Grooming | Attire |
|---|---|
| Hair styled | Solid colors |
| Face clean | No busy patterns |
| Light makeup | Well-fitted clothes |
Proper grooming and attire set the foundation for a great headshot. They ensure you look your best and feel confident during the shoot.
Posing And Body Language
Posing and body language are critical in achieving a professional headshot. They convey your personality and professionalism. Follow these tips to get the best results:
- Posture: Stand or sit up straight. Good posture exudes confidence. Avoid slouching or leaning.
- Angle: Slightly angle your body to the camera. This creates a more dynamic and engaging shot. Turn your shoulders a bit and face the camera with a natural expression.
- Smile: A genuine smile can make a big difference. Practice in front of a mirror to find your best smile. Aim for a friendly yet professional look.
- Eyes: Look directly into the camera lens. This creates a sense of connection with the viewer. Avoid looking away or squinting.
Here are some quick tips for posing and body language:
- Relax your shoulders to avoid tension.
- Keep your chin slightly down to avoid shadows on your face.
- Use your hands naturally. Avoid crossing your arms.
Posing and body language can make or break your headshot. Practice different poses and find what works best for you. Remember, confidence is key. The more relaxed you are, the better your headshot will be.
Setting Up Your Iphone
Taking a professional headshot with your iPhone is easier than you might think. With the right setup, you can achieve stunning results that rival a studio shot. Setting up your iPhone correctly is the first step. This guide will show you how to optimize your iPhone for a perfect headshot.
Camera Settings
Optimizing your iPhone’s camera settings is essential for a professional headshot. First, open the Camera app and navigate to the settings. Ensure your camera is set to the highest resolution. This allows for crisp and clear images. Below are some settings to adjust:
- Resolution: Set to 4K for the highest quality.
- HDR: Enable HDR (High Dynamic Range) to balance light and shadows.
- Grid: Turn on the grid to help frame your shot using the rule of thirds.
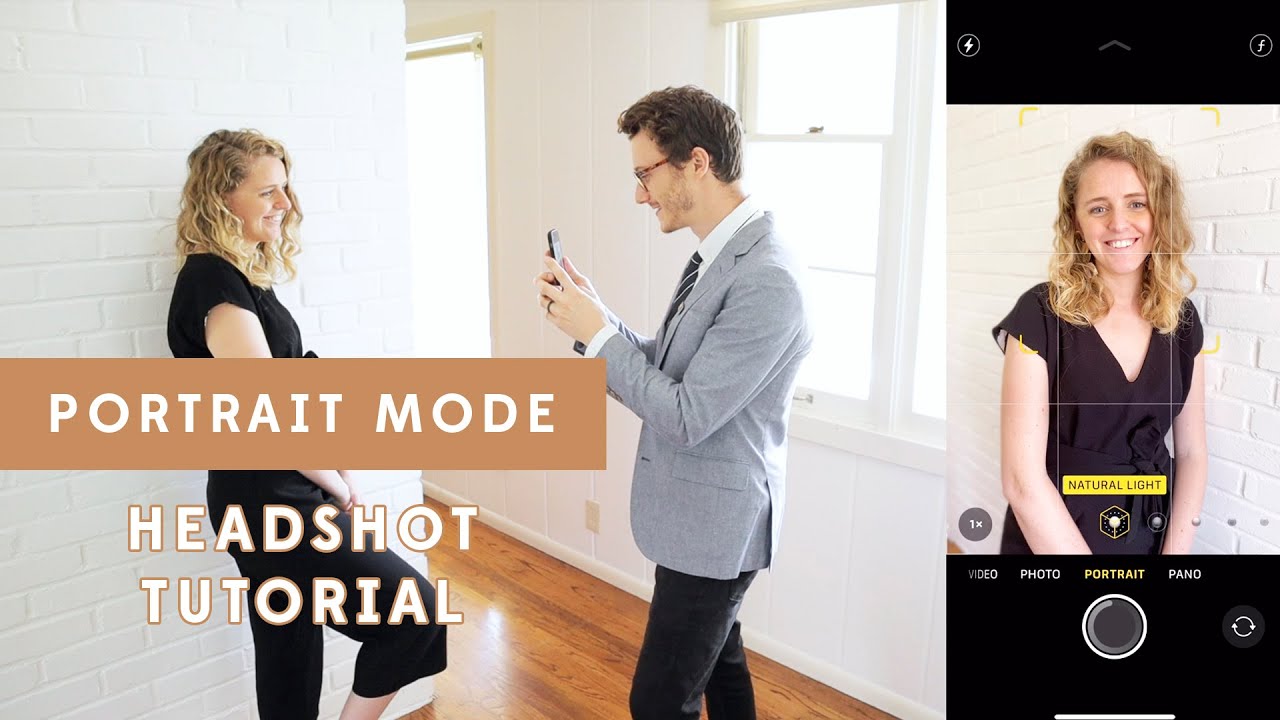
Additionally, consider using the Portrait mode. This mode blurs the background, making your face the focal point. Follow these steps for Portrait mode:
- Open the Camera app.
- Swipe to Portrait mode.
- Ensure you are within 2 to 8 feet from the camera.
For advanced users, manual settings can offer more control. Use third-party apps like ProCam or Halide. These apps allow you to adjust ISO, shutter speed, and white balance. Experiment with these settings for the best results.
Accessories To Consider
Using the right accessories can elevate your headshot quality. Here are some accessories to consider:
- Tripod: A tripod helps stabilize your iPhone. This prevents shaky images. Choose a tripod with adjustable height and a sturdy base.
- Lighting: Good lighting is crucial. Use a ring light for even, flattering light. Alternatively, natural light near a window works well.
- Remote Shutter: A remote shutter allows you to take photos without touching your iPhone. This avoids any camera shake.
Below is a table summarizing useful accessories:
| Accessory | Benefit |
|---|---|
| Tripod | Stabilizes iPhone |
| Ring Light | Provides even lighting |
| Remote Shutter | Prevents camera shake |
Investing in these accessories can make a significant difference. They help you achieve a professional look with minimal effort. Aim to use at least a tripod and good lighting for the best results.
Taking The Shot
Using your iPhone to take a professional headshot is easier than you might think. With a few simple tips, you can get a headshot that looks like it was taken by a pro. The key to a great headshot is in how you take the shot. This includes framing the shot, using the self-timer, and capturing multiple shots.
Framing The Shot
Framing is crucial to getting a great headshot. Proper framing ensures that your face is the focal point. Here are some tips to help you frame your shot like a pro:
- Find Good Lighting: Natural light works best. Position yourself facing a window or an open door.
- Choose a Clean Background: A clutter-free background keeps the focus on you. Plain walls or simple backdrops work well.
- Position Your iPhone: Keep the camera at eye level. This angle is the most flattering.
Using these tips, you can ensure your headshot looks clean and professional. Look at professional headshot examples to get an idea of good framing.
| Aspect | Tip |
|---|---|
| Lighting | Use natural light |
| Background | Choose a clean, simple background |
| Camera Position | Keep it at eye level |
Using The Self-timer
The self-timer feature is a great tool for taking a professional headshot. It allows you to get into position and compose yourself before the shot is taken. Here’s how to use it:
- Open the Camera app on your iPhone.
- Set your iPhone on a stable surface or tripod.
- Tap the timer icon (it looks like a clock).
- Select either 3 seconds or 10 seconds.
- Press the shutter button and get into position.
This feature gives you enough time to pose naturally. You won’t feel rushed, and your headshot will look more relaxed and professional. Look at professional headshot examples to see how natural posing can make a difference.
Capturing Multiple Shots
Taking multiple shots is essential for getting the perfect headshot. The more options you have, the better your chances of finding the best one. Here are some tips:
- Take Many Shots: Don’t settle for just one. Take at least 10-20 shots to have a variety to choose from.
- Vary Your Expressions: Try smiling, a neutral expression, and even a slight smirk.
- Change Angles: Slightly tilt your head or change the angle of the camera to find your best side.
Review all your shots and pick the one that best represents you. Compare your shots with professional headshot examples to see which one stands out.
Editing Your Headshot
Editing your headshot is crucial to achieving a polished and professional look. After learning how to take professional self portraits with iPhone, your next step is to enhance your photo using editing tools. Whether you prefer built-in editing tools or third-party apps, refining your image can make a significant difference.
Using Built-in Editing Tools
Your iPhone comes equipped with powerful built-in editing tools. These tools are user-friendly and provide a range of options to enhance your headshot. Here are some steps to follow:
- Open the Photos app: Select your headshot and tap “Edit” in the top right corner.
- Adjust the exposure: Brighten or darken your photo to make your features stand out. Use the slider to find the perfect balance.
- Enhance the contrast: Increase the contrast to make your image pop. This helps in defining the shadows and highlights.
- Modify the saturation: Adjust the saturation to ensure your skin tone looks natural. Avoid making the colors too vibrant.
- Utilize the filters: Explore different filters to give your photo a unique style. Filters like “Vivid” or “Dramatic” can add a professional touch.
- Crop and straighten: Ensure your headshot is centered and properly aligned. Use the crop tool to remove any unwanted background elements.
These built-in tools are perfect for quick and effective edits. They help in maintaining a natural and professional look for your headshot.
Third-party Editing Apps
For more advanced editing options, third-party apps are highly recommended. These apps offer a range of features that can take your headshot to the next level. Some popular apps include:
- Snapseed: This app offers precise control over various aspects of your photo. Use tools like “Selective Adjust” to enhance specific areas.
- VSCO: Known for its filters, VSCO can give your headshot a unique aesthetic. Adjust the exposure, contrast, and other settings to refine your image.
- Adobe Lightroom: A professional-grade app that offers advanced editing capabilities. Use presets to quickly apply a professional look or manually adjust settings for a custom edit.
Here’s a quick comparison table of features:
| App | Main Features |
|---|---|
| Snapseed | Selective Adjust, Healing, Brushes |
| VSCO | Filters, Exposure, Contrast |
| Adobe Lightroom | Presets, Advanced Color Grading |
Using third-party apps can provide greater control and more options for editing. These apps help in achieving a professional finish that stands out.
Choosing The Right Headshot
Taking a professional headshot with your iPhone can be both fun and rewarding. Choosing the right headshot is crucial for making a lasting impression. With some tips and tricks, you can achieve a polished look without needing expensive equipment. Let’s dive into how you can perfect your headshot with just your iPhone.
Selecting The Best Shot
Selecting the best shot is the first step in creating a standout headshot. Here are some tips to help you pick the perfect photo:
- Lighting: Ensure your face is well-lit. Natural light works best. Avoid harsh shadows and overexposure.
- Background: Choose a clean, uncluttered background. Neutral colors are ideal.
- Expression: A genuine smile or a confident look can make a big difference. Practice in front of a mirror to find your best expression.
- Angles: Experiment with different angles. Slightly tilting your head can add dimension to your face.
Take multiple shots from various angles and lighting conditions. Review each one and compare. Look for a shot that highlights your best features and conveys professionalism. You may want to involve a friend or family member for a second opinion. Using the burst mode on your iPhone can help you capture a series of shots quickly, increasing the chances of finding the perfect one.
Crop And Resize
After selecting your best shot, the next step is to crop and resize the image. Proper cropping can enhance the focus on your face and remove any distracting elements. Here’s how to do it:
- Open the photo in the Photos app.
- Tap “Edit” and select the crop tool.
- Adjust the frame to center your face. A close-up shot from the shoulders up works best for headshots.
- Use the gridlines to align your eyes along the top third of the frame. This follows the rule of thirds, making the photo more balanced.
Resizing the photo ensures it meets the requirements for different platforms. For example, LinkedIn and other professional networks often have specific size guidelines. Use an image editing app or online tool to resize your photo to the recommended dimensions.
Exporting And Sharing
Once your headshot is cropped and resized, it’s time to export and share it. Follow these steps:
- In the Photos app, tap the share icon.
- Select the format you need. For most platforms, JPEG is a good choice.
- Choose the quality setting. High quality is preferable to ensure your headshot looks crisp and professional.
- Save the photo to your device or upload it directly to your desired platform.
Sharing your professional headshot is easy with the iPhone’s built-in sharing options. Whether you need to email it, upload it to LinkedIn, or share it on social media, your iPhone has you covered. Be sure to keep a copy of the original photo in case you need to make future adjustments.
By following these steps, you can create a professional headshot that highlights your best features and makes a great impression. Whether you’re learning how to take a professional photo of yourself or looking for tips on professional headshots female, these guidelines will help you succeed.
Bonus Tips And Tricks
Taking a professional headshot with an iPhone is easier than you might think. With the right tips and tricks, you can achieve stunning results without needing expensive equipment. Here are some bonus tips and tricks to elevate your headshot game.
Using Portrait Mode
Portrait Mode on the iPhone is a powerful tool for achieving a professional look. This feature mimics the effect of a DSLR camera by blurring the background and making the subject stand out. Here are some steps to use Portrait Mode effectively:
- Select Portrait Mode: Open your camera app and swipe to Portrait Mode. You’ll see the background blur, creating a depth-of-field effect.
- Lighting Effects: Use the lighting options at the bottom of the screen. Try “Natural Light” for a soft look or “Studio Light” for a brighter appearance.
- Frame Your Shot: Position your subject in the frame, ensuring their face is well-lit and centered. Keep the camera steady for the best results.
Using Portrait Mode can significantly enhance the quality of your headshots, making them look more professional. Experiment with different lighting effects and distances to find the perfect shot.
Utilizing External Lighting
Good lighting is crucial for any professional headshot. While natural light works well, external lighting can provide more control and consistency. Here are some tips for using external lighting:
- Ring Light: A ring light is an affordable option that provides even lighting. Position it in front of your subject to eliminate shadows.
- Softbox: Softboxes diffuse light, creating a softer appearance. Place them at a 45-degree angle to your subject for a natural look.
- LED Panels: LED panels offer adjustable brightness and color temperature. Use them to balance light and reduce harsh shadows.
Utilizing external lighting can dramatically improve the quality of your headshots, making them look like they were taken in a studio. Here’s a quick comparison table of common lighting options:
| Lighting Type | Pros | Cons |
|---|---|---|
| Ring Light | Even lighting, Affordable | Can create circular reflections in eyes |
| Softbox | Soft lighting, Reduces shadows | Bulky, Requires space |
| LED Panels | Adjustable settings, Portable | Expensive, Requires setup |
Experimenting With Angles
Angles play a significant role in how your headshot turns out. The right angle can highlight your best features and make your headshot look more professional. Here are some tips for experimenting with angles:
- Eye Level: Hold the iPhone at eye level for a natural, straightforward look. This angle is flattering for most people.
- Slightly Above: Position the camera slightly above your eye level and tilt your head up. This can make your face appear slimmer and more defined.
- Side Profile: Try taking a side profile shot. This can add depth and dimension to your headshot.
Experimenting with angles can help you find the most flattering perspective. Take multiple shots from different angles and compare them to see which one you like best. Remember, practice makes perfect.
By following these tips and tricks, you’ll master how to take a professional headshot at home with your iPhone. Happy shooting!
Frequently Asked Questions
What Iphone App Can Take Headshots?
For taking headshots, try the iPhone app “PortraitCam”. It offers professional-quality portraits with adjustable settings. Another good option is “FaceApp”.
How Do I Make My Headshot Look Professional?
To make your headshot look professional, choose good lighting, dress appropriately, use a neutral background, maintain good posture, and smile naturally.
How To Take Professional Portraits With Iphone?
Use Portrait mode for depth effect. Find good lighting to enhance features. Ensure background is simple. Use grid lines for composition. Edit with iPhone tools for final touch.
Conclusion
Capturing a professional headshot with your iPhone is easier than you think. Just follow these simple steps. Pay attention to lighting, composition, and background. Utilize editing tools to enhance your photo. With practice, you’ll master the art of taking stunning headshots.
Start today and elevate your professional image effortlessly.
