
How to Delete Voicemail on iPhone, open the Phone app and navigate to the Voicemail tab. Swipe left on the voicemail and tap Delete.
Managing voicemail is essential for keeping your iPhone organized and ensuring you never miss important messages. Voicemails can quickly accumulate, taking up valuable storage space and making it harder to find the messages that matter most. Deleting unnecessary voicemails is a straightforward process that can help you stay organized and maintain optimal performance on your device.
Whether you receive numerous voicemails daily or just a few, knowing how to efficiently manage and delete them will enhance your overall iPhone experience. Let’s explore how to delete voicemails quickly and easily.
How to Delete Voicemail on iPhone?
Accessing Voicemail
Accessing voicemail on your iPhone is easy. Follow these steps to delete unwanted messages. These steps will help you clear up space and manage your inbox.
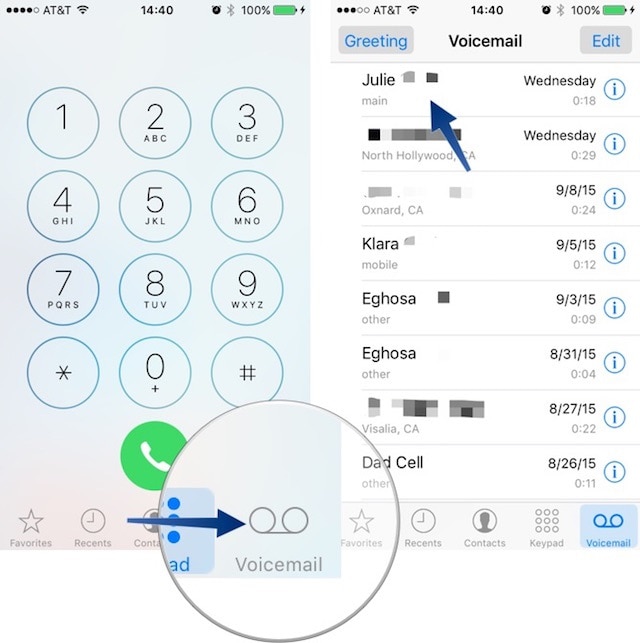
Opening The Phone App
First, open the Phone app on your iPhone. This app is usually on your home screen. It has a green icon with a white phone symbol.
Tap the icon to launch the app. You will see various tabs at the bottom of the screen.
Navigating To Voicemail
Next, tap the Voicemail tab at the bottom right. This tab will take you to your voicemail inbox. You can see a list of all your voicemails here.
Find the voicemail you want to delete. Swipe left on the voicemail message. A Delete button will appear. Tap it to remove the voicemail.
Listening To Voicemails
Listening to voicemails on your iPhone is easy. Follow these steps to play and manage your messages. You can listen to, save, or delete voicemails quickly.
Selecting A Voicemail
First, open the Phone app. Tap on the Voicemail tab at the bottom. You will see a list of voicemails. Choose the voicemail you want to hear. Tap on it to select.
Playing The Voicemail
After selecting, hit the play button. The voicemail will start playing. You can use the slider to rewind or fast forward. Adjust the volume using the side buttons on your iPhone. To pause, tap the play button again.
| Action | Steps |
|---|---|
| Select Voicemail | Open Phone app > Tap Voicemail tab > Choose voicemail |
| Play Voicemail | Tap play button > Adjust volume > Use slider |
- Open Phone app
- Tap Voicemail tab
- Select voicemail
- Tap play button
- Adjust volume
- Open Phone app
- Tap Voicemail tab
- Select voicemail
- Tap play button
- Adjust volume
Deleting A Single Voicemail
Deleting a voicemail on your iPhone is simple. Focus on these steps to ensure you remove unwanted messages quickly. This guide will help you delete a single voicemail with ease.
Swipe To Delete
First, open the Phone app on your iPhone. Tap on the Voicemail tab at the bottom right corner. You will see a list of voicemails.
Find the voicemail you want to delete. Swipe left on that voicemail. A red Delete button will appear. Tap on the red button to delete the voicemail.
Confirming Deletion
After tapping the Delete button, the voicemail will move to the Deleted Messages folder. To make sure it is gone forever, go to the Deleted Messages folder.
In the Deleted Messages folder, tap on Clear All at the top right. Confirm by tapping Clear All again in the pop-up window. Your voicemail is now permanently deleted.

Deleting Multiple Voicemails
Deleting multiple voicemails on an iPhone is simple. This guide will help you clear your voicemail inbox quickly. Follow these steps to save time and keep your voicemail organized.
Editing Voicemail List
First, open the Phone app on your iPhone. Tap on the Voicemail tab at the bottom right of the screen. You’ll see a list of all your voicemails. Next, tap on the Edit button in the top right corner.
Selecting Multiple Voicemails
After tapping Edit, small circles will appear next to each voicemail. Tap the circles to select the voicemails you want to delete. You can select as many voicemails as needed. Selected voicemails will show a checkmark.
Deleting Selected Voicemails
Once you’ve selected the voicemails, look at the bottom right corner. Tap the Delete button. A confirmation popup may appear. Confirm the deletion to remove the selected voicemails from your inbox.
If you accidentally delete a voicemail, you can recover it. Go to the Deleted Messages folder and restore it.
Emptying Deleted Messages
Voicemail messages can pile up quickly on your iPhone. It’s essential to know how to delete them permanently. Emptying deleted messages is a crucial step in this process. Follow the steps below to keep your voicemail inbox clean and organized.
Accessing Deleted Messages Folder
To start, open the Phone app on your iPhone. Tap on the Voicemail tab at the bottom right corner. Scroll down to find the Deleted Messages folder. Tap on it to access all your deleted voicemails.
Permanently Deleting Messages
In the Deleted Messages folder, you will see a list of voicemails. Tap on Clear All to remove all messages at once. Alternatively, you can delete individual messages by swiping left and tapping Delete.
| Action | Steps |
|---|---|
| Access Deleted Messages | Open Phone app > Voicemail tab > Scroll to Deleted Messages |
| Permanently Delete All | In Deleted Messages folder > Tap Clear All |
| Delete Individual Messages | Swipe left on message > Tap Delete |
By following these steps, you can easily manage your voicemail messages. Keeping your inbox clean helps you stay organized. Make it a habit to regularly empty your deleted messages folder.
Recovering Deleted Voicemails
Accidentally deleted an important voicemail? Don’t worry, you can recover it. Follow these steps to get your voicemail back on your iPhone.
Navigating To Deleted Messages
- Open the Phone app on your iPhone.
- Tap on the Voicemail tab at the bottom.
- Scroll down to find the Deleted Messages section.
In the Deleted Messages section, you can see all the voicemails you have deleted recently.
Restoring Voicemails
- Tap on the voicemail you want to recover.
- Tap the Undelete button to restore the voicemail.
- The voicemail will move back to your main voicemail inbox.
It’s that simple! You can now listen to your recovered voicemail anytime.
Troubleshooting Voicemail Issues
Sometimes, deleting voicemail on your iPhone can be troublesome. You might encounter issues that prevent you from removing unwanted messages. This section addresses common problems and provides solutions to fix them.
Voicemail Not Deleting
Are you struggling to delete voicemails from your iPhone? Here are a few steps to resolve this issue:
- Open the Phone app and go to the Voicemail tab.
- Swipe left on the voicemail you want to delete.
- Tap the Delete button.
If the voicemail still doesn’t delete, try these methods:
- Restart your iPhone.
- Update your iPhone to the latest iOS version.
- Reset your network settings.
To reset network settings, follow these steps:
- Go to Settings.
- Tap General.
- Select Reset.
- Choose Reset Network Settings.
Visual Voicemail Not Working
Sometimes, visual voicemail may not work correctly. This can be frustrating. Here are steps to fix visual voicemail issues:
- Ensure you have a good cellular signal.
- Verify that your carrier supports visual voicemail.
- Check your voicemail settings.
To check voicemail settings:
- Open the Phone app.
- Go to the Voicemail tab.
- Tap on Set Up Now.
- Follow the prompts to set up visual voicemail.
If visual voicemail still doesn’t work, try these additional steps:
- Turn on and off Airplane Mode.
- Update your carrier settings.
- Contact your carrier for further assistance.
Follow these tips to troubleshoot and fix voicemail issues on your iPhone.
Managing Voicemail Storage
Managing your iPhone’s voicemail storage is crucial for maintaining optimal performance. Clearing out old messages can free up space and ensure you never miss an important voicemail. Follow these simple steps to effectively manage your voicemail storage.
Checking Voicemail Capacity
To start, you need to check your voicemail capacity:
- Open the Phone app.
- Tap the Voicemail tab.
- Look at your list of voicemails to see how many you have.
If your voicemail list is long, it might be time to delete some messages. Deleting old voicemails will help you free up space.
Tips For Freeing Up Space
Here are some tips for freeing up voicemail space:
- Delete Unwanted Voicemails: Swipe left on a voicemail and tap Delete.
- Clear Deleted Messages: Go to the Deleted Messages folder and tap Clear All.
- Save Important Voicemails: Tap Share on a voicemail and save it to your notes or email.
By following these tips, you can ensure your voicemail storage is well-managed. This will help your iPhone run smoothly and keep important messages accessible.
:max_bytes(150000):strip_icc()/003_delete-voicemail-on-iphone-2000549-5bb55a424cedfd0026be2a42.jpg)
Conclusion
Deleting voicemail on your iPhone is simple and efficient. Follow the steps outlined to manage your voicemail easily. Regularly clearing voicemails can free up space and ensure optimal performance. Stay organized and keep your device running smoothly by deleting unnecessary messages.
Enjoy a clutter-free voicemail inbox with these straightforward tips.