
How to Scan a Document With iPhone, use the Notes app or a third-party scanning app. Open the app, select the scan option, and follow on-screen instructions.
Scanning documents with an iPhone is quick and easy. The built-in Notes app offers a convenient way to digitize paper documents without additional software. You can also explore third-party apps for advanced features like OCR (Optical Character Recognition) and cloud storage integration.
These apps provide higher-quality scans and additional editing options. Scanning with your iPhone saves time, reduces paper clutter, and enhances organization. Whether for business, school, or personal use, your iPhone can efficiently convert physical documents into digital files, making them easy to share and store.
How to Scan a Document With iPhone?
Preparing Your Iphone
Before you scan a document with your iPhone, you need to prepare your device. This ensures a smooth and hassle-free scanning iOS version. Follow these steps to get started:
Check Ios Version
First, make sure your iPhone is running the latest iOS version. This helps you access the latest features and security updates.
- Go to Settings.
- Tap General.
- Select Software Update.
- If an update is available, tap Download and Install.
Updating your iOS ensures compatibility with the latest scanning apps.
Install Necessary Apps
Next, you need to install the right apps for scanning. The built-in Notes app is a great option, but other apps can offer extra features.
- Notes – Already installed on your iPhone.
- Adobe Scan – Available for free on the App Store.
- CamScanner – Offers advanced features with a free version.
- Microsoft Office Lens – Integrates well with Microsoft apps.
Choose the app that best suits your needs. Download and install it from the App Store.
Once your iPhone is prepared, you can move on to scanning your documents. A well-prepared device ensures an efficient scanning process.
Using The Notes App
Scanning documents with an iPhone is simple and fast. The built-in Notes app makes it easy. No need for third-party apps or scanners. Learn how to scan using the Notes app.
Opening Notes
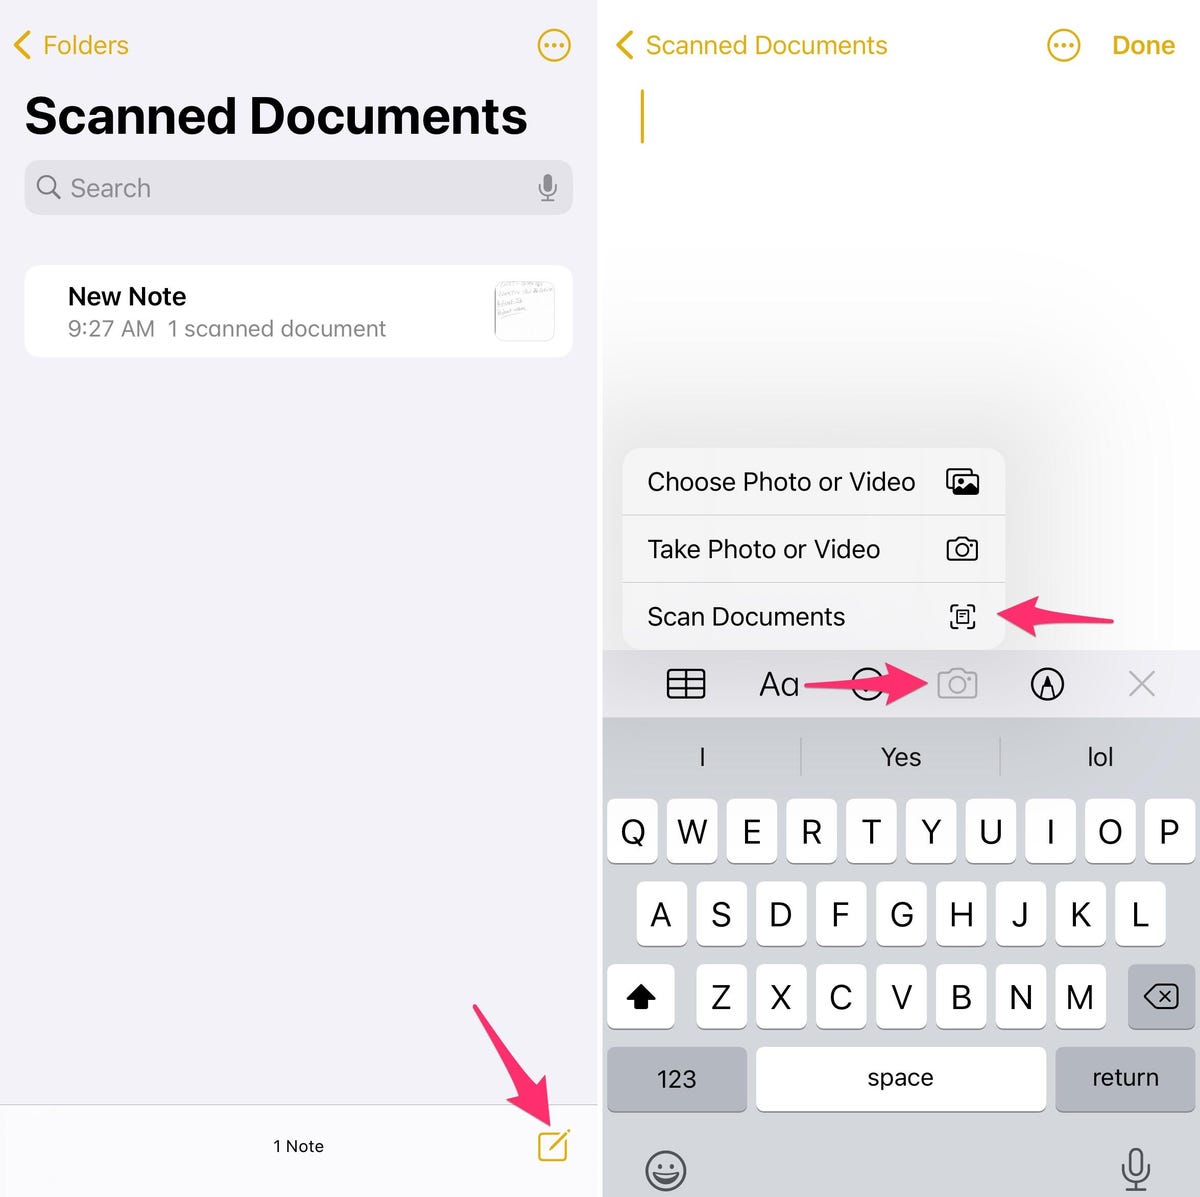
First, open the Notes app on your iPhone. Look for the yellow icon with a white note. Tap to open it.
If you don’t see the app, swipe down on your home screen. Type “Notes” in the search bar. Tap the app when it appears.
Starting A New Scan
Once the Notes app is open, start a new note. Tap the compose button (a square with a pencil) at the bottom right.
Now, you have a blank note ready. Tap the camera icon in the toolbar above the keyboard. A menu will appear.
Select “Scan Documents” from the menu. Your camera will open. Position your document in view. The app will automatically find the edges.
The app will scan your document. Adjust the corners if needed. Tap Keep Scan when done.
Repeat for more pages. Tap “Save” to finish. Your scanned document is now saved in your note.
| Step | Action |
|---|---|
| 1 | Open Notes app |
| 2 | Tap Compose button |
| 3 | Tap Camera icon |
| 4 | Select “Scan Documents” |
| 5 | Position document and scan |
| 6 | Tap “Save” |
Scanning The Document
Scanning a document with your iPhone is simple and efficient. Follow these steps to get a clear and accurate scan. This guide will help you position and capture the perfect scan.
Positioning The Document
First, place your document on a flat surface. Ensure the lighting is good to avoid shadows. Align the edges of the document with the camera view.
Here are some tips:
- Use natural light for better clarity.
- Avoid direct sunlight to prevent glare.
- Ensure the document is flat and not wrinkled.
Capturing The Scan

Open the Notes app on your iPhone. Tap the camera icon and select “Scan Documents”. Position your iPhone above the document. The app will detect the edges automatically.
Here are the steps to follow:
- Hold your iPhone steady.
- Let the app capture the scan automatically.
- Or tap the shutter button for manual capture.
- Adjust the corners if needed.
- Save the scan by tapping “Keep Scan”.
Tip: You can scan multiple pages in one document. Keep adding pages by repeating the steps above.
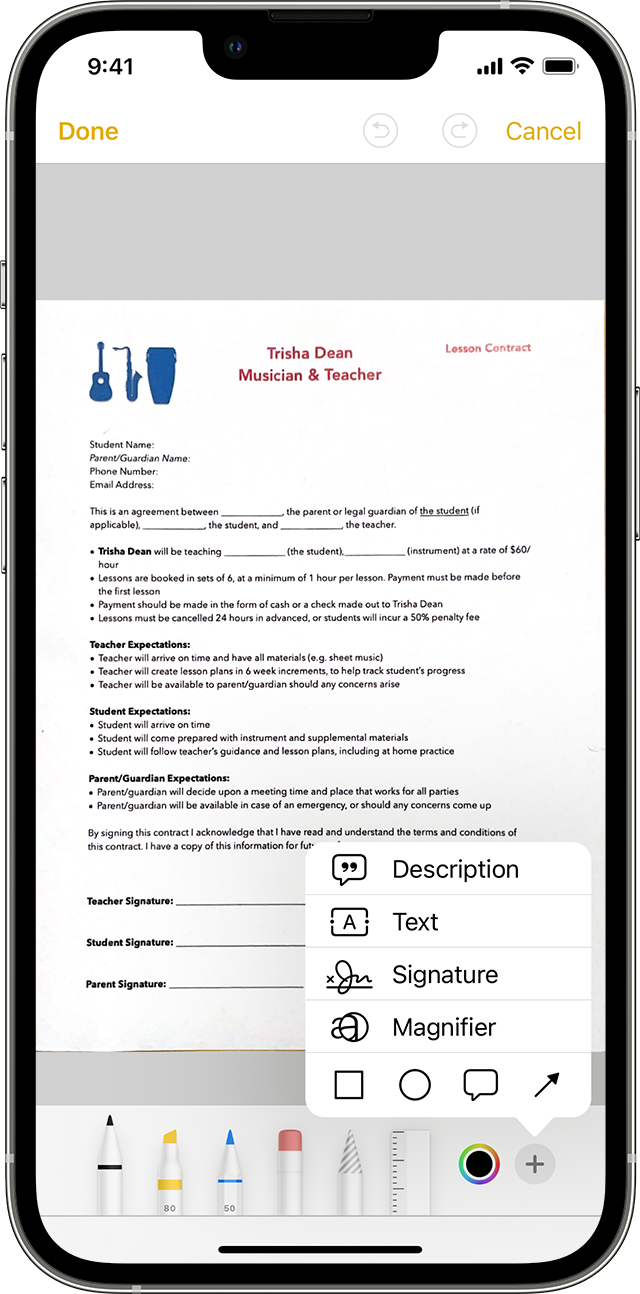
f The Scan
After scanning your document with an iPhone, it’s time to edit it. Editing helps in enhancing the quality and ensuring the document looks professional. In this section, we’ll explore how to crop and adjust your scan and apply various filters to improve its appearance.
Cropping And Adjusting
Cropping is essential for removing unwanted parts of your scan. Here’s how you can do it:
- Open the scanned document in the Notes app.
- Tap on the scanned document to select it.
- Tap on the Edit button located at the top-right corner.
- Drag the corners to adjust the crop box.
- Tap on Done to save the changes.
Adjusting the scan can enhance its clarity. Follow these steps:
- In the Edit mode, tap on the Adjust button.
- Use the sliders to change brightness and contrast.
- Tap on Done to apply the adjustments.
Applying Filters
Filters can make your scanned document look more professional. Here’s how to apply them:
- Open the scanned document and tap on Edit.
- Tap on the Filters icon at the bottom.
- Select from options like Black & White, Grayscale, or Color.
- Tap on Done to save the filter applied.
Using these steps, you can make your scanned documents look clean and professional. Proper editing ensures your documents are easy to read and share.
Saving And Sharing
Once you’ve scanned a document with your iPhone, it’s important to save and share it correctly. This ensures that your document is accessible and can be easily shared with others. Below, we’ll explore the different ways to save and share your scanned document.
Saving To Files
After scanning a document, you can save it directly to the Files app on your iPhone. This makes it easy to organize and find your documents later. Follow these steps:
- Open the scanned document.
- Tap the Share button.
- Select Save to Files.
- Choose the desired folder or create a new one.
- Tap Save.
Your document is now saved in the Files app. You can access it anytime from there.
Sharing Options
Sharing your scanned document is simple with the iPhone. You have multiple options to choose from:
- Email: Send the document as an email attachment.
- Messages: Share via iMessage or SMS.
- AirDrop: Instantly share with nearby Apple devices.
- Cloud Storage: Upload to iCloud, Google Drive, or Dropbox.
- Social Media: Share on platforms like Facebook or Twitter.
To share a document, follow these steps:
- Open the scanned document.
- Tap the Share button.
- Choose your preferred sharing option.
- Follow the prompts to complete the sharing process.
These methods make it easy to share your documents with anyone, anytime.
Troubleshooting Tips
Scanning a document with your iPhone is easy. But sometimes, you might face problems. This section will help you fix common issues.
Blurry Scans
Blurry scans can be annoying. Here are some tips to fix them:
- Hold your iPhone steady. Use both hands if needed.
- Ensure the document is flat. Use a book to hold it down.
- Clean your camera lens. Wipe it with a soft cloth.
- Use autofocus. Tap the screen to focus on the document.
Lighting Issues
Poor lighting can affect scan quality. Follow these tips for better lighting:
- Use natural light. Place the document near a window.
- Avoid shadows. Ensure no objects block the light.
- Turn on a lamp. Use a desk lamp for extra light.
- Avoid direct sunlight. It can cause glare on the document.
With these tips, you should get clear and perfect scans every time.
Alternative Apps
If you want to scan documents with your iPhone, you have many options. Some people prefer using the built-in Notes app. But there are many alternative apps with more features. These apps can make scanning easier and better.
Third-party Options
There are many third-party apps available for scanning documents. Some of the best ones include:
- Adobe Scan: This app is free and easy to use. It integrates with Adobe’s other tools.
- CamScanner: Offers many features like OCR and cloud storage. It’s very popular.
- Microsoft Office Lens: Works well with Microsoft Office apps. It’s good for business use.
- Scanner Pro: Known for high-quality scans and many editing options.
Comparing Features
Each app has different features. Here is a table to compare some key features:
| App | Free Version | OCR | Cloud Storage | Integration |
|---|---|---|---|---|
| Adobe Scan | Yes | Yes | Yes | Adobe Tools |
| CamScanner | Yes | Yes | Yes | Google Drive, Dropbox |
| Microsoft Office Lens | Yes | Yes | Yes | Microsoft Office |
| Scanner Pro | No | Yes | Yes | iCloud |
These apps offer various features to suit different needs. Choose the one that fits your workflow best.
Conclusion
Mastering document scanning with your iPhone is simple and efficient. Follow the steps outlined to streamline your tasks. With just a few taps, you can digitize important papers effortlessly. Make the most of this handy feature and keep your documents organized.
Enjoy the convenience and boost your productivity today.