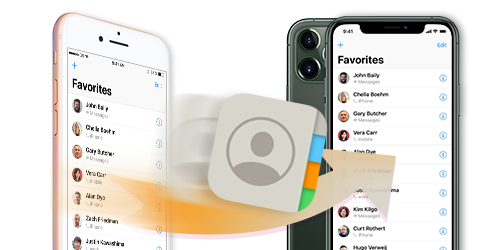
How to Copy iPhone Contacts to iPhone, use iCloud or AirDrop. Both methods are quick and straightforward.
Transferring contacts between iPhones is essential when upgrading to a new device or sharing contact information. Using iCloud or AirDrop ensures a seamless transfer process without the need for third-party apps. ICloud syncs your contacts to the cloud, making them accessible on any device logged into the same Apple ID.
AirDrop, on the other hand, allows for instant, wireless sharing between nearby Apple devices. These methods are efficient and user-friendly, ensuring your important contacts are always within reach. Whether you’re tech-savvy or a beginner, transferring contacts between iPhones has never been easier.
How to Copy iPhone Contacts to iPhone?
:max_bytes(150000):strip_icc()/001_transfer-contacts-from-iphone-to-iphone-4160363-fbde7749795e489c95684881a3fb4eb9.jpg)
Using Icloud
Transferring contacts between iPhones can seem difficult, but using iCloud makes it easy. Follow these steps to seamlessly transfer your contacts.
Enabling Icloud Backup
First, ensure iCloud Backup is enabled on both iPhones. This will store your contacts on iCloud.
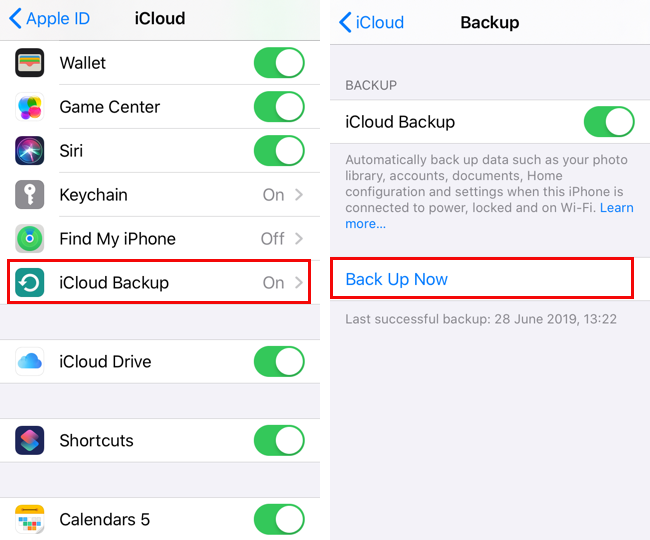
- Open the Settings app on your old iPhone.
- Tap on your Apple ID at the top.
- Select iCloud.
- Toggle the switch next to Contacts to enable syncing.
- Scroll down and tap iCloud Backup.
- Ensure iCloud Backup is turned on, then tap Back Up Now.
Your contacts will now be backed up to iCloud. Make sure you have a stable Wi-Fi connection.
Syncing Contacts
Next, sync the contacts to your new iPhone. Follow these steps:
- Turn on your new iPhone and connect to Wi-Fi.
- During setup, select Restore from iCloud Backup.
- Log in with your Apple ID and password.
- Select the most recent backup from your old iPhone.
- Wait for the restore process to complete.
If your new iPhone is already set up, follow these steps:
- Open the Settings app on your new iPhone.
- Tap on your Apple ID at the top.
- Select iCloud.
- Toggle the switch next to Contacts to enable syncing.
Your contacts will now sync automatically to your new iPhone.
Using Itunes
Transferring contacts between iPhones can be effortless with iTunes. This method is reliable and secure. Follow these steps to ensure a smooth transfer.
Connecting To Itunes
First, you need to connect your iPhone to a computer with iTunes installed. Use a USB cable for this. Make sure your iPhone is unlocked.
Open iTunes. Look for the device icon in the top-left corner. Click on it. This will open your iPhone’s summary page.
Transferring Contacts
On the summary page, find the Info tab. Click on it. You will see various sync options.
Check the box next to “Sync Contacts”. Choose the contacts you want to sync. You can sync all contacts or select specific groups.
Click the Apply button to start syncing. Wait for the process to complete. Once done, disconnect your iPhone.
Now, connect your new iPhone to the same computer. Repeat the steps above to sync the contacts to the new device.
Ensure both iPhones use the same Apple ID. This will keep your contacts synchronized.
| Step | Action |
|---|---|
| 1 | Connect your old iPhone to the computer. |
| 2 | Open iTunes and click the device icon. |
| 3 | Go to the Info tab and check “Sync Contacts”. |
| 4 | Click Apply to start syncing. |
| 5 | Disconnect the old iPhone and connect the new iPhone. |
| 6 | Repeat the steps to sync contacts to the new iPhone. |
Using Airdrop
Transferring contacts between iPhones is simple with AirDrop. This method is quick and requires no cables. AirDrop uses Bluetooth and Wi-Fi to share files. Follow the steps below to transfer your contacts.
Activating Airdrop
First, ensure AirDrop is active on both iPhones. Follow these steps:
- Open the Control Center by swiping down from the top-right corner.
- Press and hold the network settings card.
- Tap on AirDrop.
- Select Everyone or Contacts Only.
Both phones need AirDrop enabled. Keep them close together for the transfer.
Sending Contacts

Now, send the contact details from one iPhone to another:
- Open the Contacts app on the sender’s iPhone.
- Select the contact you wish to share.
- Tap Share Contact at the bottom.
- Choose AirDrop from the options.
- Select the recipient’s iPhone.
- On the recipient’s iPhone, tap Accept to receive the contact.
The contact will appear in the recipient’s Contacts app. This process ensures a seamless transfer.
Using Third-party Apps
Transferring contacts between iPhones can be easy with third-party apps. These apps offer a simple and quick way to move contacts. They are user-friendly and save time.
Popular Apps
Several apps can help transfer contacts. Here are some popular ones:
- My Contacts Backup: This app creates a backup file of your contacts.
- Copy My Data: A straightforward app for copying contacts and other data.
- Contact Mover & Account Sync: Ideal for syncing contacts between multiple accounts.
Step-by-step Guide
Follow these steps to copy contacts using My Contacts Backup:
- Download and install My Contacts Backup from the App Store.
- Open the app and grant necessary permissions.
- Tap on the Backup button.
- The app will create a .vcf file with all your contacts.
- Tap on Email and send the .vcf file to yourself.
- Open the email on your new iPhone.
- Tap on the .vcf file attachment.
- Choose Add All Contacts to import them to your new iPhone.
Using Copy My Data:
- Install Copy My Data on both iPhones.
- Ensure both iPhones are connected to the same Wi-Fi.
- Open the app on both devices.
- Follow the on-screen instructions to connect the iPhones.
- Select Contacts to transfer.
- Wait for the transfer to complete.
Using Contact Mover & Account Sync:
- Download and install the app on both iPhones.
- Open the app and sign in with the same account on both devices.
- Choose the source and destination accounts.
- Tap on Sync to move contacts.
- Wait for the sync process to finish.
These steps make it easy to transfer contacts. Choose the app that suits your needs best.
Using Sim Card
Copying contacts using a SIM card is a simple process. This method is useful if you need to transfer contacts between iPhones.
Exporting Contacts
To begin, you need to export your contacts to the SIM card. Here are the steps:
- Insert the SIM card into the source iPhone.
- Go to Settings and select Contacts.
- Tap on Import SIM Contacts. This option may be located in different menus based on iOS versions.
- Wait for the contacts to be exported to the SIM card.
Ensure the process completes before removing the SIM card.
Importing Contacts
Next, you will import the contacts to the new iPhone. Follow these steps:
- Insert the SIM card into the new iPhone.
- Open Settings and navigate to Contacts.
- Tap on Import SIM Contacts.
- Wait for the contacts to be imported to the new iPhone.
After the import is complete, check the Contacts app to ensure all contacts are present.
| Step | Action |
|---|---|
| 1 | Insert SIM into source iPhone |
| 2 | Go to Settings > Contacts |
| 3 | Tap on Import SIM Contacts |
| 4 | Wait for contacts to export |
| 5 | Insert SIM into new iPhone |
| 6 | Go to Settings > Contacts |
| 7 | Tap on Import SIM Contacts |
| 8 | Wait for contacts to import |
This method ensures your contacts are easily transferred. It is a reliable way to move contacts between iPhones using a SIM card.
Troubleshooting Tips
Encountering issues while copying iPhone contacts can be frustrating. Here are some troubleshooting tips to help you resolve common problems easily.
Common Issues
There are several common issues users face when copying contacts:
- Contacts not showing up: Contacts may not appear after transferring.
- Incomplete transfer: Some contacts might be missing.
- Duplicate contacts: You may see the same contact twice.
- Sync errors: iCloud may not sync your contacts correctly.
Quick Fixes
Try these quick fixes to resolve common issues:
Contacts not showing up
- Ensure both iPhones are using the same Apple ID.
- Go to Settings > [your name] > iCloud and turn on Contacts.
- Restart both iPhones and check again.
Incomplete transfer
Use these steps to address incomplete transfers:
| Step | Action |
|---|---|
| 1 | Check your internet connection. |
| 2 | Ensure enough iCloud storage is available. |
| 3 | Manually transfer missing contacts via AirDrop. |
Duplicate contacts
Follow these steps to remove duplicate contacts:
- Open the Contacts app on your iPhone.
- Tap the duplicate contact.
- Select Edit and then Delete Contact.
Sync errors
Resolve sync errors with these methods:
- Go to Settings > [your name] > iCloud and turn off Contacts.
- Restart your iPhone.
- Go back to Settings > [your name] > iCloud and turn on Contacts again.

Conclusion
Transferring iPhone contacts is a straightforward process. Follow the steps outlined to ensure seamless transfer. Whether using iCloud or iTunes, the process is quick and efficient. Keep your contacts safe and accessible across devices. Stay organized and connected effortlessly with these simple methods.
Enjoy your new iPhone with all your important contacts intact.


