
How to restore notes on iPhone, open the Notes app and check the Recently Deleted folder. You can also use iCloud backup.
Losing important notes on your iPhone can be frustrating. Restoring them is often straightforward if you know where to look. The Notes app has a Recently Deleted folder that temporarily stores deleted notes for 30 days. This feature allows you to recover notes with just a few taps.
ICloud backups provide another way to restore lost notes. Regular backups ensure that your data remains safe. By following these simple steps, you can quickly retrieve your notes. This guide helps you navigate the process efficiently. Save time and avoid stress by utilizing these methods to restore your important notes.
How to Restore Notes on iPhone?
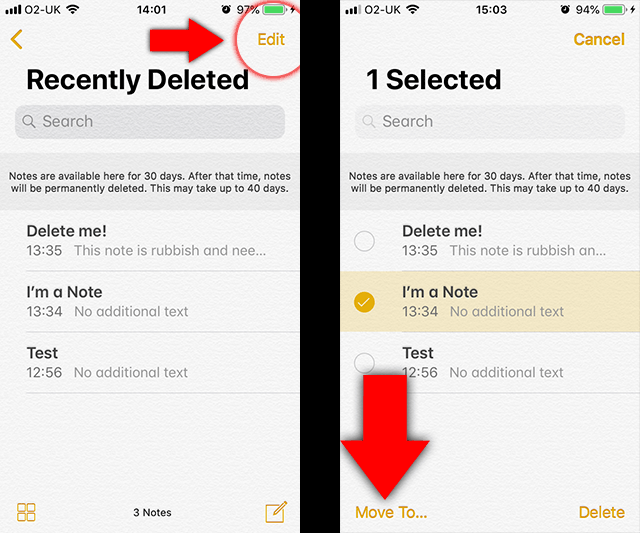
Checking Recently Deleted Folder
If you accidentally deleted an important note on your iPhone, don’t worry. You can restore it by checking the Recently Deleted folder. This folder holds your deleted notes for up to 30 days. Follow these steps to retrieve your lost notes quickly.
Accessing Recently Deleted
First, you need to access the Recently Deleted folder. Here’s how:
- Open the Notes app on your iPhone.
- Tap on the Back button until you see the Folders view.
- Find and tap on Recently Deleted.
Now, you can see all the notes you have deleted in the last 30 days.
Restoring From Recently Deleted
Once you are in the Recently Deleted folder, you can restore your notes easily:
- Select the note you want to restore.
- Tap on the Move button at the bottom.
- Choose the folder where you want to move the note.
Your note is now restored to the chosen folder. This process is simple and ensures you never lose important information.
:max_bytes(150000):strip_icc()/001-how-to-recover-deleted-notes-on-iphone-4707250-9985da3c8d2a44e6b1b97661f194b59b.jpg)
Restoring From Icloud Backup
Restoring notes on your iPhone can be easy with an iCloud Backup. This method ensures your important notes are safely restored.
Enabling Icloud Backup
First, ensure that iCloud Backup is enabled on your iPhone. Follow these steps:
- Open the Settings app.
- Tap on your name at the top.
- Select iCloud.
- Scroll down and tap on iCloud Backup.
- Ensure the iCloud Backup toggle is turned on.
With iCloud Backup enabled, your notes will be backed up automatically.
Steps To Restore
To restore notes from an iCloud Backup, follow these steps:
- Open the Settings app.
- Go to General, then select Reset.
- Tap on Erase All Content and Settings.
- Your iPhone will restart. Follow the on-screen setup instructions.
- When prompted, select Restore from iCloud Backup.
- Sign in with your Apple ID and select the backup that contains your notes.
- Wait for the restore process to complete. Your iPhone will restart.
After the restart, check the Notes app. Your restored notes should appear.
Using Itunes Backup
Restoring notes on your iPhone using an iTunes backup is straightforward. This method ensures you retrieve all your lost notes quickly. Follow these simple steps to get your notes back.
Connecting To Itunes
First, connect your iPhone to your computer using a USB cable. Make sure you have the latest version of iTunes installed.
Open iTunes and wait for it to recognize your iPhone. Your device name should appear on the iTunes interface.
| Step | Action |
|---|---|
| 1 | Connect iPhone to Computer |
| 2 | Open iTunes |
| 3 | Wait for iTunes to recognize iPhone |
Restoring Notes
Once connected, locate the Device icon in iTunes and click on it. Navigate to the Summary tab.
In the Summary tab, you will find the Restore Backup button. Click on it and select the most recent backup that contains your notes.
- Click on Device icon
- Navigate to Summary tab
- Click Restore Backup
- Select recent backup
- Wait for restore process to complete
After selecting the backup, click Restore. Wait for the process to complete. Your iPhone will restart, and your notes will be restored.
Make sure not to disconnect your iPhone during the restore process. This can cause errors.
By following these steps, you can easily restore your lost notes using iTunes.
:max_bytes(150000):strip_icc()/004how-to-recover-deleted-notes-on-iphone-4707250-ffb2a9533a7248ed8f594f305f2f107c.jpg)
Third-party Apps And Services
Restoring notes on an iPhone can be tricky. Sometimes, built-in methods might not work. This is where third-party apps and services come into play. These apps can help you recover lost notes efficiently.
Popular Recovery Apps
Several third-party apps can assist in note recovery. Some of the most popular ones include:
- Dr.Fone – Data Recovery: A comprehensive tool for iOS data recovery.
- iMobie PhoneRescue: Known for its high success rate in data recovery.
- Tenorshare UltData: Provides an easy-to-use interface for recovering notes.
- EaseUS MobiSaver: Offers efficient recovery solutions for iPhone users.
How To Use Them
Using these apps is quite simple. Here’s a step-by-step guide:
- Download and install the app on your computer.
- Connect your iPhone to the computer via USB cable.
- Launch the app and select the “Recover from iOS Device” option.
- Click “Start Scan” to begin scanning your iPhone.
- Once the scan is complete, preview the recoverable notes.
- Select the notes you want to restore and click “Recover”.
Each app may have a slightly different interface. The basic steps remain the same. Ensure your iPhone stays connected during the process.
Here’s a quick comparison of these apps:
| App | Success Rate | User Interface |
|---|---|---|
| Dr.Fone – Data Recovery | 90% | Easy |
| iMobie PhoneRescue | 85% | Moderate |
| Tenorshare UltData | 88% | Easy |
| EaseUS MobiSaver | 80% | Moderate |
Preventing Future Loss
Restoring lost notes on your iPhone is essential. But preventing future loss is even more critical. Follow these steps to safeguard your valuable notes.
Regular Backups
Regular backups are crucial for keeping your notes safe. Use iCloud for automatic backups. Enable iCloud Backup in your settings.
Follow these steps:
- Go to Settings.
- Tap on your Apple ID.
- Select iCloud.
- Toggle on iCloud Backup.
- Tap Back Up Now.
Create a habit of manual backups weekly. This ensures your notes are always current.
Using Multiple Platforms
Storing notes on multiple platforms minimizes risk. Use apps like Google Keep or Evernote. These apps sync across devices.
Here’s a quick comparison:
| Feature | Google Keep | Evernote |
|---|---|---|
| Sync | Yes | Yes |
| Cross-Platform | Yes | Yes |
| Free Tier | Yes | Limited |
Using multiple platforms ensures access to your notes always. Backup your notes in more than one place.
By following these steps, you can prevent future loss of your iPhone notes.
Troubleshooting Common Problems
Restoring notes on your iPhone can sometimes lead to unexpected issues. Troubleshooting these common problems can help you get your notes back easily. Here we will cover issues with iCloud and problems with iTunes.
Issues With Icloud
iCloud sync problems can prevent your notes from restoring properly. Here are some solutions:
- Check iCloud Settings: Ensure iCloud is enabled for Notes. Go to
Settings > [Your Name] > iCloudand toggle the Notes switch. - Internet Connection: Make sure you have a stable internet connection. iCloud needs a strong connection to sync notes.
- Storage Space: Verify if you have enough iCloud storage. Go to
Settings > [Your Name] > iCloud > Manage Storage.
Problems With Itunes
iTunes can also face issues while restoring notes. Here’s what you can do:
- Update iTunes: Ensure you have the latest version of iTunes. Go to
Help > Check for Updates. - Device Connection: Make sure your iPhone is properly connected to your computer. Use a certified cable.
- Backup Issues: Check if the backup file is corrupted. Try restoring from a different backup.
| Problem | Solution |
|---|---|
| iCloud not syncing | Check iCloud settings and internet connection |
| iTunes not recognizing iPhone | Update iTunes and check device connection |
| Not enough iCloud storage | Manage storage and free up space |
Conclusion
Restoring notes on your iPhone is simple and stress-free with the right steps. Follow the outlined methods to recover your important information efficiently. Ensure your notes are backed up to prevent future loss. With these tips, you can keep your notes safe and accessible at all times.