
How to remove private browsing on iPhone, open Safari and tap the tabs button. Select “Private” to exit private mode.
Private browsing on an iPhone allows users to surf the internet without leaving traces. This feature is handy for maintaining privacy, but there may be times you want to disable it. Exiting private browsing is straightforward, and doing so reverts Safari to its standard mode, where history and cookies are stored.
This guide will help you understand the steps to turn off private browsing and ensure a seamless browsing experience. Whether you’re troubleshooting or just want to monitor browsing activities, knowing how to switch off private mode is essential. Follow these easy steps to manage your browsing preferences effectively.
How to Remove Private Browsing on iPhone?
Introduction To Private Browsing On Iphone
Private Browsing on iPhone lets users browse the web without saving history. It is a useful feature for keeping activity hidden. But sometimes, it is necessary to disable it.
What Is Private Browsing?
Private Browsing is a mode available in Safari. It prevents your browsing history from being recorded. No cookies are saved, and websites cannot track you.
This mode is perfect for maintaining privacy. It ensures your activities remain hidden from others.
Reasons To Disable Private Browsing
There are several reasons to disable Private Browsing:
- Parental Control: Parents may want to monitor kids’ internet use.
- Work Devices: Employers may need to track activity on work phones.
- Personal Tracking: Users may want to keep a record of visited sites.
Disabling Private Browsing can help in these situations. It allows for better monitoring and tracking.
Setting Up Your Iphone For The First Time
Setting up your iPhone for the first time can be exciting. It’s important to configure your privacy settings carefully. These settings help protect your personal information.
Initial Privacy Settings
When you turn on your iPhone, follow the on-screen instructions. You will be prompted to set up your privacy settings.
- Location Services: Decide if apps can access your location.
- Analytics: Choose if you want to share usage data with Apple.
- App Permissions: Control what apps can access your data.
Ensure you review each option carefully. This will keep your data safe.
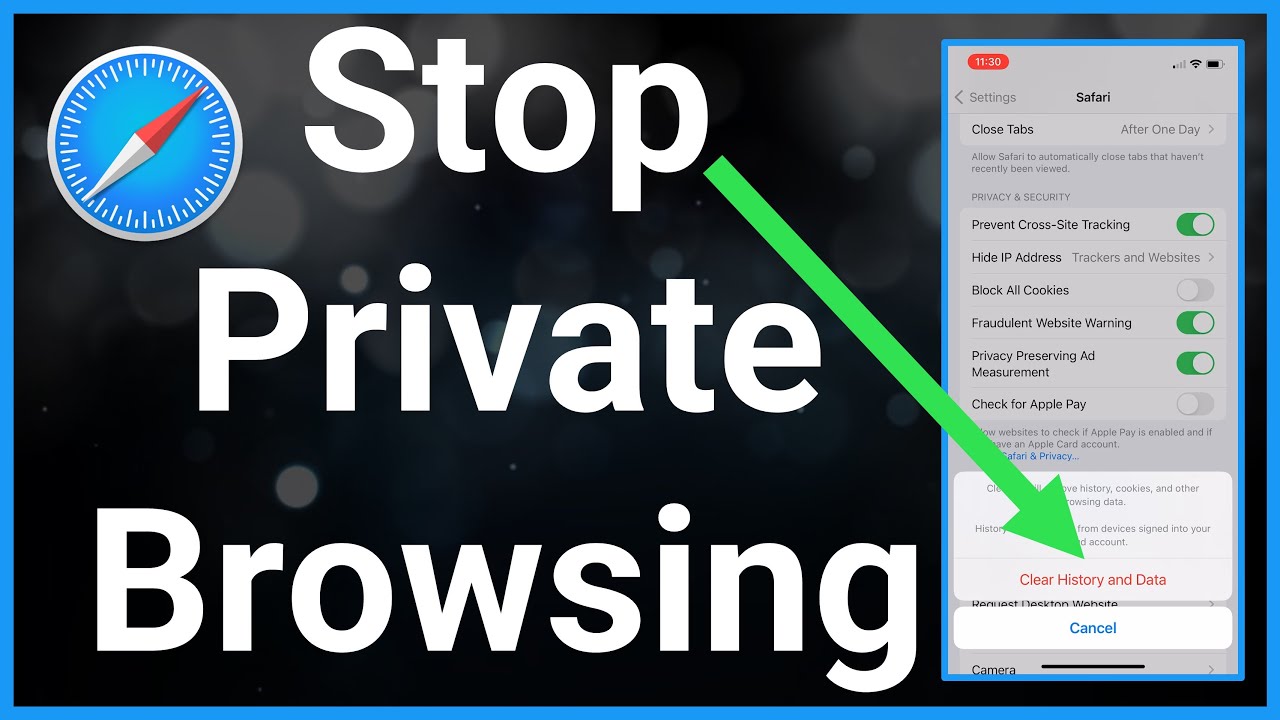
Understanding Safari Privacy Controls
Safari is the default web browser on your iPhone. It has built-in privacy controls to protect your browsing history.
- Open Settings: Tap on the Settings app on your home screen.
- Scroll to Safari: Navigate down and tap on Safari.
- Privacy & Security: Check the options under Privacy & Security.
Here you can manage cookies, prevent cross-site tracking, and block pop-ups. These settings help you browse the web safely.
If you want to remove private browsing, turn off the Private Browsing mode in Safari. This will save your browsing history and cookies.
Navigating Safari’s Private Browsing Mode
Safari’s Private Browsing Mode keeps your online activities private. It helps you hide your browsing history. Learn how to remove private browsing on your iPhone easily.
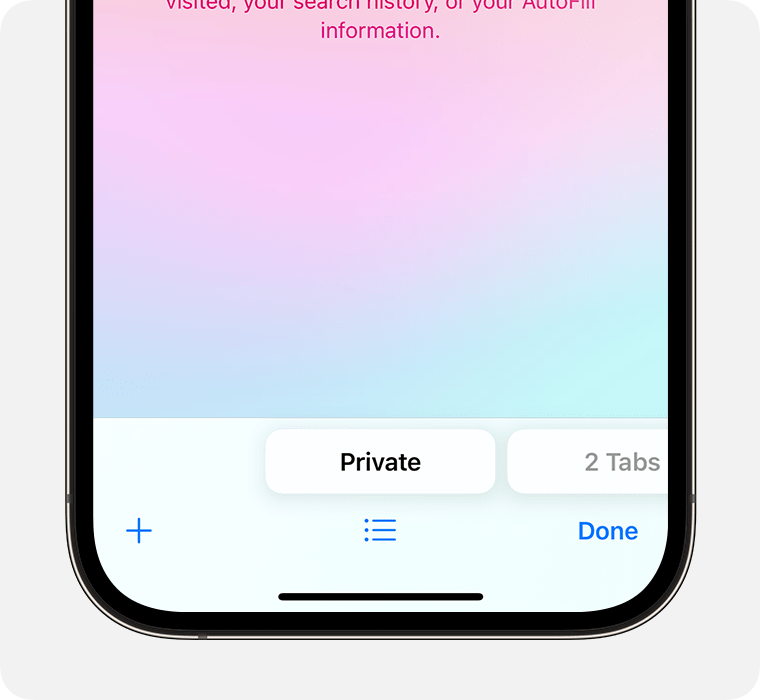
Accessing Private Browsing
To access Private Browsing, open Safari on your iPhone. Tap the tabs button at the bottom right. Press the Private option in the lower-left corner. Now, you are in Private Browsing mode.
Identifying Private Tabs
Private tabs look different from regular tabs. They have a dark background. This helps you know you are browsing privately. You can open multiple private tabs.
- Private tabs do not save history.
- They do not store cookies.
- They do not remember search entries.
To switch back to normal browsing, tap the tabs button again. Choose the Private option to turn it off. Your regular tabs will appear again.
| Step | Action |
|---|---|
| 1 | Open Safari |
| 2 | Tap the tabs button |
| 3 | Select Private option |
| 4 | Start browsing privately |
| 5 | Repeat steps to switch back |
Knowing how to navigate Safari’s Private Browsing mode is useful. It helps you manage your privacy effectively.
Steps To Disable Private Browsing
Want to stop private browsing on your iPhone? Follow these simple steps. Disabling private browsing helps keep track of your web history. Here’s how to do it in Safari.
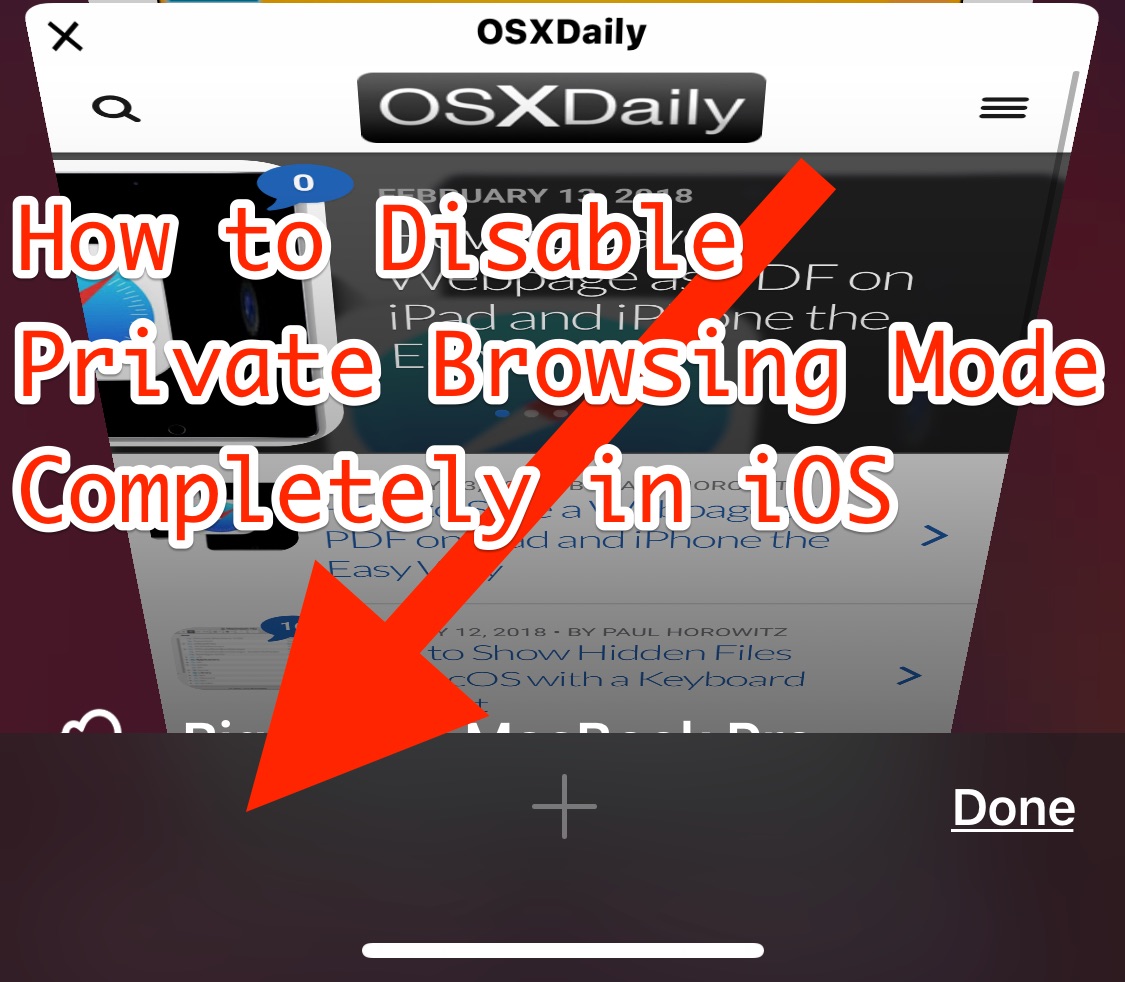
Exiting Private Mode In Safari
First, open the Safari app on your iPhone. Look at the bottom of your screen. Find the two square icons overlapping each other. This is the tab button.
Tap the tab button. You will see an option called “Private”. It’s usually highlighted. Tap on “Private” to turn off private browsing. Your Safari will switch back to normal mode.
Closing Private Tabs
After exiting private mode, you may still have private tabs open. Here’s how to close them:
- Tap on the tab button again.
- Swipe left on each tab to close them.
- Or, tap the “X” button on each tab.
That’s it! You have disabled private browsing and closed all private tabs.
Restricting Private Browsing Via Screen Time
Private browsing can hide web history. Parents may want to restrict it. Using Screen Time on an iPhone helps manage this.
Setting Up Screen Time
To start, open the Settings app on your iPhone. Scroll down and tap on Screen Time. If Screen Time is not enabled, tap “Turn On Screen Time”.
Once enabled, follow these steps:
- Tap on Continue.
- Select whether the iPhone is for you or your child.
Now, you can set up limits for apps, websites, and more.
Content & Privacy Restrictions
Next, configure Content & Privacy Restrictions to block private browsing:
- In Screen Time, tap on Content & Privacy Restrictions.
- Toggle the switch to enable it.
- Tap on Content Restrictions.
- Select Web Content.
- Choose Limit Adult Websites.
This setting will block private browsing and restrict adult content.
Here is a summary in a table format:
| Step | Action |
|---|---|
| 1 | Open Settings and tap Screen Time |
| 2 | Turn on Screen Time |
| 3 | Enable Content & Privacy Restrictions |
| 4 | Go to Content Restrictions |
| 5 | Select Web Content |
| 6 | Choose Limit Adult Websites |
Using Third-party Browsers
If you wish to remove private browsing on your iPhone, using third-party browsers can be a helpful option. These browsers offer different features and settings that can help you control your privacy better. Below, we’ll explore some alternative browser options and the privacy features they offer.
Alternative Browser Options
There are several third-party browsers you can use on your iPhone. Here are some popular choices:
- Google Chrome: Known for its speed and syncing capabilities.
- Mozilla Firefox: Offers robust privacy controls and extensions.
- Opera Browser: Includes a built-in VPN and ad blocker.
- Brave Browser: Focuses on privacy and blocking ads.
Each of these browsers has its unique features, making them suitable for different needs. Choosing the right one can help you manage your privacy better.
Privacy Features In Other Browsers
Third-party browsers come with various privacy features that can be useful. Here’s a comparison table of some key privacy features:
| Browser | Private Browsing Mode | Ad Blocker | VPN | Tracking Protection |
|---|---|---|---|---|
| Google Chrome | Yes | No | No | Basic |
| Mozilla Firefox | Yes | Yes (via Add-ons) | No | Advanced |
| Opera Browser | Yes | Yes | Yes | Basic |
| Brave Browser | Yes | Yes | No | Advanced |
Understanding these features can help you pick the browser that best suits your needs. Each browser offers unique ways to enhance your privacy on the iPhone.
Maintaining Privacy Without Private Browsing
Private browsing on the iPhone helps keep your activity hidden. But there are other ways to maintain privacy without using private browsing. This section covers some effective methods to enhance your privacy.
Regularly Clearing History And Website Data
Regularly clearing your history and website data helps maintain privacy. You can do this through the Safari app on your iPhone.
- Open the Settings app.
- Scroll down and tap Safari.
- Tap Clear History and Website Data.
- Confirm by tapping Clear History and Data.
Clearing history removes all traces of your web activity. It also frees up storage space on your device.
Using Ad Blockers And Privacy Extensions
Ad blockers and privacy extensions can enhance your online privacy. These tools help block unwanted ads and trackers.
| Ad Blocker | Privacy Extension |
|---|---|
| AdBlock | Ghostery |
| AdGuard | DuckDuckGo Privacy Essentials |
Installing these tools is simple:
- Download the app from the App Store.
- Follow the setup instructions within the app.
Once installed, these tools help keep your browsing data private. They also improve your overall web experience by reducing clutter and blocking tracking scripts.
Troubleshooting Common Issues
If you are having trouble with private browsing on your iPhone, you’re not alone. Many users face difficulties turning it off or restoring missing Safari features. This guide provides clear solutions to these common issues.
Private Browsing Not Turning Off
If private browsing won’t turn off, try these steps:
- Open the Safari app.
- Tap the Tabs icon at the bottom.
- Tap Private to switch to normal browsing.
If this doesn’t work, restart your iPhone. Hold down the power button and swipe to power off. Turn it back on and check Safari again.
Still not working? Reset all settings:
- Go to Settings.
- Tap General.
- Select Reset.
- Choose Reset All Settings.
This won’t delete your data but will reset system settings. Check Safari to see if private browsing is off.
Restoring Missing Safari Features
If Safari features are missing, follow these steps:
- Go to Settings.
- Scroll down and tap Safari.
- Ensure Search Engine Suggestions and Safari Suggestions are on.
If your tabs or bookmarks are missing, try these steps:
- Open the Safari app.
- Tap the Tabs icon.
- Swipe down to reveal recently closed tabs.
To restore bookmarks, sync with iCloud:
- Go to Settings.
- Tap Your Name at the top.
- Select iCloud.
- Ensure Safari is toggled on.
This will sync your bookmarks across all Apple devices. If features are still missing, reset all settings as mentioned earlier.
Conclusion
Removing private browsing on an iPhone is simple and enhances security. Follow these steps for a safer browsing experience. Remember to stay updated with the latest iOS features. Protect your privacy by regularly reviewing your browsing settings. This ensures a secure and personalized internet experience on your device.