
How to transfer everything from one iPhone to another, use Quick Start or iCloud backup. These methods ensure a seamless data migration.
Upgrading to a new iPhone is always exciting, but transferring your data can seem daunting. Apple’s Quick Start and iCloud backup features simplify this process, making it easy to move photos, apps, and settings. Quick Start uses Bluetooth to transfer data directly between devices.
ICloud backup involves backing up your old iPhone to iCloud and then restoring that backup on your new iPhone. Both methods are secure and user-friendly, ensuring your data remains intact. Following these steps helps you transition smoothly to your new iPhone, keeping all your important information in place.
How to Transfer Everything from One iPhone to Another?

Introduction To Iphone Transfers
Transferring data between iPhones can seem challenging. This guide simplifies the process. You’ll learn how to move everything from your old iPhone to a new one seamlessly.
The Need For Seamless Data Migration
Switching to a new iPhone should be hassle-free. You want all your photos, contacts, and apps to transfer smoothly. A seamless data migration helps you keep important information.
Imagine losing all your cherished memories. Or not having your essential apps and settings. This can be frustrating. A seamless transfer ensures you continue using your new phone without interruption.
What To Expect From This Guide
This guide covers everything you need to know. Follow the steps for an easy iPhone transfer. Expect detailed instructions and helpful tips.
- Step-by-step process for transferring data.
- Information on using iCloud and iTunes.
- Troubleshooting common issues.
We’ll start with preparing your old iPhone. Then, we’ll move on to setting up your new iPhone. Finally, we will ensure everything is transferred correctly.
| Step | Description |
|---|---|
| 1 | Back up your old iPhone |
| 2 | Turn on your new iPhone |
| 3 | Follow the setup assistant |
| 4 | Restore from backup |
By the end of this guide, your new iPhone will be ready. All your data will be exactly where you want it.
Preparing Your Old Iphone
Before transferring data to a new iPhone, prepare your old device. This ensures a smooth transition. Follow these steps to get started.
Backing Up Data
Backing up your data is crucial. It protects your information during the transfer.
- iCloud Backup: Go to Settings > [your name] > iCloud > iCloud Backup. Turn on iCloud Backup. Tap Back Up Now.
- iTunes Backup: Connect your iPhone to a computer. Open iTunes. Select your device. Click Back Up Now.
Ensure the backup finishes before proceeding. This keeps your data safe.
Ensuring Software Is Up To Date
Update your iPhone to the latest software version. This prevents compatibility issues.
- Open Settings.
- Tap General.
- Select Software Update.
- If an update is available, tap Download and Install.
Updating your software ensures the best performance during the transfer.
| Backup Method | Steps |
|---|---|
| iCloud Backup | Settings > [your name] > iCloud > iCloud Backup > Back Up Now |
| iTunes Backup | Connect to computer > Open iTunes > Select device > Back Up Now |
Following these steps ensures your old iPhone is ready for the transfer. Your data stays safe and the process remains smooth.
Setting Up Your New Iphone
Setting up your new iPhone can be an exciting experience. This guide will help you move everything smoothly from your old iPhone to your new one.
Starting The Setup Process
To start, turn on your new iPhone by holding the power button. A welcome screen will appear. Follow the on-screen instructions to begin.
If you have another device, use Quick Start. Place both devices close together. Your new iPhone will prompt you to use your Apple ID.
Choosing Your Language And Region
Select your preferred language from the list. Next, choose your region or country. This will help set up the correct time and date formats.
Below is a quick reference table for common regions and their settings:
| Region | Language | Time Format |
|---|---|---|
| United States | English | 12-hour |
| United Kingdom | English | 24-hour |
| Japan | Japanese | 24-hour |
Once you have selected your language and region, tap Next. This will take you to the next step in the setup process.
Transfer Methods Overview
Transferring data from one iPhone to another can seem daunting. Fortunately, Apple provides several methods to make this process easy and seamless. Below, we explore three effective ways to transfer everything from your old iPhone to your new one. These methods are Quick Start, iCloud, and iTunes/Finder.
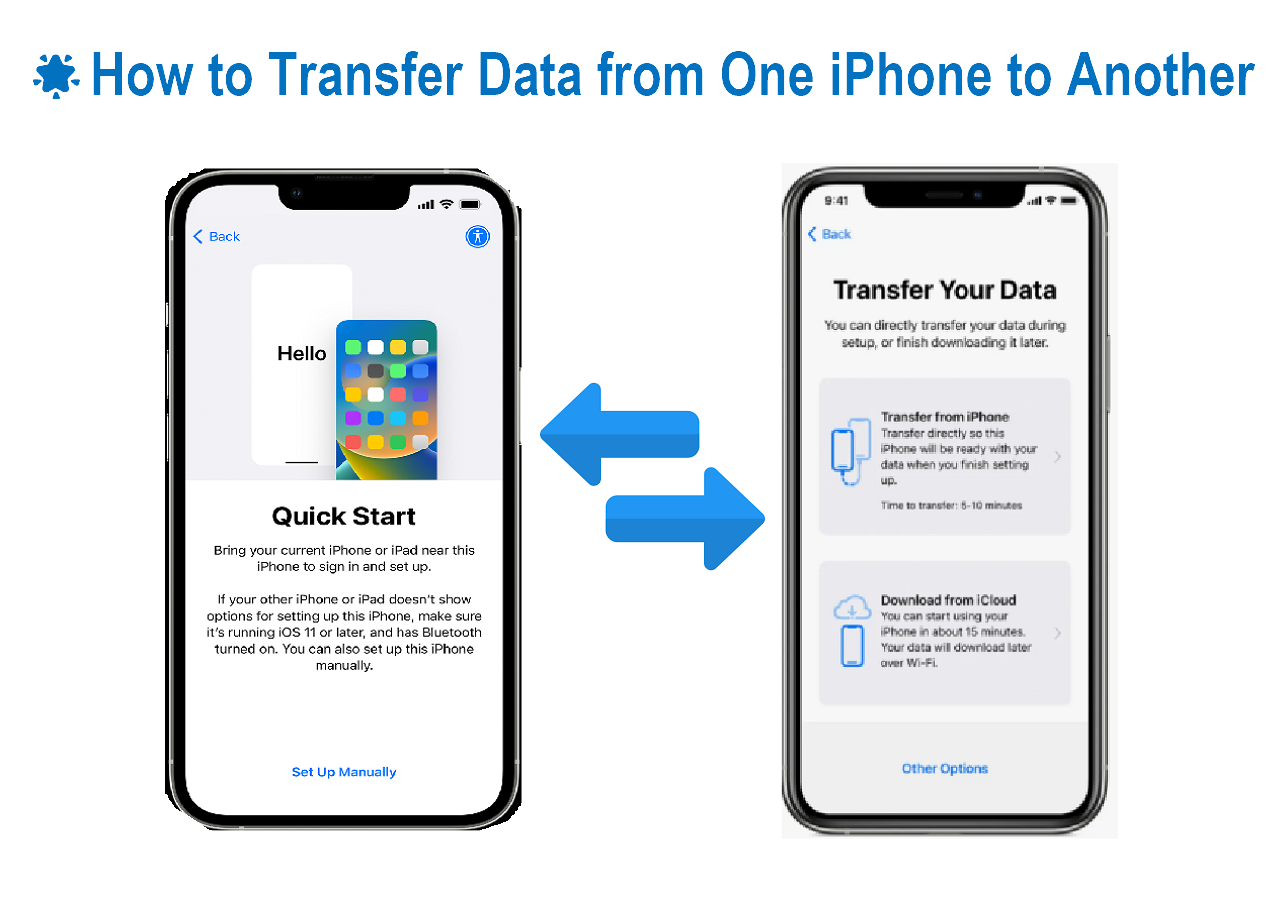
Quick Start
Quick Start is the fastest way to set up your new iPhone. It uses both devices and a few taps.
- Turn on your new iPhone and place it near your old one.
- A Quick Start screen appears on your old iPhone.
- Tap ‘Continue’ on your old iPhone.
- Scan the animation on your new iPhone using your old iPhone.
- Enter your old iPhone’s passcode on your new iPhone.
- Follow the on-screen instructions to transfer data.
Quick Start is simple and saves you time. Both iPhones need iOS 11 or later for Quick Start to work.
Icloud
iCloud lets you backup and transfer data wirelessly. This method uses your iCloud account.
- Ensure both iPhones are connected to Wi-Fi.
- On your old iPhone, go to Settings > [your name] > iCloud > iCloud Backup.
- Tap Back Up Now to create a recent backup.
- Turn on your new iPhone and follow the setup steps.
- When prompted, choose Restore from iCloud Backup.
- Sign in with your Apple ID and select the latest backup.
iCloud is convenient but requires sufficient iCloud storage space.
Itunes/finder
iTunes/Finder allows you to transfer data using a computer.
| Steps | Description |
|---|---|
| 1 | Connect your old iPhone to your computer using a USB cable. |
| 2 | Open iTunes or Finder and select your device. |
| 3 | Click Back Up Now to create a full backup. |
| 4 | Disconnect the old iPhone and connect the new one. |
| 5 | Select Restore Backup and choose the latest backup. |
This method is useful if you prefer using a computer. Ensure you have the latest version of iTunes or macOS.
Using Quick Start For Instant Setup
Want to transfer everything from one iPhone to another? Quick Start makes it simple and fast. This guide will show you how to use Quick Start for an instant setup. You’ll also learn how to troubleshoot common issues.
Step-by-step Guide
- Turn on your new iPhone and place it near your old iPhone.
- A Quick Start screen will appear on your old iPhone.
- Press Continue to begin the setup process.
- Wait for an animation to appear on the new iPhone.
- Hold your old iPhone over the new one to scan the animation.
- Enter your old iPhone’s passcode on the new iPhone.
- Follow the on-screen instructions to set up Face ID or Touch ID.
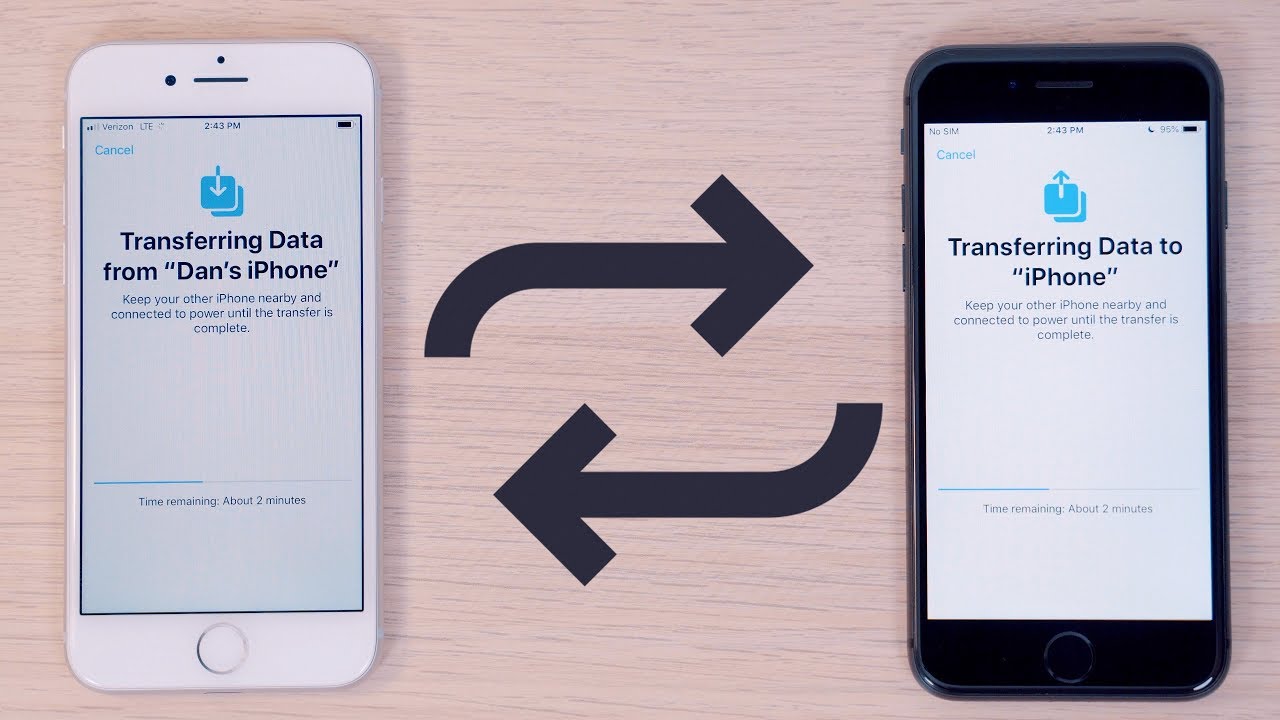
- Choose Transfer from iPhone to start transferring your data.
- Keep both iPhones close together until the transfer is complete.
Troubleshooting Common Issues
- Issue: Quick Start screen does not appear.
- Solution: Ensure both iPhones have Bluetooth turned on.
- Issue: Animation does not appear on new iPhone.
- Solution: Restart both iPhones and try again.
- Issue: Data transfer is taking too long.
- Solution: Make sure both iPhones are fully charged.
Icloud Transfer: Wireless Convenience
Transferring data from one iPhone to another can be a hassle. iCloud Transfer makes this process smooth and easy. It uses wireless technology for a seamless experience. Below are the steps to prepare and restore your data using iCloud.
Preparing For Icloud Backup
Before you start, make sure both iPhones are charged. Also, connect them to a stable Wi-Fi network.
- Go to Settings on your old iPhone.
- Tap on your Apple ID at the top.
- Select iCloud.
- Tap iCloud Backup.
- Make sure the iCloud Backup toggle is on.
- Tap Back Up Now to start the backup.
Wait for the backup to complete. Do not use your iPhone during this time.
Restoring From Icloud Backup
Once the backup is complete, you can start the restoration process on your new iPhone.
- Turn on your new iPhone.
- Follow the on-screen setup instructions.
- When you reach the Apps & Data screen, select Restore from iCloud Backup.
- Sign in with your Apple ID.
- Select the most recent backup.
Wait for the restoration process to finish. This may take some time. Keep your new iPhone connected to Wi-Fi and plugged in.
After the restoration, your new iPhone will have all your old data. This includes apps, photos, and settings.
Itunes/finder Transfer: The Wired Approach
Transferring data from one iPhone to another can seem daunting. But, using iTunes/Finder makes it straightforward. This wired method ensures a smooth and reliable transfer.
Creating A Backup With Itunes/finder
First, connect your old iPhone to your computer. Open iTunes on Windows or Finder on macOS Catalina and later.
Follow these steps:
- Click on the iPhone icon in iTunes/Finder.
- Select Summary from the sidebar.
- Choose Back Up Now.
- Ensure the Encrypt iPhone backup option is checked for a secure backup.
Your iPhone will start backing up to your computer. This may take a while depending on the amount of data.
Restoring Backup To New Iphone
Once the backup is complete, disconnect your old iPhone. Now, connect your new iPhone to the same computer.
Follow these steps:
- Open iTunes or Finder again.
- Select your new iPhone from the device list.
- Choose Restore Backup.
- Select the most recent backup from the list.
- Click Restore and wait for the process to complete.
Your new iPhone will restart and all your data will be transferred. This includes apps, settings, and personal data.
Ensure your new iPhone stays connected during the entire process. This prevents any data loss or corruption.
Post-transfer Checklist
After successfully transferring your data to a new iPhone, it’s crucial to follow a post-transfer checklist. This ensures everything works properly and nothing is missing. Below is a comprehensive guide to help you verify and finalize your settings.
Verifying Data On New Iphone
First, ensure all your apps have transferred correctly. Check your home screen and app library.
- Open each app to verify data and settings.
- Check if your photos and videos are available in the Photos app.
- Confirm contacts and messages are intact by opening the Phone and Messages apps.
Next, verify your music and podcasts. Open the Music and Podcasts apps to ensure your library is complete.
Check your calendars and reminders:
- Open the Calendar app to see if all events are present.
- Check the Reminders app for your tasks.
Finalizing Settings
After verifying your data, it’s time to finalize your settings. Follow these steps to ensure everything is set up correctly:
- Wi-Fi and Bluetooth: Go to Settings > Wi-Fi and reconnect to your network. Ensure Bluetooth is on and paired with your devices.
- Face ID/Touch ID: Set up Face ID or Touch ID for security. Go to Settings > Face ID & Passcode or Touch ID & Passcode.
- Apple ID and iCloud: Confirm you’re signed in with your Apple ID. Go to Settings > [Your Name] to check iCloud services.
- Notifications: Customize your notification settings. Go to Settings > Notifications and adjust preferences.
- Privacy Settings: Ensure your privacy settings are correct. Go to Settings > Privacy and review permissions for apps.
- Software Update: Check for software updates. Go to Settings > General > Software Update.
By following this checklist, you ensure a smooth transition to your new iPhone. Enjoy your new device!
Common Transfer Challenges And Solutions
Transferring data from one iPhone to another can be tricky. Many users face issues during this process. Understanding these challenges and their solutions is essential. This section will help you navigate common problems.
Handling Data Transfer Errors
Data transfer errors can be frustrating. Here are some common errors and solutions:
- Insufficient Storage: Make sure both iPhones have enough space. Delete unnecessary files if needed.
- Connection Issues: Use a stable Wi-Fi connection. Avoid public networks.
- Software Updates: Ensure both iPhones run the latest iOS version. Update your devices before transferring.
- Backup Problems: Check if your iCloud or iTunes backup is complete. Restart the backup if there’s an issue.
Tips For Large Data Transfers
Transferring large amounts of data can take time. Follow these tips to ensure a smooth process:
- Use a Wired Connection: Connect both iPhones using a cable. Wired transfers are faster and more reliable.
- Transfer in Segments: Move data in smaller chunks. This reduces the risk of errors.
- Optimize Storage: Compress large files before transferring. Use apps that help reduce file sizes.
- Check Battery Levels: Charge both iPhones to 100%. Ensure they remain plugged in during the transfer.
By following these steps, you can avoid many common issues. Happy transferring!
Maintaining Data Integrity And Security
Transferring data between iPhones can be stressful. Ensuring data integrity and security is crucial. You need to protect your personal information from loss or theft. Follow these steps to transfer everything safely.
Protecting Your Data During Transfers
Before starting, make a complete backup of your old iPhone. Use either iCloud or iTunes for this. This ensures you have a copy if something goes wrong. Here’s how:
- Go to Settings on your old iPhone.
- Tap Your Name at the top.
- Select iCloud and then iCloud Backup.
- Tap Back Up Now and wait for the process to complete.
For iTunes backup:
- Connect your iPhone to your computer.
- Open iTunes and select your device.
- Click on Summary and then Back Up Now.
- Ensure the backup is encrypted for added security.
After backing up, you can start transferring data to your new iPhone. During setup, choose Restore from iCloud Backup or Restore from iTunes Backup. This will bring all your data to the new device.
What To Do With Your Old Iphone
After transferring data, you must secure your old iPhone. Follow these steps:
- Go to Settings and select General.
- Scroll down and tap Reset.
- Choose Erase All Content and Settings.
- Enter your Apple ID password to confirm.
This will delete all data on your old iPhone, making it safe to sell or give away. Ensure to remove the SIM card if you plan to use it in your new iPhone.
Always keep your data secure during transfers. Use strong passwords and two-factor authentication to add extra layers of security.
Advanced Tips For Power Users
Transferring data between iPhones can be simple. But power users need advanced tips to make it seamless. Here are some expert strategies to transfer everything efficiently.
Streamlining The Process For Future Transfers
Power users transfer data often. Streamline this process by following these tips:
- Update iOS: Ensure both iPhones run the latest iOS version.
- Use Quick Start: Position both iPhones close. Follow the on-screen instructions.
- Prepare Backups: Regularly back up your iPhone to iCloud or iTunes.
These steps make future transfers quick and easy. Keep your data organized for smoother transitions.
Leveraging Icloud For More Than Backups
iCloud offers more than just backup services. Here’s how power users can maximize iCloud:
| Feature | Benefit |
|---|---|
| iCloud Drive | Store and access files from any device. |
| iCloud Photos | Sync and organize all your photos seamlessly. |
| iCloud Keychain | Securely store and sync your passwords. |
These features ensure your data is always available. Use iCloud to its full potential.
Conclusion: Embracing The New Iphone
Transferring data to a new iPhone can seem challenging. But with the right steps, it’s simple and quick. Let’s recap the key steps and encourage you to explore the new features.
Recap Of Key Steps
- Backup your old iPhone using iCloud or iTunes.
- Turn on your new iPhone and follow the setup instructions.
- When prompted, choose to Restore from iCloud Backup or Restore from iTunes Backup.
- Sign in with your Apple ID to start the restoration process.
- Wait for the data transfer to complete and then check your new iPhone.
Encouragement To Explore New Features
Your new iPhone comes with many amazing features. Take the time to explore and enjoy them.
- Try the enhanced camera capabilities for stunning photos.
- Use the Face ID for secure access.
- Explore the new iOS updates for improved performance and new apps.
Embrace these features to get the most out of your new iPhone. Happy exploring!
Conclusion
Transferring everything from one iPhone to another is simple and efficient. Follow the steps for a seamless transition. Ensure both devices are updated for the best experience. Backup your data regularly for safety. Enjoy your new iPhone with all your data intact, stress-free and ready to use.