
How to rename your iPhone, go to Settings, tap General, then About, and select Name. Enter the new name and save.
Renaming your iPhone is a simple task that can personalize your device. This process helps you easily identify your phone, especially if you own multiple Apple devices. A unique name also aids in managing Bluetooth and Wi-Fi connections. You can quickly complete this task through the Settings app on your iPhone.
Changing the name does not affect the functionality of your device. Whether for organization or personalization, renaming your iPhone is quick and straightforward. This guide will help you through each step, ensuring your device stands out.
How to Rename Your iPhone?
Introduction To Renaming Your Iphone
Renaming your iPhone can make it feel more personal. It helps you identify your device easily. This guide will help you through the process.
Why Personalize Your Device Name?
Personalizing your iPhone name has many benefits. It makes your device stand out. It’s easier to spot in a list of devices. This is useful in crowded places or when sharing files.
It can also help in identifying your device during troubleshooting. Your unique name can be more memorable than the default one.
Preparation Before Renaming
Before renaming your iPhone, ensure you have a few things ready:
- Make sure your iPhone is fully charged.
- Ensure you have a stable internet connection.
- Backup important data to avoid any loss.
Having these preparations done will make the process smoother. Follow these simple steps to rename your iPhone easily.
Accessing Your Iphone Settings
Renaming your iPhone is a simple task. First, access the iPhone’s settings. This guide will help you navigate through the necessary steps. Follow these instructions to rename your device quickly and easily.
Navigating To The Settings App
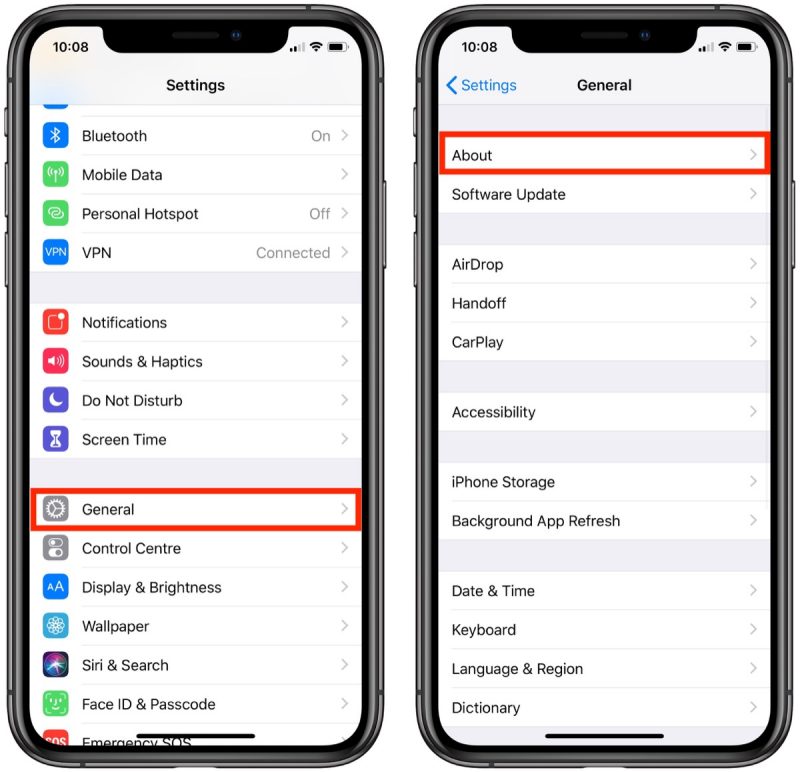
Locate the Settings app on your home screen. The icon looks like a set of grey gears. Tap the icon to open the app. This app holds all the controls for your iPhone.
If you have many apps, use the search bar. Swipe down on your home screen. Type “Settings” to find the app quickly. Tap the app once it appears in the search results.
Finding The About Section
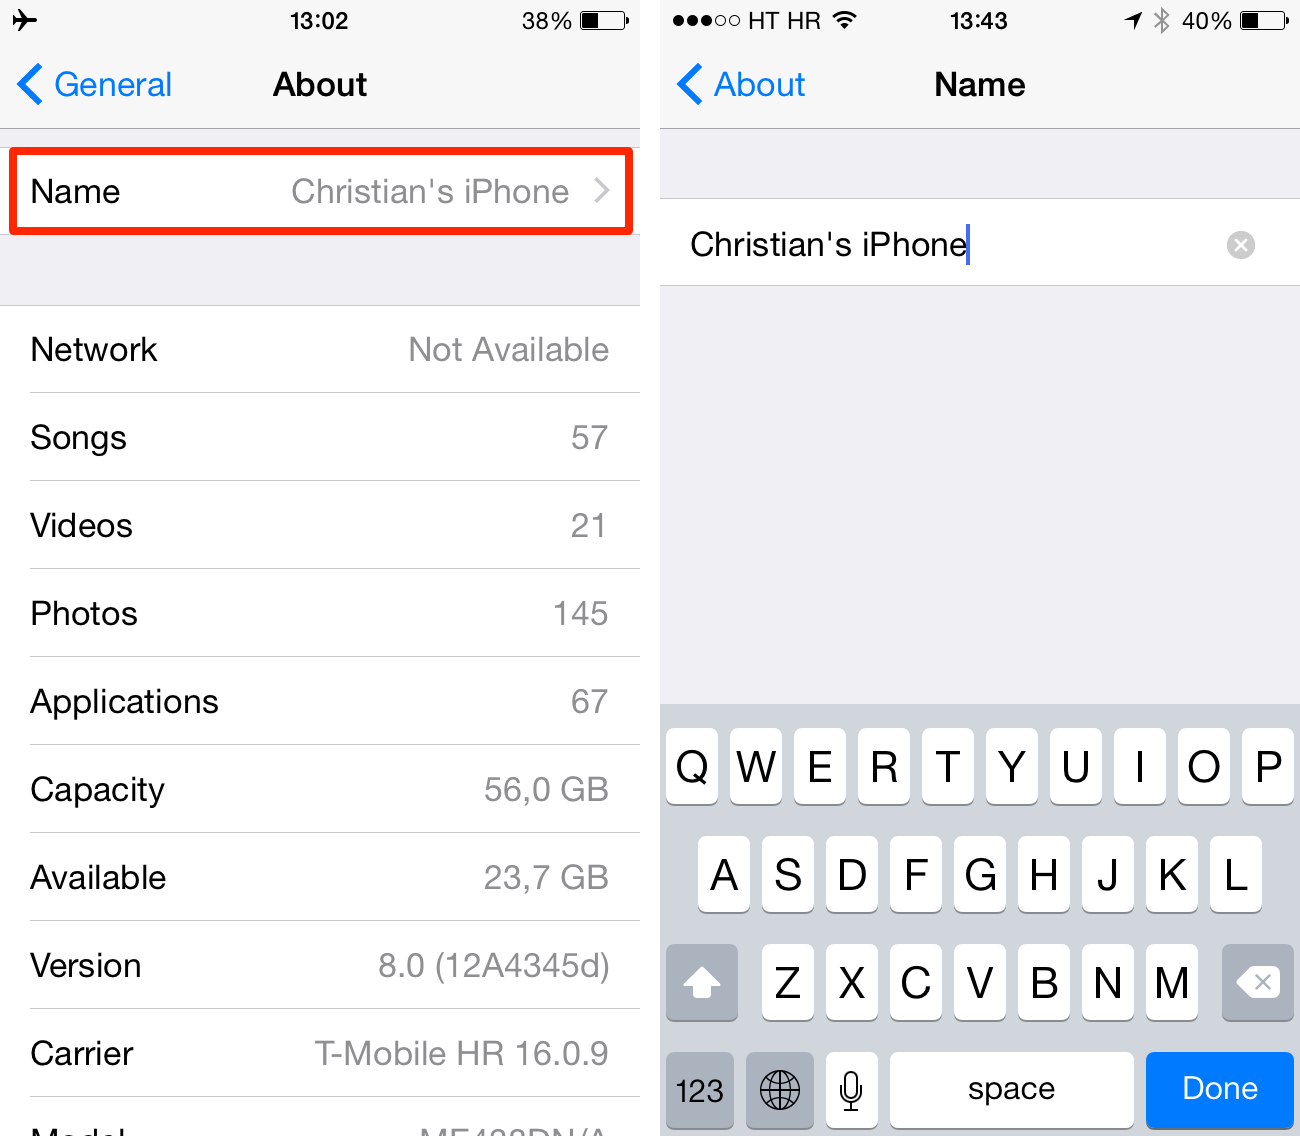
In the Settings app, scroll down and tap General. This section contains many of the phone’s core settings. Look for the About option at the top of the list. Tap “About” to access your phone’s details.
Here, you will see your iPhone’s name at the top. Tap on the name field. A keyboard will appear, allowing you to type a new name for your device.
After entering the new name, press Done on the keyboard. Your iPhone is now renamed!
| Step | Action |
|---|---|
| 1 | Open the Settings app |
| 2 | Tap General |
| 3 | Tap About |
| 4 | Tap the current name |
| 5 | Type the new name |
| 6 | Press Done |
Step-by-step Renaming Process
Renaming your iPhone is simple and quick. Follow these steps to change your iPhone’s name. This guide ensures you can identify your iPhone easily.
Selecting The Name Field
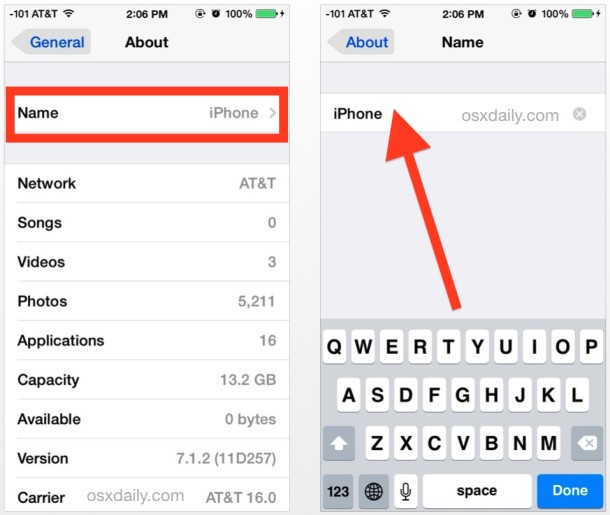
First, open the Settings app on your iPhone. Scroll down and tap on General. Next, select About from the list of options. Here, you will see your iPhone’s current name at the top. Tap on the Name field to proceed.
Entering Your New Iphone Name
Once the Name field is selected, the keyboard will appear. Delete the current name by tapping the backspace key. Now, type in your desired new name for your iPhone. Make sure it is unique and easy to recognize. After entering the new name, tap Done on the keyboard.
Your iPhone’s name is now updated. This new name will appear in various settings and when connecting to other devices.
Renaming your iPhone is simple and quick. Follow these steps to change your iPhone’s name. This guide ensures you can identify your iPhone easily.
Selecting The Name Field
First, open the Settings app on your iPhone. Scroll down and tap on General. Next, select About from the list of options. Here, you will see your iPhone’s current name at the top. Tap on the Name field to proceed.
Entering Your New Iphone Name
Once the Name field is selected, the keyboard will appear. Delete the current name by tapping the backspace key. Now, type in your desired new name for your iPhone. Make sure it is unique and easy to recognize. After entering the new name, tap Done on the keyboard.
Your iPhone’s name is now updated. This new name will appear in various settings and when connecting to other devices.
Tips For Choosing A New Iphone Name
Renaming your iPhone is a simple task that can make it unique. It helps in identifying your device easily among others. This guide will provide tips for choosing a new name for your iPhone.
Creative Naming Ideas
Choosing a creative name for your iPhone can be fun. Here are some ideas:
- Favorite Characters: Name it after your favorite movie or book character.
- Personal Interests: Use your hobbies as inspiration.
- Funny Puns: Create a name that makes you smile.
Think about what makes you happy. Use that to inspire your iPhone’s new name.
Avoiding Common Mistakes
There are some mistakes to avoid when renaming your iPhone. Here are a few:
- Too Complex: Avoid names that are hard to spell or remember.
- Personal Info: Do not include personal information like your full name.
- Offensive Words: Steer clear of names that could offend others.
Keep the name simple and memorable. This ensures you can easily identify your iPhone.
| Creative Names | Names to Avoid |
|---|---|
| GadgetGuru | 12345 |
| StarryNight | JohnDoePhone |
| PixelPerfect | Phone123! |
Confirming The Name Change
After renaming your iPhone, it’s essential to confirm the change. This ensures your device is easily identifiable on networks and other devices.
Saving The New Settings
After entering the new name, tap Done. This action saves your new settings. Your iPhone now uses this new name. Ensure you have a stable internet connection. This helps your iPhone update the name faster.
Verifying The Updated Name
To verify the updated name, follow these steps:
- Open the Settings app.
- Tap General.
- Select About.
- Check the Name field. It should display the new name.
If the new name appears, your changes are successful. If not, repeat the renaming steps.
Another way to verify is via iTunes:
- Connect your iPhone to a computer.
- Open iTunes.
- Locate your device on iTunes.
- Check the displayed name. It should match your new name.
By following these steps, you ensure your iPhone’s name is correctly updated.
Syncing With Other Apple Devices
Renaming your iPhone is simple. It can help keep all your Apple devices organized. When you update your iPhone’s name, syncing it with other devices ensures a seamless experience. Let’s see how to do this effectively.
Updating Icloud Settings
First, you need to update your iCloud settings. Follow these steps:
- Open the Settings app on your iPhone.
- Tap on your Apple ID at the top of the screen.
- Select iCloud from the list.
- Ensure that iCloud Drive is turned on.
- Scroll down and make sure Find My iPhone is enabled.
This ensures all your devices recognize the new name.
Ensuring Continuity Across Devices
Ensuring continuity across devices helps maintain a smooth workflow. Here’s how:
- Open the Settings app on your iPad or Mac.
- Sign in with the same Apple ID used on your iPhone.
- Check that iCloud is synced on each device.
- Verify that Handoff is enabled for a seamless experience.
Now, all your Apple devices will recognize the new iPhone name. This helps in keeping your digital life organized and connected.
Troubleshooting Common Issues
Renaming your iPhone should be simple. Sometimes, issues arise. Let’s explore common problems and solutions.
Resetting Network Settings
If renaming fails, try resetting your network settings. This can fix connectivity issues.
- Open Settings on your iPhone.
- Tap General.
- Scroll down and select Reset.
- Choose Reset Network Settings.
- Enter your passcode if prompted.
- Confirm the reset.
Your iPhone will restart. You can now try renaming your iPhone again.
Seeking Further Assistance
If issues persist, seek help. Apple Support can assist you. Follow these steps to contact them:
- Visit the Apple Support website.
- Click on Contact Support.
- Choose iPhone.
- Select the issue related to renaming.
- Follow the prompts to chat or call.
Apple experts can guide you through the process.
Benefits Of Renaming Your Iphone
Renaming your iPhone can offer several advantages. It provides better personalization, easier device management, and a unique identity for your device.
Enhanced Personalization
Giving your iPhone a unique name allows you to express your personality. It can be your favorite character, a nickname, or anything special to you.
With a personalized name, your iPhone stands out. It feels more like yours.
Improved Device Management
Renaming your iPhone helps in managing your devices better. It’s especially useful if you have multiple Apple devices.
Here’s how renaming your iPhone can make a difference:
- Easy Identification: Quickly identify your iPhone among other devices.
- Seamless Sync: Synchronize your iPhone easily with iCloud and other services.
- Enhanced Security: Name your iPhone to keep track of it in public places.
Table: Benefits At A Glance
| Benefit | Description |
|---|---|
| Personalization | Make your iPhone uniquely yours with a special name. |
| Device Management | Easier to manage and identify among multiple devices. |
| Security | Track your iPhone more efficiently in public spaces. |
Conclusion
Renaming your iPhone is simple and straightforward. It helps personalize your device and makes it easily identifiable. Follow the steps outlined above to quickly change your iPhone’s name. Enjoy a more customized experience with your Apple device. Thank you for reading and happy renaming!
