
How to transfer videos from iPhone to computer? Connect your iPhone to your computer using a USB cable. Open the Photos app and import the videos.
Transferring videos from your iPhone to a computer is essential for freeing up space and preserving precious memories. This process is simple and can be done using a USB cable and the Photos app on both Windows and Mac computers.
With just a few steps, you can ensure your videos are safely stored on your computer. This guide will provide you with straightforward instructions to make the transfer process easy and hassle-free. Whether you are tech-savvy or a beginner, you will find this method efficient and user-friendly, making your video management smoother and more organized.
How to Transfer Videos from iPhone to Computer?
Introduction To Video Transfer
Transferring videos from your iPhone to a computer can seem tricky. Whether it’s for storage, editing, or sharing, knowing the right method is essential. This guide will simplify the process and address common challenges.
The Need For Transferring Videos
There are many reasons to move videos from your iPhone to a computer. Here are a few:
- Storage space: iPhone storage can fill up quickly with videos.
- Editing: Some editing software only works on computers.
- Backup: Keep your videos safe by storing them on a computer.
- Sharing: Easier to share videos from a computer than from a phone.
Common Challenges
Transferring videos can come with its set of problems. Let’s look at some common ones:
- Compatibility issues: Not all computers recognize iPhone file formats.
- File size: Large video files can take time to transfer.
- Connection problems: Sometimes, the iPhone may not connect properly.
- Quality loss: Ensuring the video quality remains intact during transfer.
Understanding these challenges can help you avoid frustration. With the right tools and methods, transferring videos can be easy and hassle-free.
Prerequisites For Transfer
Transferring videos from your iPhone to a computer is simple. But, you need to prepare. These prerequisites will ensure a smooth transfer process.
Checking Iphone Compatibility
First, check if your iPhone is compatible. This is crucial. Ensure your iPhone is updated to the latest iOS version. This helps avoid any issues.
To check, follow these steps:
- Go to Settings on your iPhone.
- Tap General.
- Select Software Update.
If there is an update, install it. Then, your iPhone is ready.
Ensuring Computer Readiness
Next, make sure your computer is ready. Both Mac and Windows need specific software.
For Mac, ensure you have the latest version of macOS. Use these steps:
- Click the Apple menu.
- Select About This Mac.
- Check for updates.
For Windows, install iTunes:
- Go to the Microsoft Store.
- Search for iTunes.
- Click Get to install.
Ensure your computer has enough storage. This is vital for transferring large video files.
Here is a quick checklist:
- Updated operating system
- Necessary software installed (iTunes for Windows)
- Adequate storage space
Once these prerequisites are met, you can start transferring videos.
Using Itunes For Video Transfer
Transferring videos from your iPhone to your computer can be easy using iTunes. This method helps you manage your media files efficiently. Follow these steps to move your videos with ease.
Connecting Your Iphone To Itunes
To start, connect your iPhone to your computer with a USB cable. Open iTunes on your computer. Ensure you have the latest version of iTunes installed. Your iPhone should appear in the device list.
| Step | Action |
|---|---|
| 1 | Connect iPhone with USB cable |
| 2 | Open iTunes on your computer |
| 3 | Check if iPhone appears in device list |
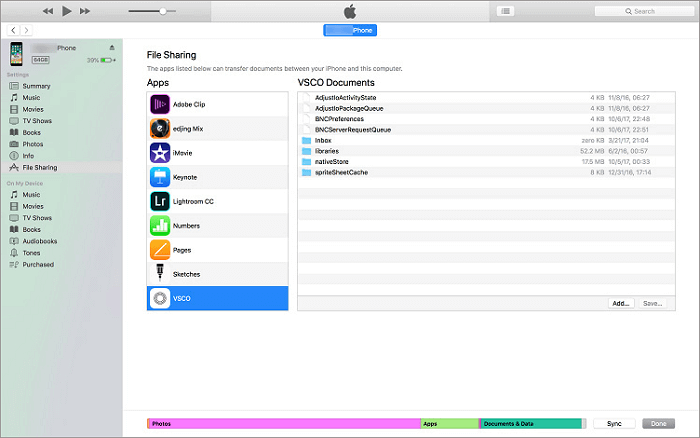
Syncing Videos To Your Computer
In iTunes, select your iPhone from the device list. Click on the File Sharing option. Choose the app that contains your videos. Select the videos you want to transfer. Click on the Save To button.
- Select your iPhone in iTunes
- Click on File Sharing
- Choose the app with your videos
- Select videos to transfer
- Click Save To
Choose the location on your computer to save the videos. Click OK to start the transfer. Your videos will now be on your computer.

Leveraging Icloud For Video Backup
Transferring videos from your iPhone to your computer is essential. One efficient method involves leveraging iCloud for video backup. This guide helps you set up iCloud on your iPhone and access videos on your computer.
Setting Up Icloud On Iphone
Follow these steps to set up iCloud on your iPhone:
- Open the Settings app on your iPhone.
- Tap your Apple ID at the top of the screen.
- Select iCloud from the menu.
- Toggle the iCloud Drive switch to On.
- Ensure the Photos option is also toggled to On.
This ensures your videos are backed up to iCloud.
Accessing Icloud Videos On Computer
To access your iCloud videos on your computer, follow these steps:
- Open a web browser and go to iCloud.com.
- Sign in with your Apple ID and password.
- Click on the Photos icon.
- Find and select the videos you want to download.
- Click the Download icon to save them to your computer.
Using iCloud ensures your videos are always accessible. This method is simple and secure.
Here’s a quick comparison table to outline the steps:
| Step | Action |
|---|---|
| 1 | Open Settings app on iPhone |
| 2 | Tap Apple ID |
| 3 | Select iCloud |
| 4 | Toggle iCloud Drive to On |
| 5 | Ensure Photos is On |
| 6 | Open iCloud.com on computer |
| 7 | Sign in with Apple ID |
| 8 | Click Photos icon |
| 9 | Select and download videos |
Exploring Airdrop For Mac Users
Transferring videos from your iPhone to your Mac can be simple. AirDrop is a fast and efficient way to do this. Let’s explore how to use AirDrop for seamless video transfers.
Enabling Airdrop On Iphone And Mac
Before transferring videos, ensure AirDrop is enabled on both devices.
On your iPhone:
- Open the Control Center by swiping down.
- Press and hold the network settings card.
- Tap AirDrop and choose Everyone or Contacts Only.
On your Mac:
- Open Finder and select AirDrop from the sidebar.
- Ensure Bluetooth and Wi-Fi are turned on.
- Set AirDrop to Everyone or Contacts Only.
Transferring Videos With Airdrop
With AirDrop enabled, you can now transfer videos.
Steps to transfer videos:
- Open the Photos app on your iPhone.
- Select the video you want to transfer.
- Tap the Share button.
- Tap AirDrop and select your Mac from the list.
- On your Mac, accept the incoming file transfer.
Tip: Ensure both devices are within Bluetooth range for a successful transfer.
By following these steps, you can easily transfer videos. AirDrop makes it quick and hassle-free.
Utilizing Third-party Software Solutions
Transferring videos from your iPhone to your computer can be simple. Third-party software solutions make this process easy and fast. These tools offer more features than basic methods. They can handle large files, multiple formats, and keep your videos safe. This section will guide you on using third-party software for video transfer.
Choosing The Right Software
Not all software is the same. Some are better for specific needs. Here are factors to consider:
- Compatibility: Ensure the software works with your computer and iPhone.
- User Interface: Choose software with a simple, user-friendly interface.
- Transfer Speed: Fast transfer speeds save time.
- Additional Features: Look for features like video editing and file management.
Here are some popular options:
| Software | Compatibility | Features |
|---|---|---|
| iMazing | Windows, Mac | Fast transfer, backup, manage files |
| Dr.Fone | Windows, Mac | File transfer, recovery, repair |
| AnyTrans | Windows, Mac | Transfer, backup, manage content |
Step-by-step Transfer Process
Follow these steps to transfer videos using third-party software:
- Download and Install: Download the software from the official website. Install it on your computer.
- Connect Your iPhone: Use a USB cable to connect your iPhone to the computer.
- Launch the Software: Open the installed software. Your iPhone should be detected.
- Select Videos: Navigate to the video section. Select the videos you wish to transfer.
- Start Transfer: Click the transfer button. Choose the destination folder on your computer.
- Complete Transfer: Wait for the transfer to complete. Check the destination folder for your videos.
Using third-party software makes transferring videos easy and efficient. Choose the right tool and follow these steps for a smooth process.
Manual Transfer Via File Explorer
Transferring videos from your iPhone to your computer manually is easy. You can use File Explorer to do this quickly. This method does not require any special software. Follow these simple steps to get started.
Connecting Your Iphone To A Pc
- Use a USB cable to connect your iPhone to your computer.
- Unlock your iPhone if prompted.
- Tap “Trust This Computer” on your iPhone screen if asked.
Copying Videos To Your Computer
- Open File Explorer on your computer.
- Find your iPhone under the “This PC” section.
- Click on your iPhone icon to access its storage.
- Navigate to the DCIM folder.
- Find the videos you want to transfer.
- Select the videos and right-click.
- Choose Copy from the context menu.
- Navigate to the folder on your PC where you want to save the videos.
- Right-click in the folder and choose Paste.
That’s it! Your videos are now on your computer. You can watch, edit, or share them as needed.
Troubleshooting Common Transfer Issues
Transferring videos from your iPhone to your computer can sometimes be tricky. Here are common issues and how to fix them.
Dealing With Device Recognition Problems
Sometimes, your computer doesn’t recognize your iPhone. This can be due to several reasons:
- Ensure your iPhone is unlocked.
- Check if you have trusted the computer on your iPhone.
- Try a different USB cable or port.
Updating iTunes and your iPhone’s software may also help. If your computer still doesn’t see your iPhone, restart both devices.
Resolving Video Format Incompatibilities
Your computer might not play the videos from your iPhone. This is usually due to video format incompatibilities.
iPhones often record videos in HEVC format. Some computers can’t play this format.
To fix this, you can:
- Convert the videos using a video converter tool.
- Change the recording format on your iPhone to a more compatible one.
To change the format on your iPhone:
- Go to Settings.
- Select Camera and then Formats.
- Choose the Most Compatible option.
These steps should help resolve any video format issues.
Best Practices For Video Management
Transferring videos from your iPhone to a computer is a common task. Proper video management helps you keep your files organized and ensures they are always safe. Here are some best practices to help you manage your videos effectively.
Organizing Videos On Your Computer
Organizing your videos is crucial for easy access. Create folders to separate your videos by categories such as dates, events, or themes. This makes it easier to find specific videos later.
- Use descriptive names for your folders and files.
- Create subfolders for better categorization.
- Keep your desktop clean by avoiding direct file storage.
Consider using a consistent naming convention. For example, you can name your files using the format YYYY-MM-DD_EventName. This helps in sorting and quick retrieval.
Maintaining Backups
Always keep a backup of your videos to prevent data loss. Use external hard drives, cloud storage, or both.
- External Hard Drives: Copy your videos to an external drive regularly.
- Cloud Storage: Services like Google Drive or iCloud offer easy backup options.
- Automated Backups: Set up automated backups to save time and ensure regular updates.
Regularly check your backups to ensure they are up-to-date and accessible. A good practice is to have at least two backup copies: one local and one in the cloud.
Conclusion And Additional Tips
Transferring videos from your iPhone to your computer is essential. This ensures your media files are safe and accessible. Below, we’ll summarize the methods and provide extra resources to help you.
Summary Of Methods
| Method | Steps | Tools Required |
|---|---|---|
| Using iTunes |
| iTunes, USB cable |
| Using iCloud |
| iCloud account, internet connection |
| Using File Explorer (Windows) |
| USB cable |
| Using Finder (Mac) |
| USB cable, macOS Catalina or later |
Further Resources For Assistance
- Apple Support: Visit the Apple Support website for official guides.
- Online Communities: Join forums like Apple Discussions for user tips.
- Video Tutorials: YouTube offers numerous tutorials for each method.
If you face issues, use these resources. They provide detailed instructions and troubleshooting tips.
Conclusion
Transferring videos from your iPhone to your computer is simple and efficient. Follow these steps to ensure a smooth transfer process. Whether using iTunes, iCloud, or third-party apps, you can easily save your memories. Keep your storage space optimized and never lose valuable videos again.
Happy transferring!
