
How to airdrop from iPhone to Mac, open the Control Center on your iPhone and enable Airdrop. On your Mac, accept the incoming file transfer.
Airdrop is a convenient way to transfer files between Apple devices quickly. It uses Bluetooth and Wi-Fi to create a peer-to-peer network, ensuring fast and secure file sharing. Airdrop can transfer photos, videos, documents, and more without needing cables or external apps.
This method is particularly useful for users who frequently switch between their iPhone and Mac. It streamlines the process, saving time and effort. Whether transferring work documents or personal photos, Airdrop makes file sharing seamless and efficient. This guide will help you understand the simple steps to use Airdrop effectively.
How to Airdrop from iPhone to Mac?
Introduction To Airdrop
Have you ever wanted to transfer files between your Apple devices quickly? Airdrop makes it possible. With Airdrop, you can send photos, videos, and files from your iPhone to your Mac effortlessly. It is a simple and efficient tool that leverages Apple’s ecosystem. Let’s dive into how Airdrop works and why it is so beneficial.
The Magic Of Apple’s Ecosystem
Apple’s ecosystem is a well-integrated network of devices. Your iPhone, Mac, iPad, and other Apple gadgets communicate seamlessly. This integration makes tasks like file transfer smooth and easy. Airdrop is a key feature of this ecosystem.
With Airdrop, you can share files instantly. No need for cables or email. It uses Bluetooth and Wi-Fi to transfer data. Your devices recognize each other and connect automatically. This is the magic of Apple’s ecosystem at work.
Why Use Airdrop?
There are several reasons to use Airdrop:
- Speed: Airdrop transfers files very quickly.
- Convenience: No need for extra apps or cables.
- Security: Airdrop uses encryption to keep your files safe.
Airdrop is incredibly user-friendly. Follow these steps to start using it:
- Open Control Center on your iPhone.
- Enable Bluetooth and Wi-Fi.
- Tap on Airdrop and select “Everyone” or “Contacts Only”.
- On your Mac, open Finder and click on Airdrop.
- Ensure your Mac’s Bluetooth and Wi-Fi are also enabled.
Once set up, you can easily share files between your iPhone and Mac. Enjoy the simplicity and efficiency of Airdrop!
Prerequisites For Airdrop
Before you can Airdrop files from your iPhone to your Mac, certain conditions must be met. This section will guide you through the essentials to ensure a smooth and successful transfer.
Compatible Devices
Not all iPhones and Macs are capable of using Airdrop. Ensure your devices are compatible:
- iPhone: iPhone 5 or later
- Mac: Any Mac from 2012 or later running OS X Yosemite or later
Check your device models and operating system versions. Both devices must be recent enough to support Airdrop.
Required Settings
Ensure you have the correct settings enabled:
- Bluetooth: Enable Bluetooth on both devices. Go to
Settings > Bluetoothon your iPhone andSystem Preferences > Bluetoothon your Mac. - Wi-Fi: Enable Wi-Fi on both devices. Go to
Settings > Wi-Fion your iPhone andSystem Preferences > Networkon your Mac. - Airdrop: Ensure Airdrop is set to receive files. On your iPhone, swipe up to open the Control Center, tap on Airdrop, and select
Everyone. On your Mac, open Finder, click on Airdrop in the sidebar, and set toEveryone.
Both devices must be within 30 feet of each other. Ensure you have disabled any personal hotspots. With these prerequisites in place, your devices will be ready for Airdrop.
Enabling Airdrop On Your Iphone
Want to share files between your iPhone and Mac? Airdrop makes it easy. First, you need to enable Airdrop on your iPhone. Follow these steps to get started.
Step-by-step Guide
- Open the Settings app on your iPhone.
- Scroll down and tap on General.
- Select Airdrop from the list.
- Choose who can see your iPhone: Contacts Only or Everyone.
- Ensure your Wi-Fi and Bluetooth are turned on.
Troubleshooting Common Issues
Sometimes Airdrop doesn’t work as expected. Here are some common issues and solutions:
| Issue | Solution |
|---|---|
| Airdrop not appearing | Ensure both Wi-Fi and Bluetooth are on. |
| Devices not showing up | Set Airdrop to Everyone temporarily. |
| Transfer fails | Restart both devices and try again. |
By following these steps, you can quickly enable Airdrop on your iPhone and resolve common issues. This will allow you to share files effortlessly between your iPhone and Mac.
Setting Up Airdrop On Your Mac
Using Airdrop makes sharing files between your iPhone and Mac super easy. First, you need to set it up on your Mac. This guide will help you configure your Mac for Airdrop quickly.
Adjusting Preferences
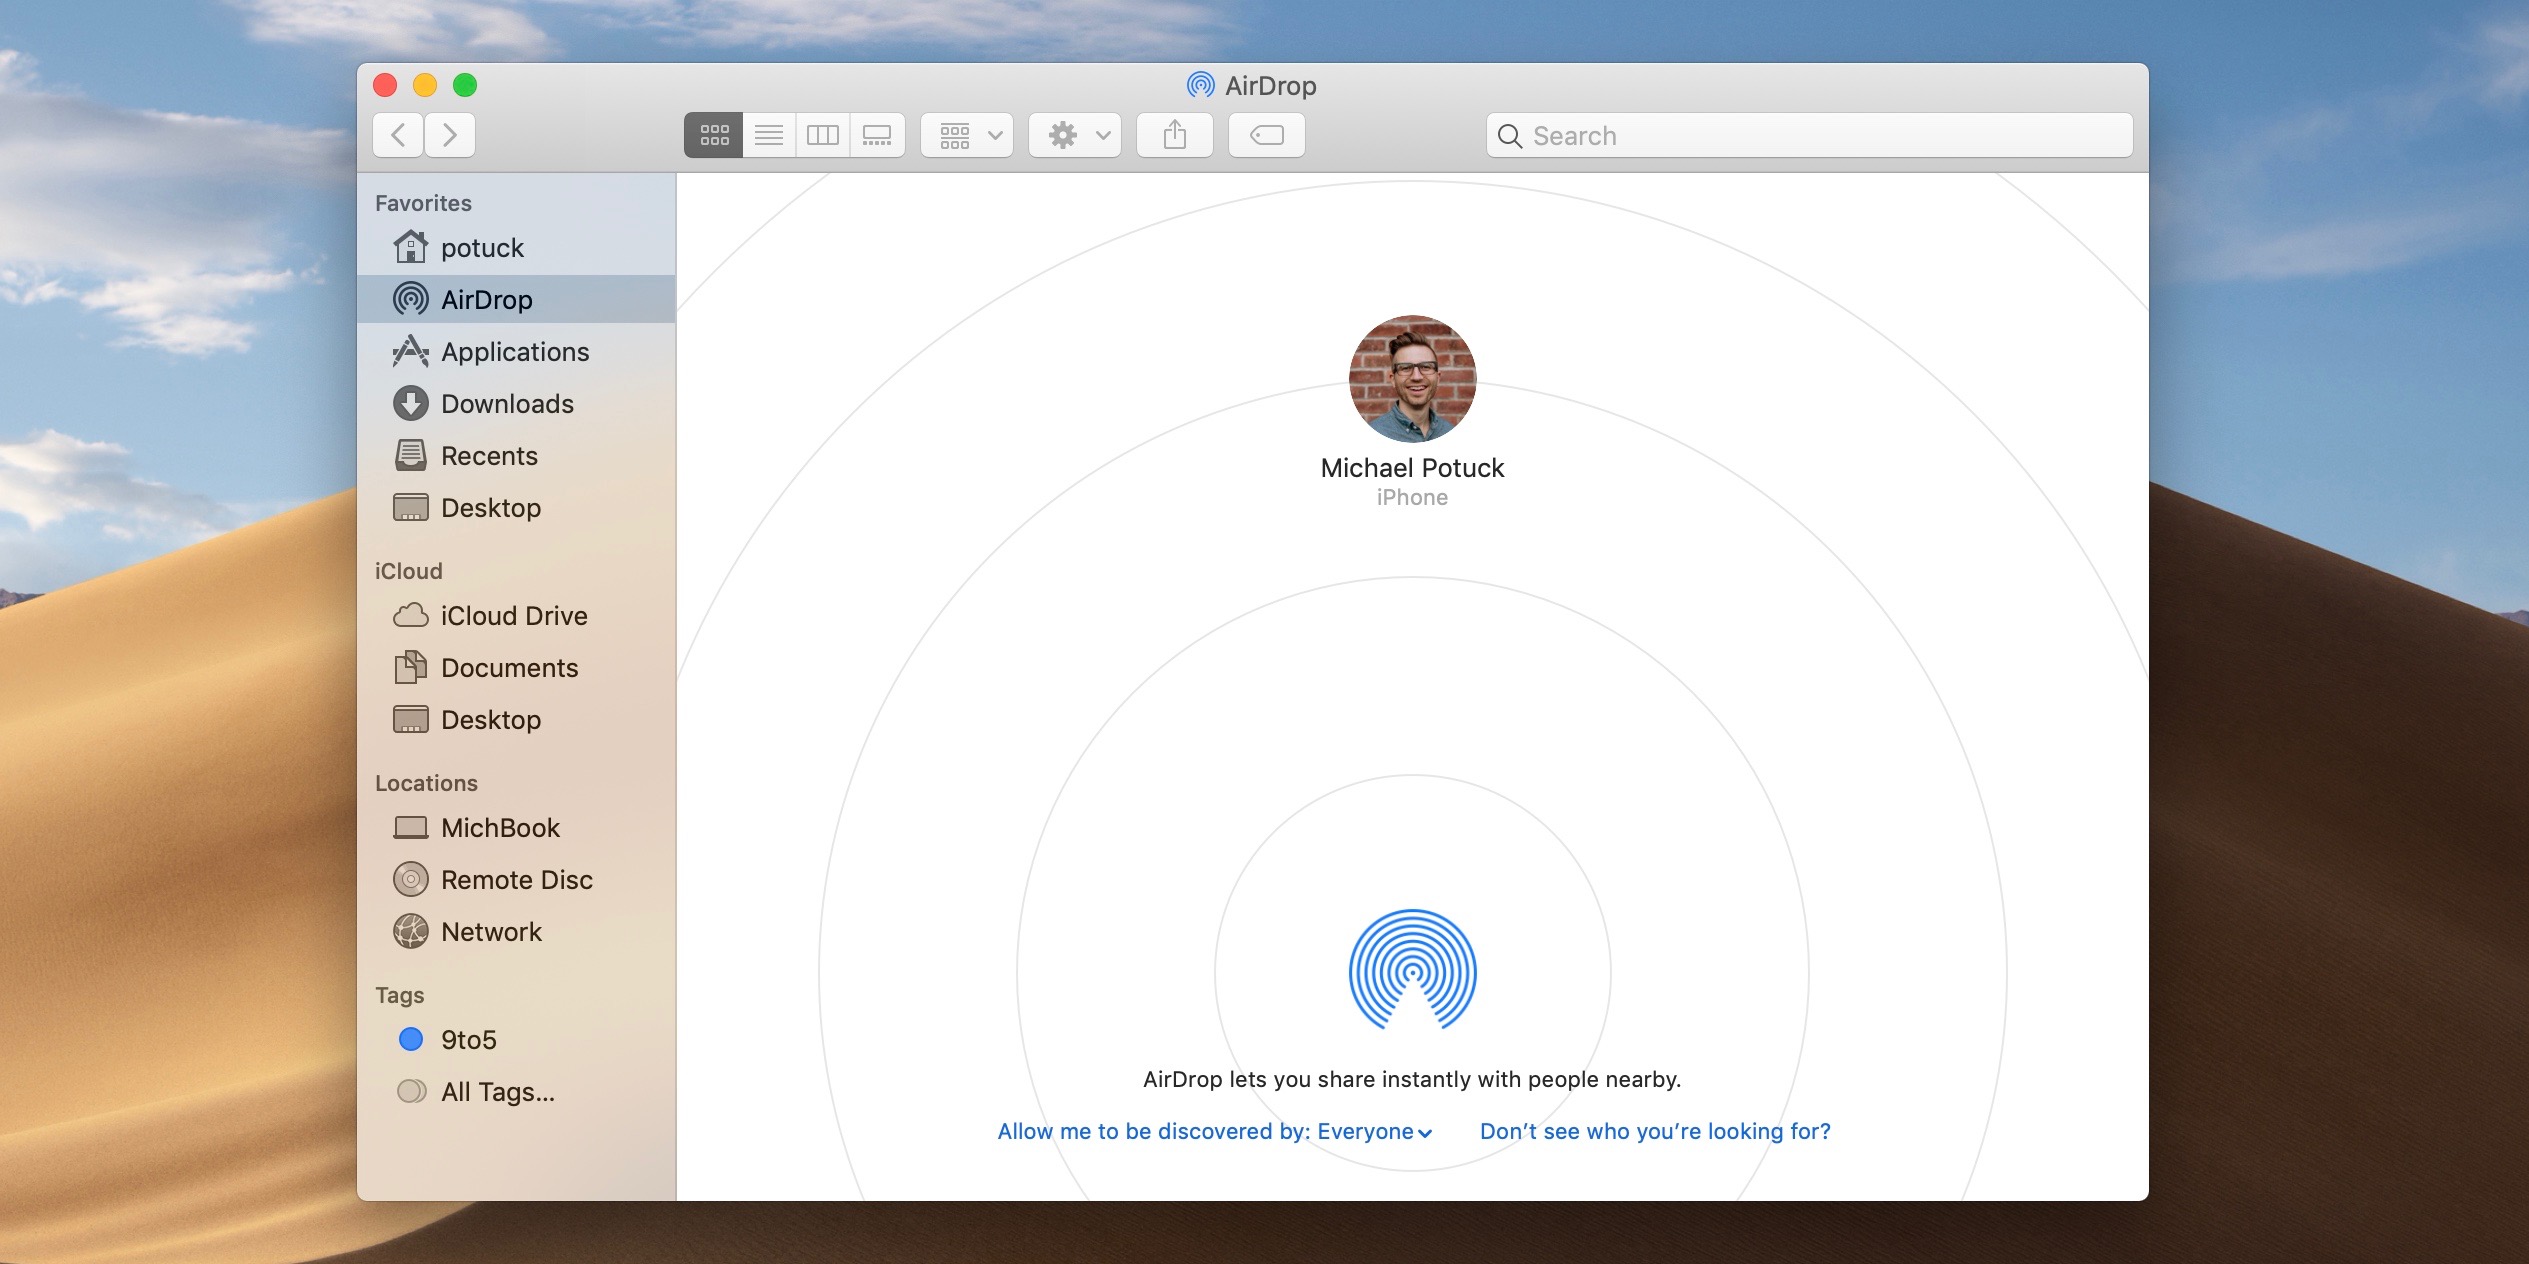
To start, open the Finder on your Mac. Then, click on Airdrop in the sidebar. You will see a window appear. At the bottom of this window, there is a text saying “Allow me to be discovered by”.
Click on this text. You will see three options:
- No One
- Contacts Only
- Everyone
Select Everyone to make your Mac visible to all nearby Apple devices. This setting ensures the smoothest sharing experience.
Ensuring Visibility
For Airdrop to work, your Mac needs to be visible. Check that both Wi-Fi and Bluetooth are turned on.
Follow these steps to ensure visibility:
- Click the Apple menu in the top left corner.
- Select System Preferences.
- Click on Network and make sure Wi-Fi is on.
- Go back to System Preferences and select Bluetooth. Make sure Bluetooth is on.
With these settings, your Mac is ready to receive files via Airdrop.
Initiating The Airdrop Process
Initiating the Airdrop process is simple and quick. This guide will help you share files from your iPhone to your Mac effortlessly. Follow these steps to ensure a smooth transfer.
Selecting Files To Share
First, open the app where your file is located. It could be Photos, Files, or any other app. Tap on the file you wish to share. If you’re sharing multiple files, select them all.
Next, tap the Share button. This button looks like a square with an arrow pointing upward. A menu will appear with different sharing options.
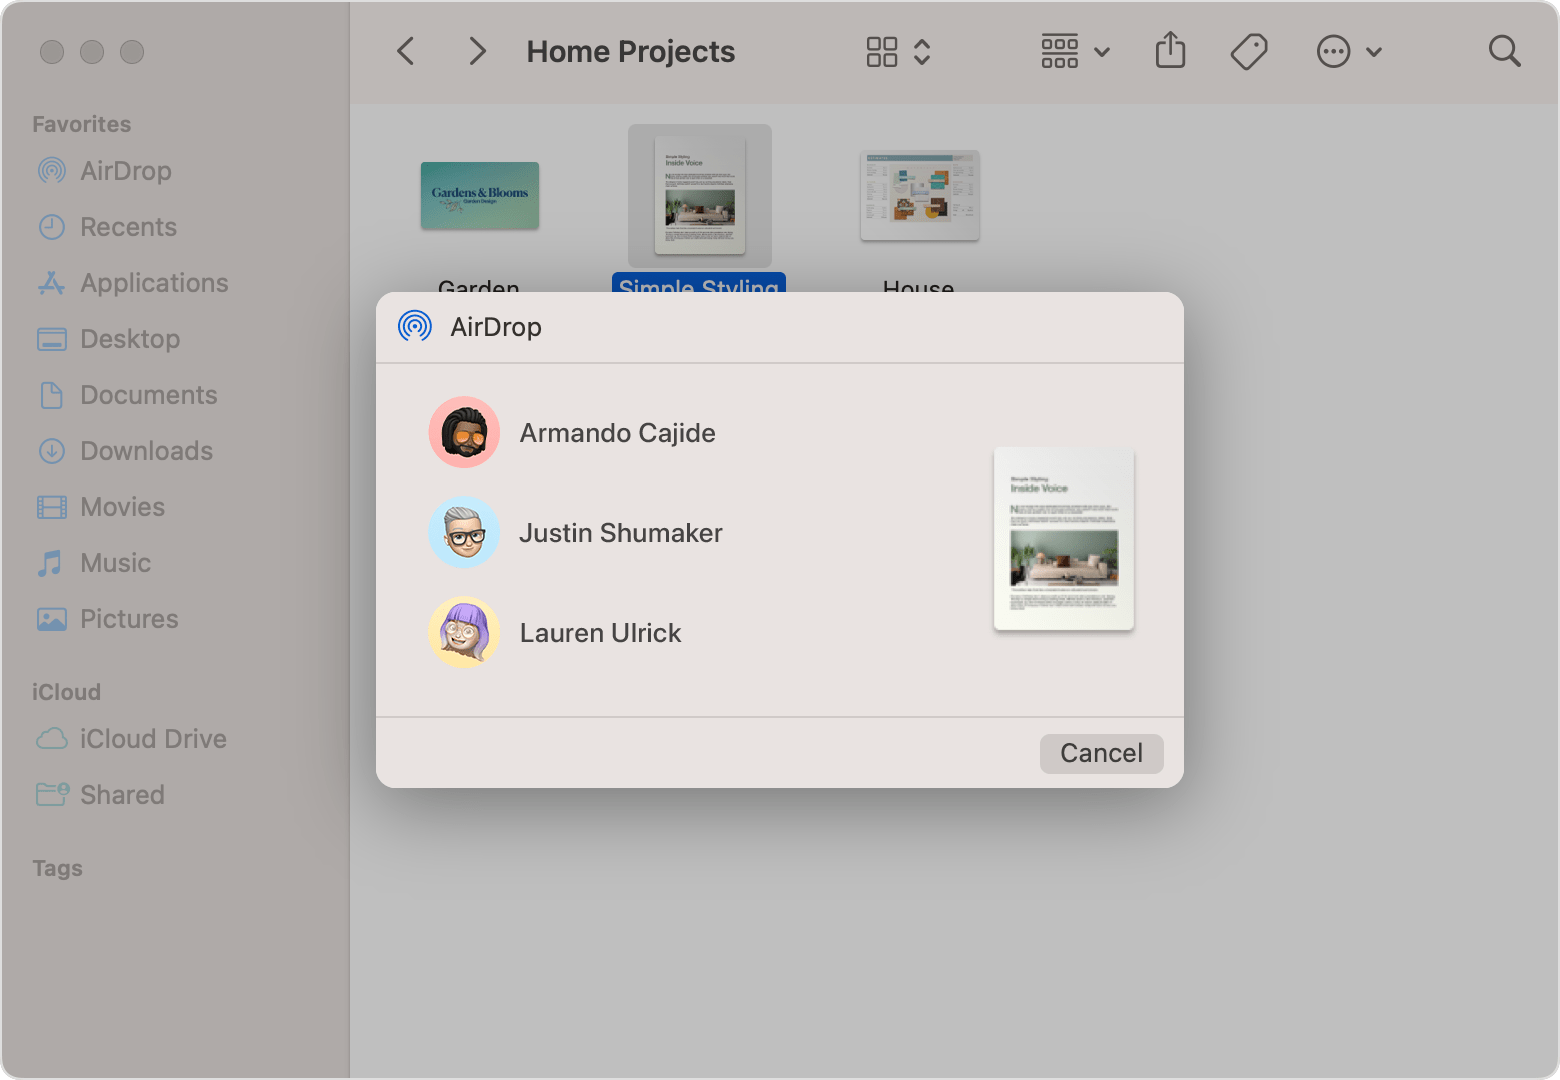
Choose Airdrop from the list. Your iPhone will start searching for nearby devices.
Choosing Your Mac As The Destination
Ensure your Mac has Airdrop enabled. Open Finder on your Mac. Click on Airdrop in the sidebar. Make sure your Mac is set to receive files from Everyone or Contacts Only.
On your iPhone, you should see your Mac’s name appear. Tap on your Mac’s name to select it as the destination.
Your Mac will receive a notification asking to accept the file. Click Accept to complete the transfer.
That’s it! You’ve successfully shared files from your iPhone to your Mac using Airdrop.

Receiving Files On Your Mac
Receiving files from your iPhone to your Mac can be seamless. With AirDrop, you can easily transfer files wirelessly. Below are steps to help you receive files on your Mac.
Accepting Incoming Transfers
Ensure your Mac is discoverable. Open Finder and select AirDrop from the sidebar. Check the “Allow me to be discovered by” setting. Set it to Contacts Only or Everyone. Your Mac will now be ready to accept incoming files.
When an AirDrop transfer starts, a notification will appear. Click Accept to receive the file. The transfer will begin immediately.
Locating Received Files
Once the transfer completes, the file will be saved in the Downloads folder. You can access it by opening Finder and navigating to Downloads.
If you have trouble finding your file, use the search function in Finder. Type the file name or part of it in the search bar. Your file should appear in the search results.
| Step | Action |
|---|---|
| 1 | Open Finder and select AirDrop. |
| 2 | Set “Allow me to be discovered by” to Contacts Only or Everyone. |
| 3 | Click Accept on the incoming transfer notification. |
| 4 | Locate the received file in the Downloads folder. |
Receiving files on your Mac with AirDrop is quick and easy. Follow these simple steps to ensure a smooth transfer process. Happy sharing!
Tips For Efficient Airdrop Use
Using Airdrop from your iPhone to your Mac can save time. To make the process smoother, follow these tips for efficient use. Learn how to use Contacts Only mode and how to send multiple items at once.
Using Contacts Only Mode
Setting Airdrop to Contacts Only mode keeps your device secure. This mode allows only people in your contacts to send files.
To enable Contacts Only mode:
- Open the Control Center on your iPhone.
- Press and hold the network settings card.
- Tap Airdrop.
- Select Contacts Only.
On your Mac, follow these steps:
- Open Finder.
- Click Airdrop in the sidebar.
- Set the Allow me to be discovered by option to Contacts Only.
Using this mode keeps strangers from sending files to your devices.
Sending Multiple Items
Airdrop allows you to send multiple items at once. This feature saves time.
To send multiple items:
- Open the Photos app or Files app on your iPhone.
- Select the items you want to send.
- Tap the Share icon.
- Choose Airdrop from the list.
- Select your Mac from the available devices.
Your selected items will transfer quickly. Ensure your devices are close to each other for the best results.
| Feature | Benefit |
|---|---|
| Contacts Only Mode | Keeps your device secure |
| Sending Multiple Items | Saves time and effort |
Following these tips makes Airdrop efficient and secure.
Troubleshooting Airdrop Issues
Sometimes, Airdrop from your iPhone to Mac may not work smoothly. This can be frustrating. But do not worry, most issues have simple fixes.
Common Problems And Solutions
Here are some common problems and their solutions:
- Devices Not Discoverable: Ensure Bluetooth and Wi-Fi are enabled on both devices.
- Software Version Mismatch: Check if both devices are running the latest iOS and macOS versions.
- Distance Issue: Keep devices within 30 feet of each other.
When To Reset Network Settings
If problems persist, consider resetting network settings. This can resolve many connectivity issues.
Follow these steps to reset network settings on your iPhone:
- Go to Settings.
- Tap on General.
- Scroll down and select Reset.
- Choose Reset Network Settings.
- Enter your passcode if prompted.
- Confirm the reset.
Note: This will erase saved Wi-Fi passwords and other network settings.
Advanced Airdrop Features
Airdrop is a powerful feature for iPhone and Mac users. It allows easy sharing of files. But there’s more to Airdrop than basic file transfer. Let’s explore some advanced Airdrop features that can make your life easier.
Using Airdrop With Other Apps
Airdrop can interact with various apps. This makes sharing even easier. For instance, you can use Airdrop to send photos directly from the Photos app. Follow these steps:
- Open the app you want to share from.
- Select the item you want to share.
- Tap the Share button.
- Choose Airdrop from the sharing options.
- Select your Mac from the list of devices.
These steps work with many apps, like Notes, Safari, and more. This makes Airdrop versatile and convenient.
Clipboard Sharing
Did you know you can share your clipboard with Airdrop? This feature is super handy. It allows you to copy text on your iPhone. Then, paste it on your Mac. Here’s how:
- Copy text or an image on your iPhone.
- Open the Finder on your Mac.
- Go to AirDrop in the sidebar.
- Make sure both devices are discoverable.
- Accept the clipboard content on your Mac.
Now, you can paste the copied content on your Mac. This speeds up your workflow and saves time.
Understanding these advanced features can enhance your Airdrop experience. Try using Airdrop with other apps and clipboard sharing. This will make your digital life much smoother.
Protecting Your Data While Airdropping
When transferring files from your iPhone to your Mac, security is crucial. Airdrop makes it easy to share files, but you must protect your data. Follow these tips to ensure safe and secure file transfers.
Privacy Considerations
Always set your Airdrop to “Contacts Only” to avoid unwanted files. This setting ensures only people in your contacts can send you files.
To adjust this, go to Settings > General > Airdrop on your iPhone. On your Mac, open Finder, select Airdrop, and choose Contacts Only.
Secure Sharing Practices
Verify the sender’s identity before accepting any files. This step prevents receiving malicious files from strangers.
Keep your software updated to protect against vulnerabilities. Regular updates enhance your device’s security features.
| Practice | Action |
|---|---|
| Enable Firewall | Go to System Preferences > Security & Privacy > Firewall |
| Use Strong Passwords | Set a strong, unique password for your devices |
Remember to only share files with trusted contacts. Avoid sharing sensitive information through Airdrop. If you must, ensure the recipient is reliable.
By following these practices, you can protect your data while using Airdrop.
Airdrop Alternatives
While Airdrop is a popular feature for sharing files between iPhone and Mac, there are times it may not work. In such cases, you need reliable alternatives to share your files effortlessly. This section explores various methods you can use to share files when Airdrop isn’t an option.
When Airdrop Isn’t An Option
Sometimes, Airdrop may not work due to various reasons. These reasons include:
- Device compatibility issues
- Bluetooth or Wi-Fi problems
- Software glitches
In such situations, having alternative methods to share files is essential. Below are some effective alternatives to Airdrop.
Third-party Sharing Apps
Several third-party apps can help you share files between your iPhone and Mac. Here are some of the best options:
| App Name | Key Features | Platform Compatibility |
|---|---|---|
| Dropbox | Cloud storage, easy sharing, cross-platform | iOS, macOS, Windows, Android |
| Google Drive | Large storage, easy access, secure | iOS, macOS, Windows, Android |
| Send Anywhere | Fast transfer, no sign-up needed | iOS, macOS, Windows, Android |
Let’s break down how to use some of these apps:
- Dropbox:
- Install the app on both iPhone and Mac.
- Upload the file to Dropbox from your iPhone.
- Access the file from Dropbox on your Mac.
- Google Drive:
- Download the app on both devices.
- Upload your file to Google Drive from your iPhone.
- Download the file from Google Drive on your Mac.
- Send Anywhere:
- Install the app on both devices.
- Open the app and select the file on your iPhone.
- Enter the generated key on your Mac to receive the file.
By using these third-party apps, you can easily share files without relying on Airdrop. Choose the one that fits your needs the best!
Conclusion
Mastering Airdrop from iPhone to Mac is simple and efficient. With these steps, sharing files becomes seamless. Enhance productivity by leveraging this powerful feature. Keep your devices updated for optimal performance. Enjoy the convenience of wireless file transfer today.
